![[Updated] 2024 Approved Zoom Meeting Fundamentals for the Uninitiated](https://thmb.techidaily.com/59a195ec28420319fea5f3f07d0383273230910a4a9660ef6c59333c64bce5cd.jpg)
"[Updated] 2024 Approved Zoom Meeting Fundamentals for the Uninitiated"
Zoom Meeting Fundamentals for the Uninitiated
Beginner’s Guide to Zoom Webinars

Richard Bennett
Mar 27, 2024• Proven solutions
Platforms like Zoom make hosting an online seminar easy, so that you don’t have to worry about technical details.
The process of scheduling webinars, approving registrants or inviting panelists with Zoom requires a minimum amount of effort which leaves you more time to dedicate attention to the development of the curriculum or discovering innovative teaching techniques.
Zoom grants you access to all the tools you are going to need in order to manage a webinar effectively, and it allows you to have up to 10,000 participants on each webinar you organize. So, in this beginner’s guide to Zoom webinars, we are going to show you how to set up or join a Zoom webinar.
 vMix 4K - Software based live production. vMix 4K includes everything in vMix HD plus 4K support, PTZ control, External/Fullscreen output, 4 Virtual Outputs, 1 Replay, 4 vMix Call, and 2 Recorders.
![]()

The All-in-One Screen Recorder & Video Editor
- Record desktop screen, voiceover, and webcam simultaneously
- Edit recorded clips quickly with a wide range of professional tools
- Built-in plentiful templates and effects
- Export to MP4, MOV, MKV, GIF and multiple formats
For Win 7 or later (64-bit)
For macOS 10.12 or later
 Secure Download
What is a Zoom Webinar?
A webinar is simply an online seminar, but the term can also be used to denote collaborative services such as webcasts or peer-level web meetings. Zoom allows its users to purchase webinar add-ons that can have as many as 149 hosts and 10,000 attendees. Each of the plans enables the host or hosts to have an unlimited number of meetings, which means that you can run as many webinars as you want with Zoom.
The platform doesn’t allow its users to host webinars for free and you must purchase a monthly or the annual subscription if you would like to host your webinars on Zoom. You can choose from Pro, Business, Education and Zoom Room options and the exact cost of the subscription depends on the maximum number of hosts and participants a webinar can have, so, for instance, you will have to pay around $50 per month if your webinar plan has just one host and a hundred participants.

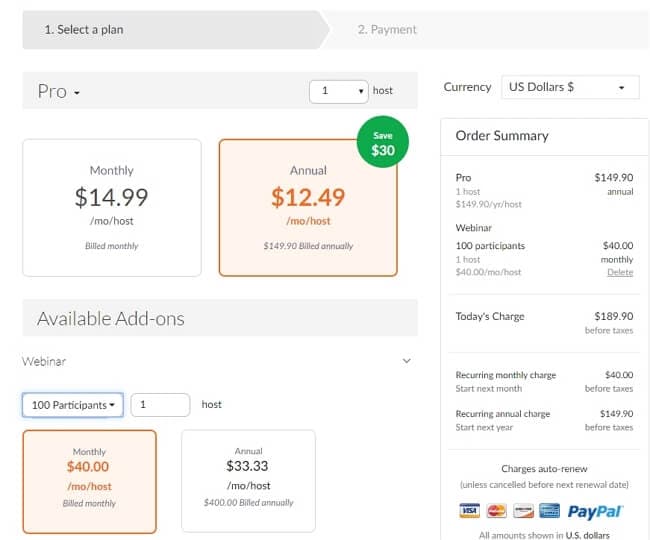
Furthermore, each of the available plans offers the cloud recording option, and you can get up to 3 TB of extra storage for an additional fee. Once you purchase a license you will also have to assign it to the owner of the Zoom account or the admin of a particular account. You can do this by heading over to the User Management menu and selecting the Users option. After you locate the user to which you would like to assign a webinar license, you should click on the Edit button at the end of the user’s row and click on the Webinar option in the Feature menu.
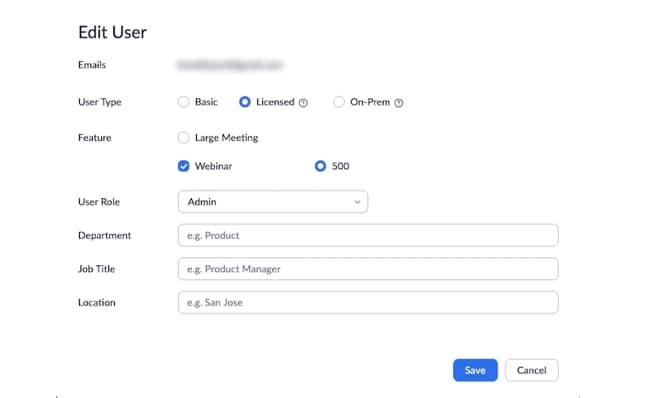
Optionally, you can choose the user’s role, specify their job title or add their location. When done, you should click on the Save button to confirm the changes you’ve made and proceed with the setup of your webinar.
Looking for some other webinar software? We’ve picked some of the best webinar software that you can use, you can check the Best Webinar Software List here .
How to Start a Webinar with Zoom?
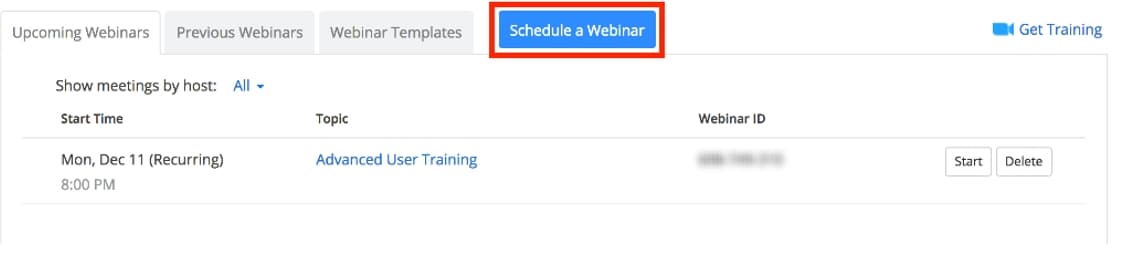
After purchasing the Zoom’s webinar add-on you can schedule a new webinar. Simply sign in to the webinar portal, click on the Webinars option and then click on the Schedule a Webinar button.
You can then provide the information about the topic of the webinar, write a short description of the webinar that is going to be displayed at the registration page, set the time and date when the webinar is supposed to take place and specify how long the webinar is going to last.
Furthermore, you can choose to set up a one time or a recurring webinar, and in case you opt for a recurring type of webinar you can choose if the webinar will take place daily, weekly or monthly. Keep in mind that a single webinar cannot occur more than fifty sessions.
In addition, you can adjust the registration settings, audio options, set up a webinar password, enable practice sessions or opt to record the webinar automatically.
Zoom also enables you to add templates to the webinar you’re scheduling, pick the webinar’s time zone or use Q&A panels during throughout the webinar. The webinar’s host can allow only signed-in users to join the webinar or make the webinar on-demand. However, only webinars that require registration can be turned into on-demand webinars, and by enabling this option you will automatically activate the cloud recording feature.
Hosts can choose to turn off their video streams while setting up a new webinar, but video streams can be switched on at any point during a webinar. Moreover, you can choose if you want to switch the participants’ videos on or off, although you should only use this option if you are sure that you won’t be needing attendees’ videos throughout the webinar.
Click on the Schedule button when done adjusting the webinar settings and proceed to send invitations to panelists or attendees.
Panelists have a different status than attendees since they can view and send videos, share their screens or add annotations. Attendees, on the other hand, can only view the webinar, but the host can unmute them or change their view of the webinar. In most cases, attendees interact with a webinar through Q&A panels and chat.
The process of inviting panelists to a webinar is straightforward since you just have to go to the Invitations tab and click on the Edit button in the Panelists section.

Zoom allows you to invite up to a hundred panelists to a webinar, and you just have to add their names and emails to the corresponding boxes and click on the checkbox next to the Send invitation to all newly added panelists immediately option.
Click on the Save button to send invitations to panelists. Panelists on recurring webinars will be invited to all webinars in the series, but you can also add or remove panelists between two webinars.
The invitation process for attendees depends on whether or not a webinar requires registration. In case your webinar doesn’t require attendees to register you can just copy the join link and send it to attendees.
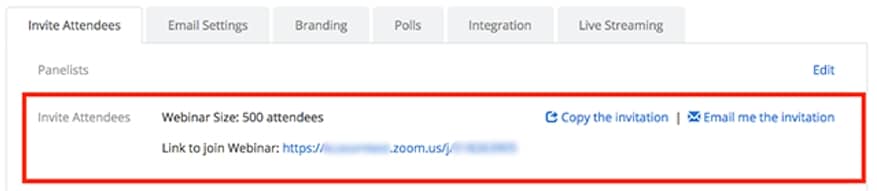
Hosts of webinars that require registration must send the registration link to attendees and each attendee must fill in the registration form. Afterward, they will receive an email that contains a unique join link. You can invite attendees to register for a webinar by copying the registration URL and sharing it through your website or your email. Optionally you can click on the Copy the invitation option and copy the invitation Zoom created, or use the Email me the invitation feature to get a copy of the invitation you can forward to the attendees.
To start a webinar, you should click on the Meetings tab, locate the webinar and click on the Start button.
How Do Attendees Join a Zoom Webinar?
As an attendee of a Zoom webinar, you can either join a webinar through a registration link or manually. Once you completed the registration process, the host can send you a registration confirmation email that contains the join link, simply click on it to join the webinar you signed up for.
In some cases, you can also gain access to the join link from the registration confirmation page and all you have to do is click on it to join a webinar.
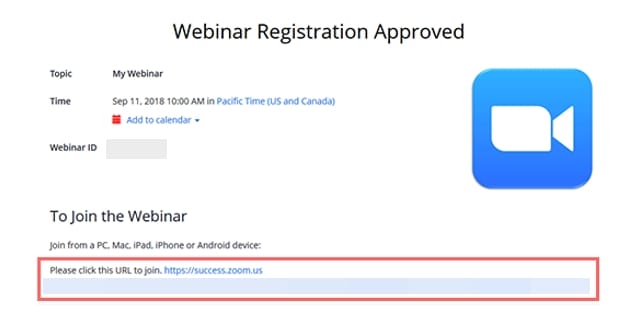
Zoom offers the option to join a webinar manually, and you just have to locate the 9-digit webinar ID in the registration email, before signing in to your Zoom account from your computer or your Smartphone. Proceed to click on the Join a Meeting option, insert the 9-digit webinar ID and click Join. Provide your name and email address if the platform asks for this information and then click on the Join Webinar button.
Webinar attendees can only interact with a webinar by raising their hands, chatting with the host and panelists or participating in Q&A panels.

What is the Difference between a Zoom Meeting and a Zoom Webinar?
Even though meetings and webinars on Zoom have a lot of in common, there are a number of differences between these two features. The webinar is a paid add-on that is available on Pro, Business and other Zoom’s subscription models. The meeting feature, on the other hand, is available on free and all other versions of the Zoom platform.
Furthermore, all participants in a Zoom meeting can share their screens, see other participants or speak to them. Webinar attendees, cannot share their screens, use annotations or any other options provided by the platform, as their interaction capabilities are reduced to chat and participation in Q&A panels. In addition, the host of a webinar can choose whether or not he or she wants to see the video of each attendee, while all attendees join webinars in a listen-only mode.
A webinar can have up to 10,000 participants, while meeting cannot have more than a thousand participants. Furthermore, Zoom meetings are primarily used for business purposes like sales or customer-facing meetings. Education is the most common reason for creating a webinar, and unlike meetings, Zoom webinars can have up to fifty sessions. Consequently, the list of features Zoom meetings and Zoom webinars offer are slightly different.
Conclusion
Anyone can set up a new webinar with Zoom, even if they have no previous experience. However, knowing how long each session of the webinar is going to last or how much time should pass between two webinar sessions is going to help you adjust the settings of your webinar more precisely. Did you find this article helpful? Leave a comment and share your experiences with Zoom webinars with us.

Richard Bennett
Richard Bennett is a writer and a lover of all things video.
Follow @Richard Bennett
Richard Bennett
Mar 27, 2024• Proven solutions
Platforms like Zoom make hosting an online seminar easy, so that you don’t have to worry about technical details.
The process of scheduling webinars, approving registrants or inviting panelists with Zoom requires a minimum amount of effort which leaves you more time to dedicate attention to the development of the curriculum or discovering innovative teaching techniques.
Zoom grants you access to all the tools you are going to need in order to manage a webinar effectively, and it allows you to have up to 10,000 participants on each webinar you organize. So, in this beginner’s guide to Zoom webinars, we are going to show you how to set up or join a Zoom webinar.

![]()

The All-in-One Screen Recorder & Video Editor
- Record desktop screen, voiceover, and webcam simultaneously
- Edit recorded clips quickly with a wide range of professional tools
- Built-in plentiful templates and effects
- Export to MP4, MOV, MKV, GIF and multiple formats
For Win 7 or later (64-bit)
For macOS 10.12 or later
Secure Download
What is a Zoom Webinar?
A webinar is simply an online seminar, but the term can also be used to denote collaborative services such as webcasts or peer-level web meetings. Zoom allows its users to purchase webinar add-ons that can have as many as 149 hosts and 10,000 attendees. Each of the plans enables the host or hosts to have an unlimited number of meetings, which means that you can run as many webinars as you want with Zoom.
The platform doesn’t allow its users to host webinars for free and you must purchase a monthly or the annual subscription if you would like to host your webinars on Zoom. You can choose from Pro, Business, Education and Zoom Room options and the exact cost of the subscription depends on the maximum number of hosts and participants a webinar can have, so, for instance, you will have to pay around $50 per month if your webinar plan has just one host and a hundred participants.
Furthermore, each of the available plans offers the cloud recording option, and you can get up to 3 TB of extra storage for an additional fee. Once you purchase a license you will also have to assign it to the owner of the Zoom account or the admin of a particular account. You can do this by heading over to the User Management menu and selecting the Users option. After you locate the user to which you would like to assign a webinar license, you should click on the Edit button at the end of the user’s row and click on the Webinar option in the Feature menu.
 CollageIt Pro
Optionally, you can choose the user’s role, specify their job title or add their location. When done, you should click on the Save button to confirm the changes you’ve made and proceed with the setup of your webinar.
Looking for some other webinar software? We’ve picked some of the best webinar software that you can use, you can check the Best Webinar Software List here .
 /a>
/a>How to Start a Webinar with Zoom?
After purchasing the Zoom’s webinar add-on you can schedule a new webinar. Simply sign in to the webinar portal, click on the Webinars option and then click on the Schedule a Webinar button.
You can then provide the information about the topic of the webinar, write a short description of the webinar that is going to be displayed at the registration page, set the time and date when the webinar is supposed to take place and specify how long the webinar is going to last.
Furthermore, you can choose to set up a one time or a recurring webinar, and in case you opt for a recurring type of webinar you can choose if the webinar will take place daily, weekly or monthly. Keep in mind that a single webinar cannot occur more than fifty sessions.
In addition, you can adjust the registration settings, audio options, set up a webinar password, enable practice sessions or opt to record the webinar automatically.
Zoom also enables you to add templates to the webinar you’re scheduling, pick the webinar’s time zone or use Q&A panels during throughout the webinar. The webinar’s host can allow only signed-in users to join the webinar or make the webinar on-demand. However, only webinars that require registration can be turned into on-demand webinars, and by enabling this option you will automatically activate the cloud recording feature.
Hosts can choose to turn off their video streams while setting up a new webinar, but video streams can be switched on at any point during a webinar. Moreover, you can choose if you want to switch the participants’ videos on or off, although you should only use this option if you are sure that you won’t be needing attendees’ videos throughout the webinar.
Click on the Schedule button when done adjusting the webinar settings and proceed to send invitations to panelists or attendees.
Panelists have a different status than attendees since they can view and send videos, share their screens or add annotations. Attendees, on the other hand, can only view the webinar, but the host can unmute them or change their view of the webinar. In most cases, attendees interact with a webinar through Q&A panels and chat.
The process of inviting panelists to a webinar is straightforward since you just have to go to the Invitations tab and click on the Edit button in the Panelists section.
 TubeDigger - online video downloader from mostly any site
Zoom allows you to invite up to a hundred panelists to a webinar, and you just have to add their names and emails to the corresponding boxes and click on the checkbox next to the Send invitation to all newly added panelists immediately option.
Click on the Save button to send invitations to panelists. Panelists on recurring webinars will be invited to all webinars in the series, but you can also add or remove panelists between two webinars.
The invitation process for attendees depends on whether or not a webinar requires registration. In case your webinar doesn’t require attendees to register you can just copy the join link and send it to attendees.
Hosts of webinars that require registration must send the registration link to attendees and each attendee must fill in the registration form. Afterward, they will receive an email that contains a unique join link. You can invite attendees to register for a webinar by copying the registration URL and sharing it through your website or your email. Optionally you can click on the Copy the invitation option and copy the invitation Zoom created, or use the Email me the invitation feature to get a copy of the invitation you can forward to the attendees.
 PCDJ Karaoki is the complete professional karaoke software designed for KJs and karaoke venues. Karaoki includes an advanced automatic singer rotation list with singer history, key control, news ticker, next singers screen, a song book exporter and printer, a jukebox background music player and many other features designed so you can host karaoke shows faster and easier!
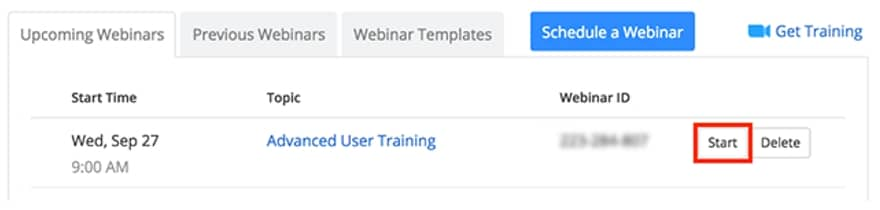
To start a webinar, you should click on the Meetings tab, locate the webinar and click on the Start button.
How Do Attendees Join a Zoom Webinar?
As an attendee of a Zoom webinar, you can either join a webinar through a registration link or manually. Once you completed the registration process, the host can send you a registration confirmation email that contains the join link, simply click on it to join the webinar you signed up for.
In some cases, you can also gain access to the join link from the registration confirmation page and all you have to do is click on it to join a webinar.
Zoom offers the option to join a webinar manually, and you just have to locate the 9-digit webinar ID in the registration email, before signing in to your Zoom account from your computer or your Smartphone. Proceed to click on the Join a Meeting option, insert the 9-digit webinar ID and click Join. Provide your name and email address if the platform asks for this information and then click on the Join Webinar button.
Webinar attendees can only interact with a webinar by raising their hands, chatting with the host and panelists or participating in Q&A panels.
What is the Difference between a Zoom Meeting and a Zoom Webinar?
Even though meetings and webinars on Zoom have a lot of in common, there are a number of differences between these two features. The webinar is a paid add-on that is available on Pro, Business and other Zoom’s subscription models. The meeting feature, on the other hand, is available on free and all other versions of the Zoom platform.
Furthermore, all participants in a Zoom meeting can share their screens, see other participants or speak to them. Webinar attendees, cannot share their screens, use annotations or any other options provided by the platform, as their interaction capabilities are reduced to chat and participation in Q&A panels. In addition, the host of a webinar can choose whether or not he or she wants to see the video of each attendee, while all attendees join webinars in a listen-only mode.
A webinar can have up to 10,000 participants, while meeting cannot have more than a thousand participants. Furthermore, Zoom meetings are primarily used for business purposes like sales or customer-facing meetings. Education is the most common reason for creating a webinar, and unlike meetings, Zoom webinars can have up to fifty sessions. Consequently, the list of features Zoom meetings and Zoom webinars offer are slightly different.
Conclusion
Anyone can set up a new webinar with Zoom, even if they have no previous experience. However, knowing how long each session of the webinar is going to last or how much time should pass between two webinar sessions is going to help you adjust the settings of your webinar more precisely. Did you find this article helpful? Leave a comment and share your experiences with Zoom webinars with us.
Richard Bennett
Richard Bennett is a writer and a lover of all things video.
Follow @Richard Bennett
Richard Bennett
Mar 27, 2024• Proven solutions
Platforms like Zoom make hosting an online seminar easy, so that you don’t have to worry about technical details.
The process of scheduling webinars, approving registrants or inviting panelists with Zoom requires a minimum amount of effort which leaves you more time to dedicate attention to the development of the curriculum or discovering innovative teaching techniques.
Zoom grants you access to all the tools you are going to need in order to manage a webinar effectively, and it allows you to have up to 10,000 participants on each webinar you organize. So, in this beginner’s guide to Zoom webinars, we are going to show you how to set up or join a Zoom webinar.
![]()
The All-in-One Screen Recorder & Video Editor
- Record desktop screen, voiceover, and webcam simultaneously
- Edit recorded clips quickly with a wide range of professional tools
- Built-in plentiful templates and effects
- Export to MP4, MOV, MKV, GIF and multiple formats
For Win 7 or later (64-bit)
For macOS 10.12 or later
Secure Download
What is a Zoom Webinar?
A webinar is simply an online seminar, but the term can also be used to denote collaborative services such as webcasts or peer-level web meetings. Zoom allows its users to purchase webinar add-ons that can have as many as 149 hosts and 10,000 attendees. Each of the plans enables the host or hosts to have an unlimited number of meetings, which means that you can run as many webinars as you want with Zoom.
The platform doesn’t allow its users to host webinars for free and you must purchase a monthly or the annual subscription if you would like to host your webinars on Zoom. You can choose from Pro, Business, Education and Zoom Room options and the exact cost of the subscription depends on the maximum number of hosts and participants a webinar can have, so, for instance, you will have to pay around $50 per month if your webinar plan has just one host and a hundred participants.
Furthermore, each of the available plans offers the cloud recording option, and you can get up to 3 TB of extra storage for an additional fee. Once you purchase a license you will also have to assign it to the owner of the Zoom account or the admin of a particular account. You can do this by heading over to the User Management menu and selecting the Users option. After you locate the user to which you would like to assign a webinar license, you should click on the Edit button at the end of the user’s row and click on the Webinar option in the Feature menu.
Optionally, you can choose the user’s role, specify their job title or add their location. When done, you should click on the Save button to confirm the changes you’ve made and proceed with the setup of your webinar.
Looking for some other webinar software? We’ve picked some of the best webinar software that you can use, you can check the Best Webinar Software List here .
 DEX 3 RE is Easy-To-Use DJ Mixing Software for MAC and Windows Designed for Today’s Versatile DJ.
Mix from your own library of music, iTunes or use the Pulselocker subsciprtion service for in-app access to over 44 million songs. Use with over 85 supported DJ controllers or mix with a keyboard and mouse.
DEX 3 RE is everything you need without the clutter - the perfect 2-deck mixing software solution for mobile DJs or hard-core hobbiests.
PCDJ DEX 3 RE (DJ Software for Win & MAC - Product Activation For 3 Machines)
How to Start a Webinar with Zoom?
After purchasing the Zoom’s webinar add-on you can schedule a new webinar. Simply sign in to the webinar portal, click on the Webinars option and then click on the Schedule a Webinar button.
You can then provide the information about the topic of the webinar, write a short description of the webinar that is going to be displayed at the registration page, set the time and date when the webinar is supposed to take place and specify how long the webinar is going to last.
Furthermore, you can choose to set up a one time or a recurring webinar, and in case you opt for a recurring type of webinar you can choose if the webinar will take place daily, weekly or monthly. Keep in mind that a single webinar cannot occur more than fifty sessions.
In addition, you can adjust the registration settings, audio options, set up a webinar password, enable practice sessions or opt to record the webinar automatically.
Zoom also enables you to add templates to the webinar you’re scheduling, pick the webinar’s time zone or use Q&A panels during throughout the webinar. The webinar’s host can allow only signed-in users to join the webinar or make the webinar on-demand. However, only webinars that require registration can be turned into on-demand webinars, and by enabling this option you will automatically activate the cloud recording feature.
Hosts can choose to turn off their video streams while setting up a new webinar, but video streams can be switched on at any point during a webinar. Moreover, you can choose if you want to switch the participants’ videos on or off, although you should only use this option if you are sure that you won’t be needing attendees’ videos throughout the webinar.
Click on the Schedule button when done adjusting the webinar settings and proceed to send invitations to panelists or attendees.
Panelists have a different status than attendees since they can view and send videos, share their screens or add annotations. Attendees, on the other hand, can only view the webinar, but the host can unmute them or change their view of the webinar. In most cases, attendees interact with a webinar through Q&A panels and chat.
The process of inviting panelists to a webinar is straightforward since you just have to go to the Invitations tab and click on the Edit button in the Panelists section.
Zoom allows you to invite up to a hundred panelists to a webinar, and you just have to add their names and emails to the corresponding boxes and click on the checkbox next to the Send invitation to all newly added panelists immediately option.
Click on the Save button to send invitations to panelists. Panelists on recurring webinars will be invited to all webinars in the series, but you can also add or remove panelists between two webinars.
The invitation process for attendees depends on whether or not a webinar requires registration. In case your webinar doesn’t require attendees to register you can just copy the join link and send it to attendees.
Hosts of webinars that require registration must send the registration link to attendees and each attendee must fill in the registration form. Afterward, they will receive an email that contains a unique join link. You can invite attendees to register for a webinar by copying the registration URL and sharing it through your website or your email. Optionally you can click on the Copy the invitation option and copy the invitation Zoom created, or use the Email me the invitation feature to get a copy of the invitation you can forward to the attendees.
To start a webinar, you should click on the Meetings tab, locate the webinar and click on the Start button.
How Do Attendees Join a Zoom Webinar?
As an attendee of a Zoom webinar, you can either join a webinar through a registration link or manually. Once you completed the registration process, the host can send you a registration confirmation email that contains the join link, simply click on it to join the webinar you signed up for.
In some cases, you can also gain access to the join link from the registration confirmation page and all you have to do is click on it to join a webinar.
Zoom offers the option to join a webinar manually, and you just have to locate the 9-digit webinar ID in the registration email, before signing in to your Zoom account from your computer or your Smartphone. Proceed to click on the Join a Meeting option, insert the 9-digit webinar ID and click Join. Provide your name and email address if the platform asks for this information and then click on the Join Webinar button.
Webinar attendees can only interact with a webinar by raising their hands, chatting with the host and panelists or participating in Q&A panels.

What is the Difference between a Zoom Meeting and a Zoom Webinar?
Even though meetings and webinars on Zoom have a lot of in common, there are a number of differences between these two features. The webinar is a paid add-on that is available on Pro, Business and other Zoom’s subscription models. The meeting feature, on the other hand, is available on free and all other versions of the Zoom platform.
Furthermore, all participants in a Zoom meeting can share their screens, see other participants or speak to them. Webinar attendees, cannot share their screens, use annotations or any other options provided by the platform, as their interaction capabilities are reduced to chat and participation in Q&A panels. In addition, the host of a webinar can choose whether or not he or she wants to see the video of each attendee, while all attendees join webinars in a listen-only mode.
A webinar can have up to 10,000 participants, while meeting cannot have more than a thousand participants. Furthermore, Zoom meetings are primarily used for business purposes like sales or customer-facing meetings. Education is the most common reason for creating a webinar, and unlike meetings, Zoom webinars can have up to fifty sessions. Consequently, the list of features Zoom meetings and Zoom webinars offer are slightly different.
Conclusion
Anyone can set up a new webinar with Zoom, even if they have no previous experience. However, knowing how long each session of the webinar is going to last or how much time should pass between two webinar sessions is going to help you adjust the settings of your webinar more precisely. Did you find this article helpful? Leave a comment and share your experiences with Zoom webinars with us.
Richard Bennett
Richard Bennett is a writer and a lover of all things video.
Follow @Richard Bennett
Richard Bennett
Mar 27, 2024• Proven solutions
Platforms like Zoom make hosting an online seminar easy, so that you don’t have to worry about technical details.
The process of scheduling webinars, approving registrants or inviting panelists with Zoom requires a minimum amount of effort which leaves you more time to dedicate attention to the development of the curriculum or discovering innovative teaching techniques.
Zoom grants you access to all the tools you are going to need in order to manage a webinar effectively, and it allows you to have up to 10,000 participants on each webinar you organize. So, in this beginner’s guide to Zoom webinars, we are going to show you how to set up or join a Zoom webinar.

![]()
The All-in-One Screen Recorder & Video Editor
- Record desktop screen, voiceover, and webcam simultaneously
- Edit recorded clips quickly with a wide range of professional tools
- Built-in plentiful templates and effects
- Export to MP4, MOV, MKV, GIF and multiple formats
For Win 7 or later (64-bit)
For macOS 10.12 or later
Secure Download
What is a Zoom Webinar?
A webinar is simply an online seminar, but the term can also be used to denote collaborative services such as webcasts or peer-level web meetings. Zoom allows its users to purchase webinar add-ons that can have as many as 149 hosts and 10,000 attendees. Each of the plans enables the host or hosts to have an unlimited number of meetings, which means that you can run as many webinars as you want with Zoom.
The platform doesn’t allow its users to host webinars for free and you must purchase a monthly or the annual subscription if you would like to host your webinars on Zoom. You can choose from Pro, Business, Education and Zoom Room options and the exact cost of the subscription depends on the maximum number of hosts and participants a webinar can have, so, for instance, you will have to pay around $50 per month if your webinar plan has just one host and a hundred participants.
Furthermore, each of the available plans offers the cloud recording option, and you can get up to 3 TB of extra storage for an additional fee. Once you purchase a license you will also have to assign it to the owner of the Zoom account or the admin of a particular account. You can do this by heading over to the User Management menu and selecting the Users option. After you locate the user to which you would like to assign a webinar license, you should click on the Edit button at the end of the user’s row and click on the Webinar option in the Feature menu.
Optionally, you can choose the user’s role, specify their job title or add their location. When done, you should click on the Save button to confirm the changes you’ve made and proceed with the setup of your webinar.
Looking for some other webinar software? We’ve picked some of the best webinar software that you can use, you can check the Best Webinar Software List here .
How to Start a Webinar with Zoom?
After purchasing the Zoom’s webinar add-on you can schedule a new webinar. Simply sign in to the webinar portal, click on the Webinars option and then click on the Schedule a Webinar button.
You can then provide the information about the topic of the webinar, write a short description of the webinar that is going to be displayed at the registration page, set the time and date when the webinar is supposed to take place and specify how long the webinar is going to last.
Furthermore, you can choose to set up a one time or a recurring webinar, and in case you opt for a recurring type of webinar you can choose if the webinar will take place daily, weekly or monthly. Keep in mind that a single webinar cannot occur more than fifty sessions.
In addition, you can adjust the registration settings, audio options, set up a webinar password, enable practice sessions or opt to record the webinar automatically.
Zoom also enables you to add templates to the webinar you’re scheduling, pick the webinar’s time zone or use Q&A panels during throughout the webinar. The webinar’s host can allow only signed-in users to join the webinar or make the webinar on-demand. However, only webinars that require registration can be turned into on-demand webinars, and by enabling this option you will automatically activate the cloud recording feature.
Hosts can choose to turn off their video streams while setting up a new webinar, but video streams can be switched on at any point during a webinar. Moreover, you can choose if you want to switch the participants’ videos on or off, although you should only use this option if you are sure that you won’t be needing attendees’ videos throughout the webinar.
Click on the Schedule button when done adjusting the webinar settings and proceed to send invitations to panelists or attendees.
Panelists have a different status than attendees since they can view and send videos, share their screens or add annotations. Attendees, on the other hand, can only view the webinar, but the host can unmute them or change their view of the webinar. In most cases, attendees interact with a webinar through Q&A panels and chat.
The process of inviting panelists to a webinar is straightforward since you just have to go to the Invitations tab and click on the Edit button in the Panelists section.
Zoom allows you to invite up to a hundred panelists to a webinar, and you just have to add their names and emails to the corresponding boxes and click on the checkbox next to the Send invitation to all newly added panelists immediately option.
Click on the Save button to send invitations to panelists. Panelists on recurring webinars will be invited to all webinars in the series, but you can also add or remove panelists between two webinars.
The invitation process for attendees depends on whether or not a webinar requires registration. In case your webinar doesn’t require attendees to register you can just copy the join link and send it to attendees.
Hosts of webinars that require registration must send the registration link to attendees and each attendee must fill in the registration form. Afterward, they will receive an email that contains a unique join link. You can invite attendees to register for a webinar by copying the registration URL and sharing it through your website or your email. Optionally you can click on the Copy the invitation option and copy the invitation Zoom created, or use the Email me the invitation feature to get a copy of the invitation you can forward to the attendees.
 SwifDoo PDF Perpetual (2-PC) Free upgrade. No monthly fees ever.
To start a webinar, you should click on the Meetings tab, locate the webinar and click on the Start button.
How Do Attendees Join a Zoom Webinar?
As an attendee of a Zoom webinar, you can either join a webinar through a registration link or manually. Once you completed the registration process, the host can send you a registration confirmation email that contains the join link, simply click on it to join the webinar you signed up for.
In some cases, you can also gain access to the join link from the registration confirmation page and all you have to do is click on it to join a webinar.
Zoom offers the option to join a webinar manually, and you just have to locate the 9-digit webinar ID in the registration email, before signing in to your Zoom account from your computer or your Smartphone. Proceed to click on the Join a Meeting option, insert the 9-digit webinar ID and click Join. Provide your name and email address if the platform asks for this information and then click on the Join Webinar button.
Webinar attendees can only interact with a webinar by raising their hands, chatting with the host and panelists or participating in Q&A panels.
What is the Difference between a Zoom Meeting and a Zoom Webinar?
Even though meetings and webinars on Zoom have a lot of in common, there are a number of differences between these two features. The webinar is a paid add-on that is available on Pro, Business and other Zoom’s subscription models. The meeting feature, on the other hand, is available on free and all other versions of the Zoom platform.
Furthermore, all participants in a Zoom meeting can share their screens, see other participants or speak to them. Webinar attendees, cannot share their screens, use annotations or any other options provided by the platform, as their interaction capabilities are reduced to chat and participation in Q&A panels. In addition, the host of a webinar can choose whether or not he or she wants to see the video of each attendee, while all attendees join webinars in a listen-only mode.
A webinar can have up to 10,000 participants, while meeting cannot have more than a thousand participants. Furthermore, Zoom meetings are primarily used for business purposes like sales or customer-facing meetings. Education is the most common reason for creating a webinar, and unlike meetings, Zoom webinars can have up to fifty sessions. Consequently, the list of features Zoom meetings and Zoom webinars offer are slightly different.
Conclusion
Anyone can set up a new webinar with Zoom, even if they have no previous experience. However, knowing how long each session of the webinar is going to last or how much time should pass between two webinar sessions is going to help you adjust the settings of your webinar more precisely. Did you find this article helpful? Leave a comment and share your experiences with Zoom webinars with us.
 PaperScan Professional: PaperScan Scanner Software is a powerful TWAIN & WIA scanning application centered on one idea: making document acquisition an unparalleled easy task for anyone.
Richard Bennett
Richard Bennett is a writer and a lover of all things video.
Follow @Richard Bennett
- Title: [Updated] 2024 Approved Zoom Meeting Fundamentals for the Uninitiated
- Author: Virginia Woolf
- Created at : 2024-07-24 11:56:34
- Updated at : 2024-07-25 11:56:34
- Link: https://visual-screen-recording.techidaily.com/updated-2024-approved-zoom-meeting-fundamentals-for-the-uninitiated/
- License: This work is licensed under CC BY-NC-SA 4.0.