![[Updated] 2024 Approved Step-by-Step Creating Timelapse Videos with iPad](https://thmb.techidaily.com/878905428de37ec37afcf7b8018e7d924bf2c1ca322a8100dfaafbd0ac4bcb97.jpg)
"[Updated] 2024 Approved Step-by-Step Creating Timelapse Videos with iPad"
Step-by-Step: Creating Timelapse Videos with iPad
A timelapse video is where you record an event for a long duration at a regular interval. Due to the low frame rate, the captured long-duration video plays in a very short time. Suppose you want to capture the moving clouds for an hour. When you capture in timelapse mode, the hour-long event will be captured in a few minutes of video.
If you own an iPad, you can create stunning timelapse videos easily. All the modern iPad variants have the timelapse feature. You can create short timelapse videos of any event and put them on social media platforms. Besides, adding a timelapse video to a regular video enhances the content. We will illustrate how to record iPad time lapse in simple steps.
Part 1. Steps to Record Timelapse Video on iPad
You can find the timelapse video option on all modern iOS devices. The timelapse feature is available on all iPads. You can find the timelapse feature on iPad Pro, iPad Air, iPad, and iPad Mini. You will need a tripod to fix your iPad to capture timelapse video. The iPad should stay still in its position during the entire timelapse capturing session. Here are the steps on how to time lapse on iPhone and iPad.
Step 1: On your iPad, tap on Camera app from the home screen.
Step 2: On the camera app, you will notice camera modes like Photo, Video, and Slow-Mo. Swipe right until Time-Lapse is selected as the camera mode.
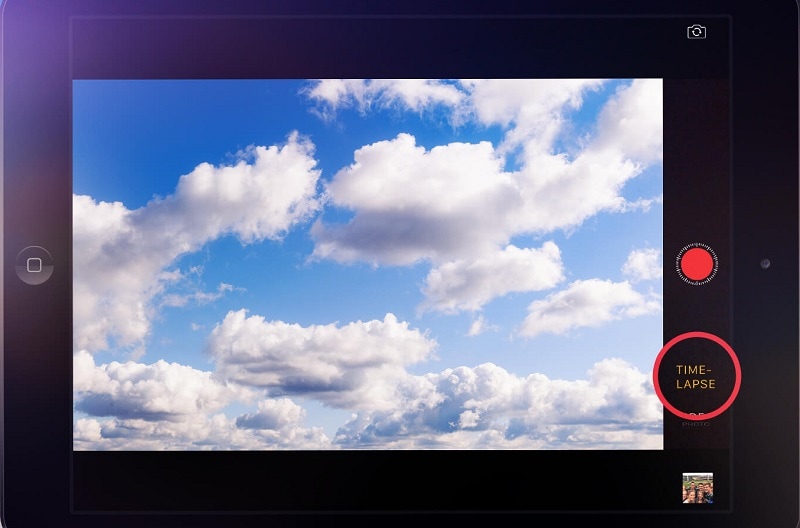
Step 3: Fix your iPad on the tripod and set the video frame perfectly. Tap on the Shutter button below Time-Lapse and the recording will start.
Step 4: When you want to stop recording the timelapse video, press the Shutter or Stop button again.

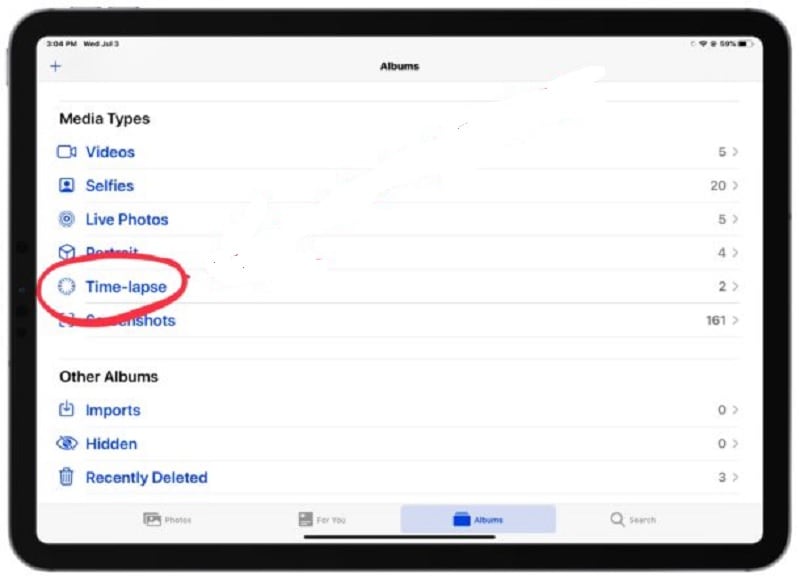
Step 5: You can go to Photos app to check out the timelapse video you have captured. Open Photos app and go to Time-lapse option under Media section.
The frame rate is automatically lowered when you select the timelapse mode. However, if you want to change iPad time lapse settings, you have to install a time lapse app. Osnap is the top-rated iOS timelapse app that you can use to customize timelapse settings. Please note that the iOS time lapse has been made available on iOS devices from iOS 8 onwards.
Part 2. Related FAQs of iPad Timelapse
How long can iPad record time-lapse?
Apple claims that iPad can record 30 hours of time-lapse video. You have to consider the battery charge and the storage space on your iPad. These important factors can limit the recording duration of your time-lapse video. The longer the duration of the time-lapse, the lower will be the frame rate.
How do you time a video on iPad?
You cannot set a fixed time duration for capturing a video on iPad. You have to manually start and stop recording a video on iPad. However, you can always trim the video duration as per your requirements. You can use iMovie app to trim the video duration and time your video accordingly.
Can you turn a regular video into a timelapse?
Yes, you can turn a regular video into a timelapse video easily on iPhone and iPad. You can use iMovie app that comes pre-installed. Otherwise, you can install it from App Store. Besides, you can use any timelapse app such as Lapse-It and SpeedPro to turn your regular video into a timelapse video.
How long is a 1 hour time lapse on iPhone?
When the recording duration is one hour in timelapse mode, iPhone frame capture rate is 1 frame per second. This means a 1-hour time lapse on iPhone will be 4 minutes. The calculation is that you have to divide the recording duration in seconds by one frame capture duration in seconds. In this case, you need to divide 3600 seconds by 4 seconds. This comes to 240 seconds which is 4 minutes.

The Bottom Line
There is no doubt that taking a timelapse video with iPhone is a cakewalk However, if you own an iPad, you can capture stunning timelapse videos as well. All you need to do is place the iPad on a firm tripod. Make sure it does not get disturbed during the timelapse capturing session. You can capture timelapse video on your iPad directly from the Camera app. If you want to customize the timelapse settings, you can install a timelapse app on your iPad.
A timelapse video is where you record an event for a long duration at a regular interval. Due to the low frame rate, the captured long-duration video plays in a very short time. Suppose you want to capture the moving clouds for an hour. When you capture in timelapse mode, the hour-long event will be captured in a few minutes of video.
If you own an iPad, you can create stunning timelapse videos easily. All the modern iPad variants have the timelapse feature. You can create short timelapse videos of any event and put them on social media platforms. Besides, adding a timelapse video to a regular video enhances the content. We will illustrate how to record iPad time lapse in simple steps.
Part 1. Steps to Record Timelapse Video on iPad
You can find the timelapse video option on all modern iOS devices. The timelapse feature is available on all iPads. You can find the timelapse feature on iPad Pro, iPad Air, iPad, and iPad Mini. You will need a tripod to fix your iPad to capture timelapse video. The iPad should stay still in its position during the entire timelapse capturing session. Here are the steps on how to time lapse on iPhone and iPad.
Step 1: On your iPad, tap on Camera app from the home screen.
Step 2: On the camera app, you will notice camera modes like Photo, Video, and Slow-Mo. Swipe right until Time-Lapse is selected as the camera mode.
Step 3: Fix your iPad on the tripod and set the video frame perfectly. Tap on the Shutter button below Time-Lapse and the recording will start.
Step 4: When you want to stop recording the timelapse video, press the Shutter or Stop button again.

Step 5: You can go to Photos app to check out the timelapse video you have captured. Open Photos app and go to Time-lapse option under Media section.
The frame rate is automatically lowered when you select the timelapse mode. However, if you want to change iPad time lapse settings, you have to install a time lapse app. Osnap is the top-rated iOS timelapse app that you can use to customize timelapse settings. Please note that the iOS time lapse has been made available on iOS devices from iOS 8 onwards.
Part 2. Related FAQs of iPad Timelapse
How long can iPad record time-lapse?
Apple claims that iPad can record 30 hours of time-lapse video. You have to consider the battery charge and the storage space on your iPad. These important factors can limit the recording duration of your time-lapse video. The longer the duration of the time-lapse, the lower will be the frame rate.
How do you time a video on iPad?
You cannot set a fixed time duration for capturing a video on iPad. You have to manually start and stop recording a video on iPad. However, you can always trim the video duration as per your requirements. You can use iMovie app to trim the video duration and time your video accordingly.
Can you turn a regular video into a timelapse?
Yes, you can turn a regular video into a timelapse video easily on iPhone and iPad. You can use iMovie app that comes pre-installed. Otherwise, you can install it from App Store. Besides, you can use any timelapse app such as Lapse-It and SpeedPro to turn your regular video into a timelapse video.
How long is a 1 hour time lapse on iPhone?
When the recording duration is one hour in timelapse mode, iPhone frame capture rate is 1 frame per second. This means a 1-hour time lapse on iPhone will be 4 minutes. The calculation is that you have to divide the recording duration in seconds by one frame capture duration in seconds. In this case, you need to divide 3600 seconds by 4 seconds. This comes to 240 seconds which is 4 minutes.
The Bottom Line
There is no doubt that taking a timelapse video with iPhone is a cakewalk However, if you own an iPad, you can capture stunning timelapse videos as well. All you need to do is place the iPad on a firm tripod. Make sure it does not get disturbed during the timelapse capturing session. You can capture timelapse video on your iPad directly from the Camera app. If you want to customize the timelapse settings, you can install a timelapse app on your iPad.
A timelapse video is where you record an event for a long duration at a regular interval. Due to the low frame rate, the captured long-duration video plays in a very short time. Suppose you want to capture the moving clouds for an hour. When you capture in timelapse mode, the hour-long event will be captured in a few minutes of video.
If you own an iPad, you can create stunning timelapse videos easily. All the modern iPad variants have the timelapse feature. You can create short timelapse videos of any event and put them on social media platforms. Besides, adding a timelapse video to a regular video enhances the content. We will illustrate how to record iPad time lapse in simple steps.
Part 1. Steps to Record Timelapse Video on iPad
You can find the timelapse video option on all modern iOS devices. The timelapse feature is available on all iPads. You can find the timelapse feature on iPad Pro, iPad Air, iPad, and iPad Mini. You will need a tripod to fix your iPad to capture timelapse video. The iPad should stay still in its position during the entire timelapse capturing session. Here are the steps on how to time lapse on iPhone and iPad.
Step 1: On your iPad, tap on Camera app from the home screen.
Step 2: On the camera app, you will notice camera modes like Photo, Video, and Slow-Mo. Swipe right until Time-Lapse is selected as the camera mode.
Step 3: Fix your iPad on the tripod and set the video frame perfectly. Tap on the Shutter button below Time-Lapse and the recording will start.
Step 4: When you want to stop recording the timelapse video, press the Shutter or Stop button again.
Step 5: You can go to Photos app to check out the timelapse video you have captured. Open Photos app and go to Time-lapse option under Media section.
The frame rate is automatically lowered when you select the timelapse mode. However, if you want to change iPad time lapse settings, you have to install a time lapse app. Osnap is the top-rated iOS timelapse app that you can use to customize timelapse settings. Please note that the iOS time lapse has been made available on iOS devices from iOS 8 onwards.
Part 2. Related FAQs of iPad Timelapse
How long can iPad record time-lapse?
Apple claims that iPad can record 30 hours of time-lapse video. You have to consider the battery charge and the storage space on your iPad. These important factors can limit the recording duration of your time-lapse video. The longer the duration of the time-lapse, the lower will be the frame rate.
How do you time a video on iPad?
You cannot set a fixed time duration for capturing a video on iPad. You have to manually start and stop recording a video on iPad. However, you can always trim the video duration as per your requirements. You can use iMovie app to trim the video duration and time your video accordingly.
Can you turn a regular video into a timelapse?
Yes, you can turn a regular video into a timelapse video easily on iPhone and iPad. You can use iMovie app that comes pre-installed. Otherwise, you can install it from App Store. Besides, you can use any timelapse app such as Lapse-It and SpeedPro to turn your regular video into a timelapse video.
How long is a 1 hour time lapse on iPhone?
When the recording duration is one hour in timelapse mode, iPhone frame capture rate is 1 frame per second. This means a 1-hour time lapse on iPhone will be 4 minutes. The calculation is that you have to divide the recording duration in seconds by one frame capture duration in seconds. In this case, you need to divide 3600 seconds by 4 seconds. This comes to 240 seconds which is 4 minutes.

The Bottom Line
There is no doubt that taking a timelapse video with iPhone is a cakewalk However, if you own an iPad, you can capture stunning timelapse videos as well. All you need to do is place the iPad on a firm tripod. Make sure it does not get disturbed during the timelapse capturing session. You can capture timelapse video on your iPad directly from the Camera app. If you want to customize the timelapse settings, you can install a timelapse app on your iPad.
- Title: [Updated] 2024 Approved Step-by-Step Creating Timelapse Videos with iPad
- Author: Virginia Woolf
- Created at : 2024-08-03 18:03:22
- Updated at : 2024-08-04 18:03:22
- Link: https://visual-screen-recording.techidaily.com/updated-2024-approved-step-by-step-creating-timelapse-videos-with-ipad/
- License: This work is licensed under CC BY-NC-SA 4.0.