![[Updated] 2024 Approved Smooth Segmentation 4 Easy Fades Explained](https://thmb.techidaily.com/9420d8c67dc649498f45244e433ec706e66933c2bf2f2b4b3c5585601cba7b98.jpg)
"[Updated] 2024 Approved Smooth Segmentation 4 Easy Fades Explained"
Smooth Segmentation: 4 Easy Fades Explained
How to Fade-in and Fade-out Video Clips

Max Wales
Mar 27, 2024• Proven solutions
The fade-in effect is commonly used to slowly introduce a shot to a viewer but it can also be used to make the transition between two shots much smoother, especially when combined with the fade-out effect that is often used to conclude a shot or suggest the end of a sequence or the entire video clip.
You may already know that professional video editing software packages , like Adobe Premiere, enable its users to add fade-in and fade-out effects to videos, but in this article, we are going to show you how to create add fade-in and fade-out effects to videos in easier ways. So let’s explore the steps you’ll need to take in order to add these effects to your videos.

4 Ways to Add Fade in & Fade Out Effects to Video in Filmora
If you’re using the latest version of Filmora, there’re several ways you can use to fade in and fade out clips. If you haven’t installed Filmora yet, click the button below to start.


1. Add Dissolve Transitions to Video to Fade in and Fade out Video Footage
The first way to fade in and fade out the footage in Filmora is by applying dissolve transition. The dissolve, also called lap dissolve sometimes, is a gradual transition from one image to another. It is often used when the first image starts to disappear and the next image starts to display gradually.
So you can apply Dissolve transition at the beginning of the video from a black screen to fade in, and add dissolve transition at the end of the clip into the blackness to fade out.
Here is how to add dissolve transition in Filmora.
- After importing video footage into Filmora, drag and drop them in the timeline.
- Go to the Transition tab and find Dissolve under the Basic category. If you didn’t see it, you can use the search bar to find it.
 /a>
/a>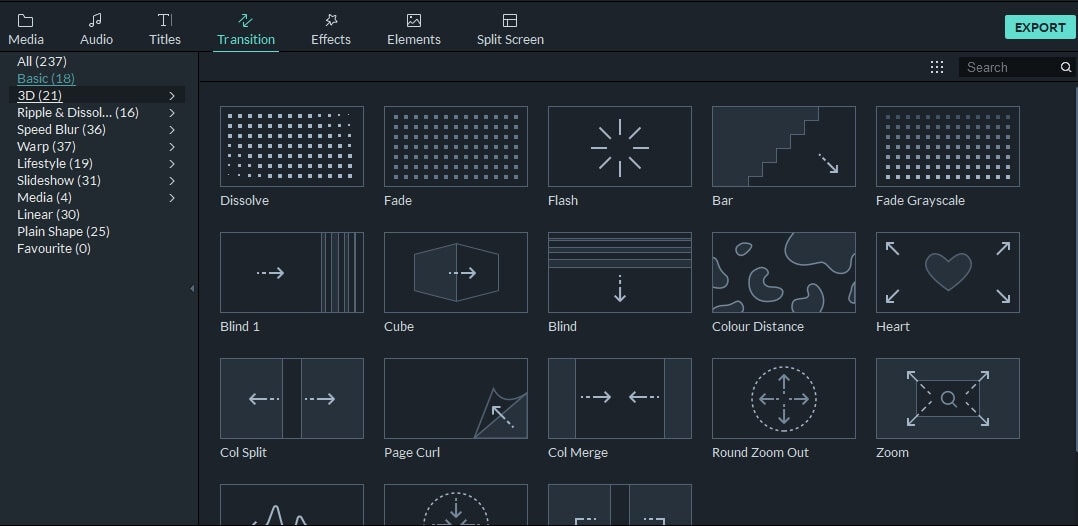
- Drag the Dissolve transition to the beginning part of the clip, and then drag the Dissolve transition again to the end of the clip.
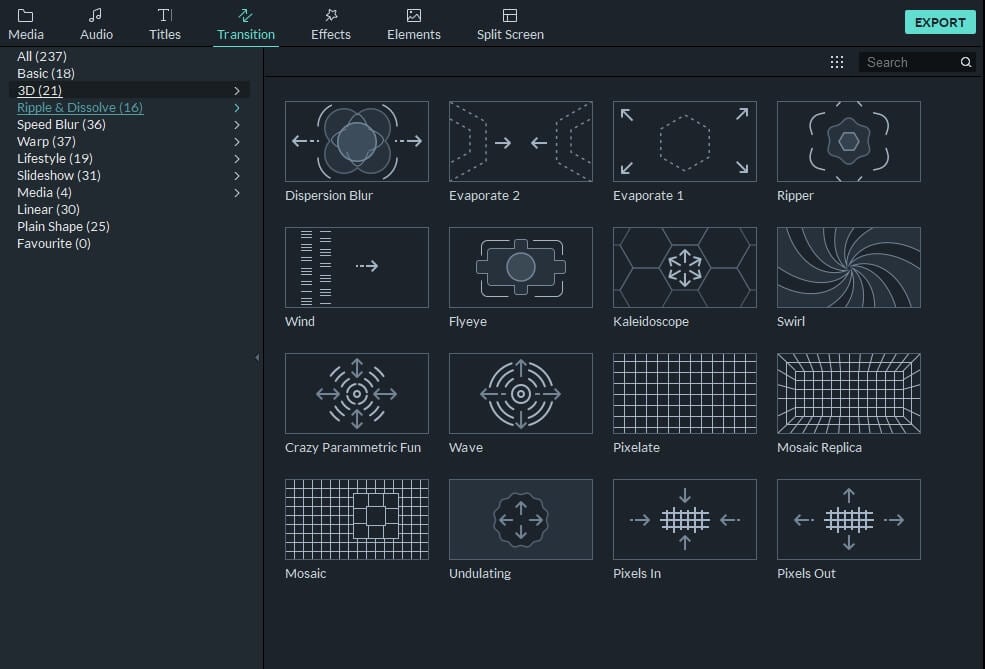
Besides applying Dissolve transition to fade video, you can also try the Fade or transitions under Ripple & Dissolve category such as Dispersion blur, evaporate, ripple, wind, swirl, or wave.
- You can adjust the duration of the Dissolve transition to get a better result.
You can learn more about Dissolve transition at our guide How to add Dissolve Transitions in Filmora .
2. Apply Fade Motion Effects to Video
Besides the regular dissolve and fade transitions, you can also apply motion fade effect to make your footage more vivid. Here is how to apply the motion fade effect to video in Filmora.
- Click the clip in the timeline and then switch to the Animation tab, scroll down and you will see the Preset Motions (Legacy) option in the Preset tab.
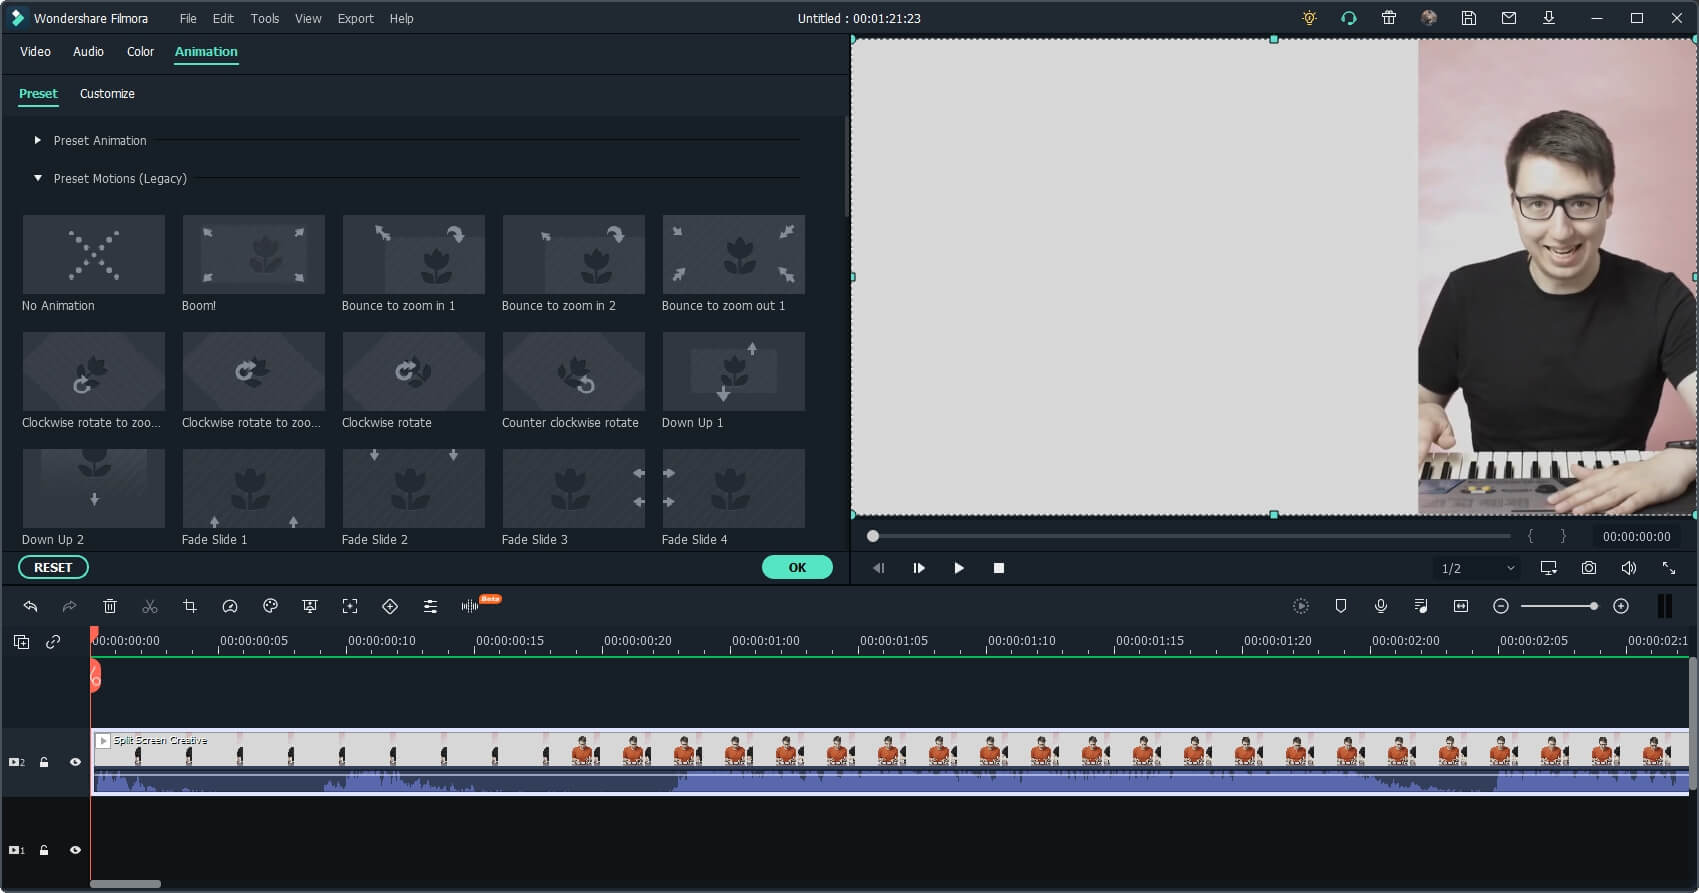
- Expand it and you will find that there are several fade effects available, such as fade-zoom in, fade-zoom out, fade slide from top to bottom, fade slide from bottom to top, fade from left to right, or fade right to left.
- Double click on the fade effect that you want to use and the fade motion effect will be added to the clip automatically.
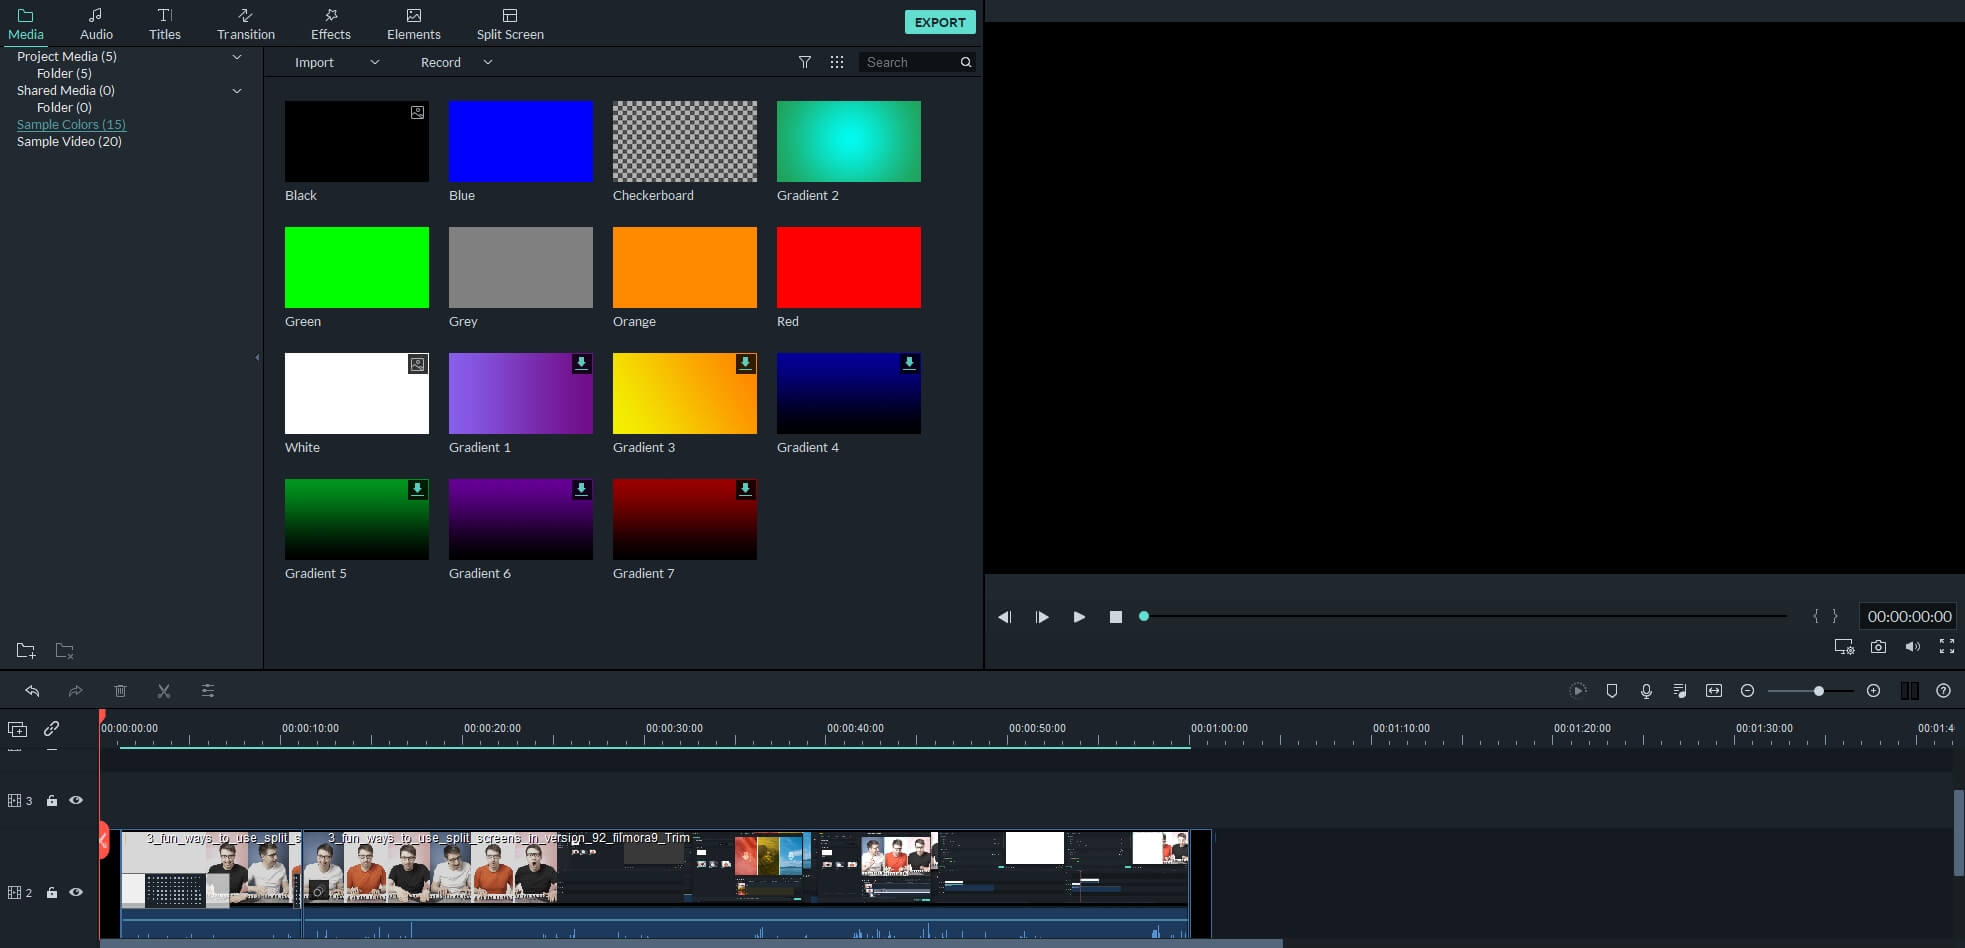
3. Add Sample Colors at the beginning and end of the video clip
In case that you don’t want to hide any frames in your video, you can add a black screen or blue screen or whatever color screen at the beginning and end of the clip first, and then apply Dissolve or fade transitions or motion fade effect.
We’ve made a video tutorial about how to fade in and fade out video easily in Filmora. The video is made with the previous Filmora version, but the steps are similar.

4. Using Animation Keyframing to Create Fade Effects
There is an animation keyframing feature available for versions after Filmora 10.0. This feature is perfect for adding fade-in and fade-out effects for users who want more control over the opacity and duration in fading.
Here are the steps of adding animation keyframing to fade videos.
Double click on the video footage in the timeline, and then go to the Animation tab.
Here are Preset and Customize options available, in order to create a fade effect, click the Customize option and you will see the screen like below:
 Video Converter Factory Pro
Move the playhead in the timeline and then click the Add button accordingly, and then adjust the Opacity slider to make a fade effect.
So easy, isn’t it? You can now download the software and make fade-in and fade-out effects with the animation keyframing in Filmora. You can read on to unlock more creative usage of the animation keyframing .

WPS Office Premium ( File Recovery, Photo Scanning, Convert PDF)–Yearly
Besides fade-in and fade-out videos, Filmora can fade in and fade out audio easily. Check the details in our guide about how to fade in and fade out audio in Filmora or watch the video tutorial below.

YouTuber Aaron Bowman has made a tutorial about the Filmora transitions, explaining how to add fade in fade out effects to videos, control the duration of transitions, as well as how to use the keyframing animations to create transitions.
Max Wales
Max Wales is a writer and a lover of all things video.
Follow @Max Wales
Max Wales
Mar 27, 2024• Proven solutions
The fade-in effect is commonly used to slowly introduce a shot to a viewer but it can also be used to make the transition between two shots much smoother, especially when combined with the fade-out effect that is often used to conclude a shot or suggest the end of a sequence or the entire video clip.
You may already know that professional video editing software packages , like Adobe Premiere, enable its users to add fade-in and fade-out effects to videos, but in this article, we are going to show you how to create add fade-in and fade-out effects to videos in easier ways. So let’s explore the steps you’ll need to take in order to add these effects to your videos.
4 Ways to Add Fade in & Fade Out Effects to Video in Filmora
If you’re using the latest version of Filmora, there’re several ways you can use to fade in and fade out clips. If you haven’t installed Filmora yet, click the button below to start.
1. Add Dissolve Transitions to Video to Fade in and Fade out Video Footage
The first way to fade in and fade out the footage in Filmora is by applying dissolve transition. The dissolve, also called lap dissolve sometimes, is a gradual transition from one image to another. It is often used when the first image starts to disappear and the next image starts to display gradually.
So you can apply Dissolve transition at the beginning of the video from a black screen to fade in, and add dissolve transition at the end of the clip into the blackness to fade out.
Here is how to add dissolve transition in Filmora.
- After importing video footage into Filmora, drag and drop them in the timeline.
- Go to the Transition tab and find Dissolve under the Basic category. If you didn’t see it, you can use the search bar to find it.
 Glarysoft File Recovery Pro - Helps to recover your lost file/data, even permanently deleted data.
- Drag the Dissolve transition to the beginning part of the clip, and then drag the Dissolve transition again to the end of the clip.
Besides applying Dissolve transition to fade video, you can also try the Fade or transitions under Ripple & Dissolve category such as Dispersion blur, evaporate, ripple, wind, swirl, or wave.
 NeoDownloader - Fast and fully automatic image/video/music downloader.
- You can adjust the duration of the Dissolve transition to get a better result.
You can learn more about Dissolve transition at our guide How to add Dissolve Transitions in Filmora .
2. Apply Fade Motion Effects to Video
Besides the regular dissolve and fade transitions, you can also apply motion fade effect to make your footage more vivid. Here is how to apply the motion fade effect to video in Filmora.
- Click the clip in the timeline and then switch to the Animation tab, scroll down and you will see the Preset Motions (Legacy) option in the Preset tab.
- Expand it and you will find that there are several fade effects available, such as fade-zoom in, fade-zoom out, fade slide from top to bottom, fade slide from bottom to top, fade from left to right, or fade right to left.
- Double click on the fade effect that you want to use and the fade motion effect will be added to the clip automatically.

WPS Office Premium ( File Recovery, Photo Scanning, Convert PDF)–Yearly
3. Add Sample Colors at the beginning and end of the video clip
In case that you don’t want to hide any frames in your video, you can add a black screen or blue screen or whatever color screen at the beginning and end of the clip first, and then apply Dissolve or fade transitions or motion fade effect.
We’ve made a video tutorial about how to fade in and fade out video easily in Filmora. The video is made with the previous Filmora version, but the steps are similar.
4. Using Animation Keyframing to Create Fade Effects
There is an animation keyframing feature available for versions after Filmora 10.0. This feature is perfect for adding fade-in and fade-out effects for users who want more control over the opacity and duration in fading.
Here are the steps of adding animation keyframing to fade videos.
Double click on the video footage in the timeline, and then go to the Animation tab.
Here are Preset and Customize options available, in order to create a fade effect, click the Customize option and you will see the screen like below:
Move the playhead in the timeline and then click the Add button accordingly, and then adjust the Opacity slider to make a fade effect.
So easy, isn’t it? You can now download the software and make fade-in and fade-out effects with the animation keyframing in Filmora. You can read on to unlock more creative usage of the animation keyframing .
Besides fade-in and fade-out videos, Filmora can fade in and fade out audio easily. Check the details in our guide about how to fade in and fade out audio in Filmora or watch the video tutorial below.
YouTuber Aaron Bowman has made a tutorial about the Filmora transitions, explaining how to add fade in fade out effects to videos, control the duration of transitions, as well as how to use the keyframing animations to create transitions.
Max Wales
Max Wales is a writer and a lover of all things video.
Follow @Max Wales
Max Wales
Mar 27, 2024• Proven solutions
The fade-in effect is commonly used to slowly introduce a shot to a viewer but it can also be used to make the transition between two shots much smoother, especially when combined with the fade-out effect that is often used to conclude a shot or suggest the end of a sequence or the entire video clip.
You may already know that professional video editing software packages , like Adobe Premiere, enable its users to add fade-in and fade-out effects to videos, but in this article, we are going to show you how to create add fade-in and fade-out effects to videos in easier ways. So let’s explore the steps you’ll need to take in order to add these effects to your videos.

4 Ways to Add Fade in & Fade Out Effects to Video in Filmora
If you’re using the latest version of Filmora, there’re several ways you can use to fade in and fade out clips. If you haven’t installed Filmora yet, click the button below to start.
1. Add Dissolve Transitions to Video to Fade in and Fade out Video Footage
The first way to fade in and fade out the footage in Filmora is by applying dissolve transition. The dissolve, also called lap dissolve sometimes, is a gradual transition from one image to another. It is often used when the first image starts to disappear and the next image starts to display gradually.
So you can apply Dissolve transition at the beginning of the video from a black screen to fade in, and add dissolve transition at the end of the clip into the blackness to fade out.
Here is how to add dissolve transition in Filmora.
- After importing video footage into Filmora, drag and drop them in the timeline.
- Go to the Transition tab and find Dissolve under the Basic category. If you didn’t see it, you can use the search bar to find it.

- Drag the Dissolve transition to the beginning part of the clip, and then drag the Dissolve transition again to the end of the clip.
Besides applying Dissolve transition to fade video, you can also try the Fade or transitions under Ripple & Dissolve category such as Dispersion blur, evaporate, ripple, wind, swirl, or wave.
Parental Control Software
- You can adjust the duration of the Dissolve transition to get a better result.
You can learn more about Dissolve transition at our guide How to add Dissolve Transitions in Filmora .
2. Apply Fade Motion Effects to Video
Besides the regular dissolve and fade transitions, you can also apply motion fade effect to make your footage more vivid. Here is how to apply the motion fade effect to video in Filmora.
- Click the clip in the timeline and then switch to the Animation tab, scroll down and you will see the Preset Motions (Legacy) option in the Preset tab.

- Expand it and you will find that there are several fade effects available, such as fade-zoom in, fade-zoom out, fade slide from top to bottom, fade slide from bottom to top, fade from left to right, or fade right to left.
- Double click on the fade effect that you want to use and the fade motion effect will be added to the clip automatically.
3. Add Sample Colors at the beginning and end of the video clip
In case that you don’t want to hide any frames in your video, you can add a black screen or blue screen or whatever color screen at the beginning and end of the clip first, and then apply Dissolve or fade transitions or motion fade effect.
We’ve made a video tutorial about how to fade in and fade out video easily in Filmora. The video is made with the previous Filmora version, but the steps are similar.
4. Using Animation Keyframing to Create Fade Effects
There is an animation keyframing feature available for versions after Filmora 10.0. This feature is perfect for adding fade-in and fade-out effects for users who want more control over the opacity and duration in fading.
Here are the steps of adding animation keyframing to fade videos.
Double click on the video footage in the timeline, and then go to the Animation tab.
Here are Preset and Customize options available, in order to create a fade effect, click the Customize option and you will see the screen like below:
Move the playhead in the timeline and then click the Add button accordingly, and then adjust the Opacity slider to make a fade effect.
So easy, isn’t it? You can now download the software and make fade-in and fade-out effects with the animation keyframing in Filmora. You can read on to unlock more creative usage of the animation keyframing .
Besides fade-in and fade-out videos, Filmora can fade in and fade out audio easily. Check the details in our guide about how to fade in and fade out audio in Filmora or watch the video tutorial below.
YouTuber Aaron Bowman has made a tutorial about the Filmora transitions, explaining how to add fade in fade out effects to videos, control the duration of transitions, as well as how to use the keyframing animations to create transitions.
Max Wales
Max Wales is a writer and a lover of all things video.
Follow @Max Wales
Max Wales
Mar 27, 2024• Proven solutions
The fade-in effect is commonly used to slowly introduce a shot to a viewer but it can also be used to make the transition between two shots much smoother, especially when combined with the fade-out effect that is often used to conclude a shot or suggest the end of a sequence or the entire video clip.
You may already know that professional video editing software packages , like Adobe Premiere, enable its users to add fade-in and fade-out effects to videos, but in this article, we are going to show you how to create add fade-in and fade-out effects to videos in easier ways. So let’s explore the steps you’ll need to take in order to add these effects to your videos.
4 Ways to Add Fade in & Fade Out Effects to Video in Filmora
If you’re using the latest version of Filmora, there’re several ways you can use to fade in and fade out clips. If you haven’t installed Filmora yet, click the button below to start.
1. Add Dissolve Transitions to Video to Fade in and Fade out Video Footage
The first way to fade in and fade out the footage in Filmora is by applying dissolve transition. The dissolve, also called lap dissolve sometimes, is a gradual transition from one image to another. It is often used when the first image starts to disappear and the next image starts to display gradually.
So you can apply Dissolve transition at the beginning of the video from a black screen to fade in, and add dissolve transition at the end of the clip into the blackness to fade out.
Here is how to add dissolve transition in Filmora.
- After importing video footage into Filmora, drag and drop them in the timeline.
- Go to the Transition tab and find Dissolve under the Basic category. If you didn’t see it, you can use the search bar to find it.
- Drag the Dissolve transition to the beginning part of the clip, and then drag the Dissolve transition again to the end of the clip.
Besides applying Dissolve transition to fade video, you can also try the Fade or transitions under Ripple & Dissolve category such as Dispersion blur, evaporate, ripple, wind, swirl, or wave.
- You can adjust the duration of the Dissolve transition to get a better result.
You can learn more about Dissolve transition at our guide How to add Dissolve Transitions in Filmora .
2. Apply Fade Motion Effects to Video
Besides the regular dissolve and fade transitions, you can also apply motion fade effect to make your footage more vivid. Here is how to apply the motion fade effect to video in Filmora.
- Click the clip in the timeline and then switch to the Animation tab, scroll down and you will see the Preset Motions (Legacy) option in the Preset tab.
- Expand it and you will find that there are several fade effects available, such as fade-zoom in, fade-zoom out, fade slide from top to bottom, fade slide from bottom to top, fade from left to right, or fade right to left.
- Double click on the fade effect that you want to use and the fade motion effect will be added to the clip automatically.
 SwifDoo PDF Perpetual (1 PC) Free upgrade. No monthly fees ever.
3. Add Sample Colors at the beginning and end of the video clip
In case that you don’t want to hide any frames in your video, you can add a black screen or blue screen or whatever color screen at the beginning and end of the clip first, and then apply Dissolve or fade transitions or motion fade effect.
We’ve made a video tutorial about how to fade in and fade out video easily in Filmora. The video is made with the previous Filmora version, but the steps are similar.
 vMix Basic HD - Software based live production. vMix Basic HD includes 4 inputs, 3 cameras, streaming, recording, playlist.
4. Using Animation Keyframing to Create Fade Effects
There is an animation keyframing feature available for versions after Filmora 10.0. This feature is perfect for adding fade-in and fade-out effects for users who want more control over the opacity and duration in fading.
Here are the steps of adding animation keyframing to fade videos.
Double click on the video footage in the timeline, and then go to the Animation tab.
Here are Preset and Customize options available, in order to create a fade effect, click the Customize option and you will see the screen like below:
Move the playhead in the timeline and then click the Add button accordingly, and then adjust the Opacity slider to make a fade effect.
So easy, isn’t it? You can now download the software and make fade-in and fade-out effects with the animation keyframing in Filmora. You can read on to unlock more creative usage of the animation keyframing .
Besides fade-in and fade-out videos, Filmora can fade in and fade out audio easily. Check the details in our guide about how to fade in and fade out audio in Filmora or watch the video tutorial below.
 Project Manager - Asset Browser for 3Ds Max
YouTuber Aaron Bowman has made a tutorial about the Filmora transitions, explaining how to add fade in fade out effects to videos, control the duration of transitions, as well as how to use the keyframing animations to create transitions.
Max Wales
Max Wales is a writer and a lover of all things video.
Follow @Max Wales
- Title: [Updated] 2024 Approved Smooth Segmentation 4 Easy Fades Explained
- Author: Virginia Woolf
- Created at : 2024-08-03 18:03:21
- Updated at : 2024-08-04 18:03:21
- Link: https://visual-screen-recording.techidaily.com/updated-2024-approved-smooth-segmentation-4-easy-fades-explained/
- License: This work is licensed under CC BY-NC-SA 4.0.