![[New] Top Microphones for iDevices & Their Benefits Explained](https://thmb.techidaily.com/84ba87eddab3e368851899b58852311f605514d50db5d45ec6de18d3ab0b6cd6.jpg)
[New] Top Microphones for iDevices & Their Benefits Explained
Top Microphones for iDevices & Their Benefits Explained
Mac computers are very capable and powerful computing devices. Besides various things you already know the Mac can perform, do you know how to record the audio in Mac easily? In the following paragraphs, we will help you learn the steps of Voice recorder mac, recording voice on Mac, and even discussing how to record audio from various computers. The singer and audio recorder are natively available features on the MacBook Pro, MacBook Air, and MacBook.
When you are ready enough to record voice on mac, you can quickly get a stock app that comes on your computer. Recording the audio with the stock app requires no extra software from third-party vendors and usually no downloads. Let’s check out how to record voice on mac.
1. Record voice on Mac with QuickTime
Quick time is a perfect tool to create the video tutorial of the application. You can even record the voice and audio for your videos and it further allows you to record the part of a screen. Along with QuickTime, you can even trim out the length of the video clips or even combine different fasteners in a single movie as you prefer.
The Quick time is a kind of go-to option for the videos which you have recorded with the smartphone but might not fare well with the obscure formats and downloaded videos.
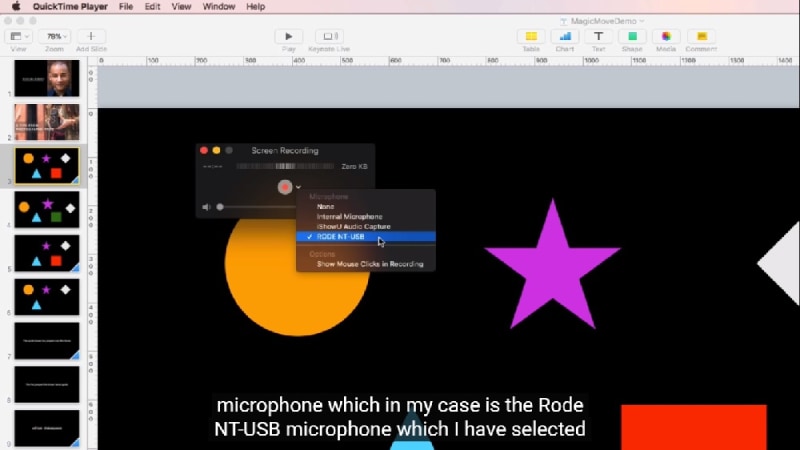
Now, to create the audio recording with QuickTime Player, you will need to follow the listed steps:-
**Step 1:-**You will have to open up the QuickTime Player from Launchpad.
Step 2:- Take your cursor to the top of your desktop screen and select the “File” from the menu bar.
Step 3:- Click on the “New Audio Recording “ from the drop-down menu bar to open up the audio recording panel.
Step 4:- Click on the Red “Record” option to start a new audio recording.
Step 5:- Click on the “Stop” button when you have completed the audio recording.
Step 6:- Click on the “X” button in the top corner of the panel for displaying the delete and save option for the audio file.
Step 7:- In pop-up options, you can even delete a file by clicking the “Delete” button, or you can save this on the computer. For saving up this file, you will have to enter the name in the “Export As” text field and choose some storage location on the device for using the “Where” option and click on the “Save” option.

2. Use Voice memo to record Mac sound
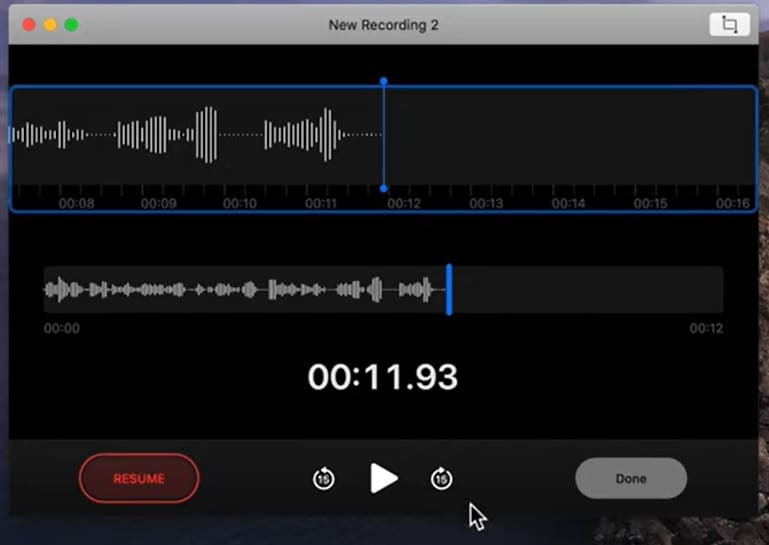
Voice Memo is one of the old features such as dictation machines and is a built-in app of Apple. It does precisely say on time. Of course, it will not give you the transcription, such as some other apps in the roundup, but it also has someplace. It even allows recording the voice memo as an audio file on the Mac device. You can opt to use the Voice memo on mac for recording the information, interviews, thoughts, and more audio format.
Let’s check out How to record voice in mac:-
Step 1:- Place the cursor at the bottom of the desktop for opening up the taskbar.
**Step 2:**On the taskbar, click on Launchpad to view all MacBook apps.
Step 3:- From displayed options, you can locate and then click on the Voice Memos app.
Step 4:- Once you open the app, click on the “Red button to start recording the voice memo.
Step 5:- Click on the “Pause” button on the bottom left corner of the screen to pause the active recording. Then, click upon the same button for resuming the recording.
Step 6:- After you start recording the audio, click on the “Done” button in the bottom corner of the screen for saving this audio.
3. Record voice with GarageBand on Mac
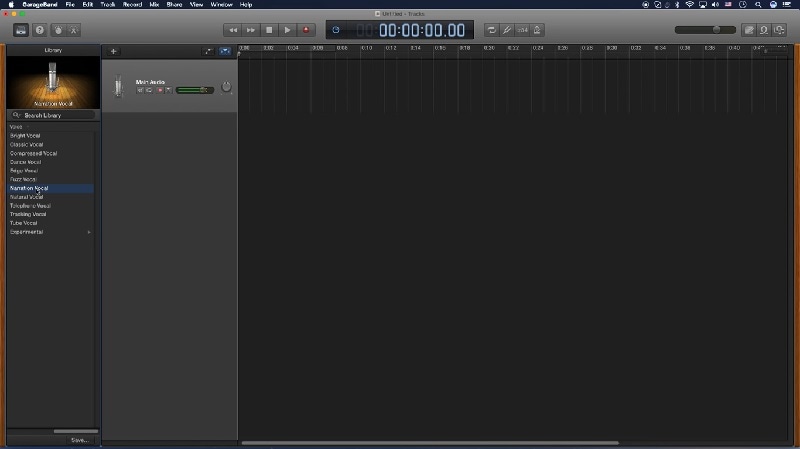
Debuted in 2004, GarageBand has come over as a tool that kind of changed the path of Mac users when it came to the creation part and to also performing part of their music ever since. When it comes to GarageBand files, they can be easily exported in a plethora of formats.
You can also opt to share them in podcasts using your device like iPad, iPhone, iPod, and more, which is sent via email or so. Moreover, GarageBand is able to record various audio tracks along with the filters. Now, this helps in simulating as well as sampling instruments to simplify voice recordings.
Step 1: Check out the equipment’s connection. First, check out that you are correctly set up and very comfortable recording. It is best to make sure you can quickly get to the computer.
Step 2: Create the New project on GarageBand. Once you are finished with the setup, you can launch GarageBand and choose the Empty Project.
Step 3: Select the correct input and output devices. You will be going to check whether the GarageBand picks up the mic, and you can hear everything. For doing this, you will have to visit GarageBand, then Preferences, and then Audio/MIDI Or Audio.
Step 4: Set up the input monitoring and enable the record option. Now you will have to configure the vocal channel to ensure that you record the best take that captures the right sound you are searching for. Useful options which you can enable you are looking for. A practical choice that you might allow if you love it.
Step 5: Select and then opt for adjusting the “Vocal” Preset. Now, you must look at selecting the “Vocal” preset. Various presets might change EQ and also add the effects to the vocals. You might choose the “Vocal” preset and can do it by choosing Voice in Sound library and selecting various song presets’ list.
Step 6: Opt for theaddition of the backing track. For recording with the use of the chosen backing track, you can opt for clicking and then dragging any chosen track that you might have from the other folder in GarageBand. The new way must automatically form, and you might even create tracks. Now, you can opt for that with the use of this command: Cmd+Option+N.
4. Use Audacity to record macOS sound
Audacity is very useful for various projects, including making short films, voiceovers, and YouTube videos for multiple platforms. Various people with multiple expertise levels can also use it, and it can even solve many problems in audio manipulation easily. Mac record voice can be done in the following steps.

Opt for the Loopback Cables:-
- When it comes to using the Loopback cables, ensure one thing and that is muting all the PC sounds. You can use these cable for recording the audio that’s played from the device i.e. Mac.
- Now, opt to plug the end of a loopback cable in output & input jacks. Starting from here, you can open up your Apple menu, choose System preference, and then visit Sound Preference.
- Under the output section, choose Line Out, and under input, you can choose Line Input.
- Next, you have to opt for adjusting the input vol. slider, and the input slider gets light up along with audio playing.
- After this, you can opt for opening Audacity. Now, go for transport options, and turn off the Software playthrough.
5. Record audio on Mac with Filmora
Did you ever think of recording the voice to the video and making some voiceover demo to share and upload on the social network website or creating a documentary for crucial stuff? You can even do this with nice video software such as Wondershare Filmora Video Editor. However, in most cases, it is recommended for you to record a voiceover first, and then the sound will get more natural. So let’s start with how to record voice with Filmora.
For Win 7 or later (64-bit)
For macOS 10.12 or later

Step 1:- Connect the microphone to the computer. Plug the mic on the computer when you are ready to start. It is better to use a professional external mic for capturing good quality sound.
Step 2:- Record the Voice over. But installing the Filmora on the computer, click on Wondershare Filmora for launching it. In the starting interface, you can click upon New Project to create the new one. Then, you can go to the record tab and click on the “Record Voiceover” option for arousing audio windows.
You can click on the microphone icon, and you can get three seconds of the countdown for starting. When you are finished, you can click on the microphone again. You can see some new Record files to appear in the audio track automatically.
Step 3:- Edit the recorded voice to video. For editing the voiceover, you will have to click on the audio track, and a window will pop up for adjusting the settings of audio like Pitch, Volume, Speed of voiceover. You can even trim and cut out the unwanted section from the recorded voiceover and apply fade in and out effect to voiceover for a smooth transition.
FAQs
1. Which one is best for a MacBook?
All apps which are mentioned in the post are the best. But if you do not want any additional downloads with extra features, you can go for QuickTime.
2. How long can we record by using Voice Memo app?
Voice memos on machave no specific limit, but it also depends upon your device’s internal storage.
3. Can we record only audio?
You can create the audio recording with the QuickTime Player. In QuickTime Player, you can select the file and click on the new audio recording.
4. Does voice memo make noises?
When you are recording the audio on the device, various unnecessary noises can creep into the clips. Fortunately, a pre-installed Voice memo MacBook or iPhone might clean up the echo and background noise with a single tap.
So, in this article, we have discussed various apps, which can be used for recording the voice in a MacBook. You can easily record the voice with the apps and the given steps. So whether you are recording for your videos or online lectures, you can have all options ready for you. So why are you waiting for me? Just get into the work.
5. Record audio on Mac with Filmora
Did you ever think of recording the voice to the video and making some voiceover demo to share and upload on the social network website or creating a documentary for crucial stuff? You can even do this with nice video software such as Wondershare Filmora Video Editor. However, in most cases, it is recommended for you to record a voiceover first, and then the sound will get more natural. So let’s start with how to record voice with Filmora.
For Win 7 or later (64-bit)
For macOS 10.12 or later
 Video Converter Factory Pro
Step 1:- Connect the microphone to the computer. Plug the mic on the computer when you are ready to start. It is better to use a professional external mic for capturing good quality sound.
Step 2:- Record the Voice over. But installing the Filmora on the computer, click on Wondershare Filmora for launching it. In the starting interface, you can click upon New Project to create the new one. Then, you can go to the record tab and click on the “Record Voiceover” option for arousing audio windows.
You can click on the microphone icon, and you can get three seconds of the countdown for starting. When you are finished, you can click on the microphone again. You can see some new Record files to appear in the audio track automatically.
Step 3:- Edit the recorded voice to video. For editing the voiceover, you will have to click on the audio track, and a window will pop up for adjusting the settings of audio like Pitch, Volume, Speed of voiceover. You can even trim and cut out the unwanted section from the recorded voiceover and apply fade in and out effect to voiceover for a smooth transition.
FAQs
1. Which one is best for a MacBook?
All apps which are mentioned in the post are the best. But if you do not want any additional downloads with extra features, you can go for QuickTime.
2. How long can we record by using Voice Memo app?
Voice memos on machave no specific limit, but it also depends upon your device’s internal storage.
3. Can we record only audio?
You can create the audio recording with the QuickTime Player. In QuickTime Player, you can select the file and click on the new audio recording.
4. Does voice memo make noises?
When you are recording the audio on the device, various unnecessary noises can creep into the clips. Fortunately, a pre-installed Voice memo MacBook or iPhone might clean up the echo and background noise with a single tap.
So, in this article, we have discussed various apps, which can be used for recording the voice in a MacBook. You can easily record the voice with the apps and the given steps. So whether you are recording for your videos or online lectures, you can have all options ready for you. So why are you waiting for me? Just get into the work.
- Title: [New] Top Microphones for iDevices & Their Benefits Explained
- Author: Virginia Woolf
- Created at : 2024-07-24 12:18:30
- Updated at : 2024-07-25 12:18:30
- Link: https://visual-screen-recording.techidaily.com/new-top-microphones-for-idevices-and-their-benefits-explained/
- License: This work is licensed under CC BY-NC-SA 4.0.