![[New] Streamline Screen-Recording Processes During FaceTime](https://thmb.techidaily.com/0f399835ae801930fc09d856b55526ca68007b6aa28f7cfc8442056063114a14.jpg)
"[New] Streamline Screen-Recording Processes During FaceTime"
Streamline Screen-Recording Processes During FaceTime
Wondering how to record FaceTime on your device to keep the precious moments with you for lifetime? FaceTime is the most popular app among iPhone and Mac users for audio and video calling their contacts. There are going to be times when you may want to record your FaceTime sessions for future references. However, FaceTime does not have an inbuilt screen recorder to record FaceTime calls. This makes Apple users question “Can you record a FaceTime call?”
If you are a Mac user, you can use Mac Screenshot tool. You can also use QuickTime Player for FaceTime record. But we recommend Wondershare Filmora on Mac for proper recording of your FaceTime calls. For iPhone users, you can either use the inbuilt screen recorder or you can record your iPhone screen through your Mac. In this article, we will illustrate how to record FaceTime with audio.
Part 1. How to Record FaceTime on Mac
Part 2. How to Record FaceTime on iPhone
Part 1. How to Record FaceTime on Mac
Way 1. Use Mac Screen Recorder Tool
If your Mac is running on the latest version of macOS, you should be aware of the presence of an inbuilt screen recorder tool. You can use the tool to screen record FaceTime with audio without any issue. This is advantageous because there is no need for installing any external software. Here are the steps you have to follow on how to record FaceTime calls with mac screen recorder tool.
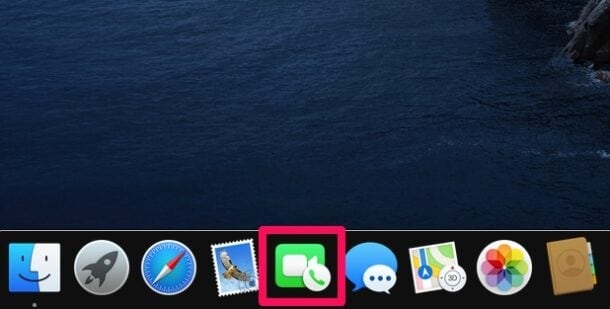
Step 1: Open FaceTime app on your Mac and be ready to make a FaceTime call.

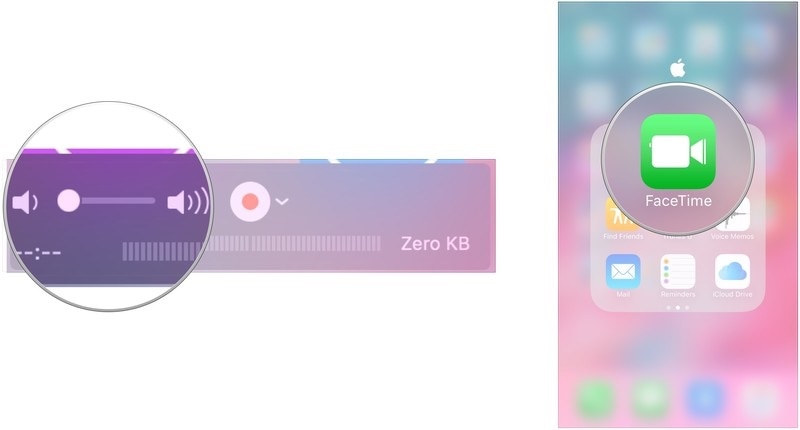
Step 2: Press Command + Shift + 5 keys together. This will launch the inbuilt screen recorder tool.
Step 3: Drag the selection to get the recording screen dimensions correct and click on Record Selected Portion.
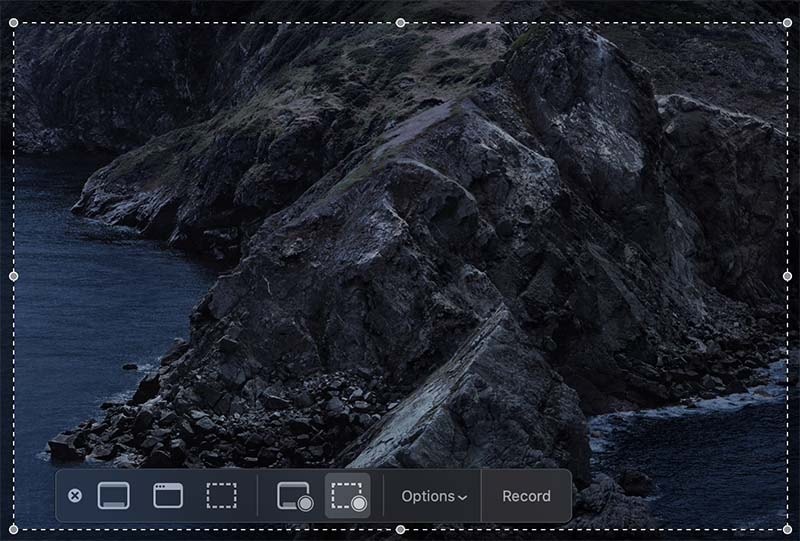
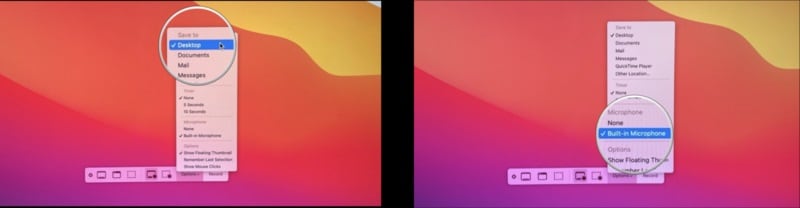
Step 4: Click on Options and select audio source and the destination to save the recorded video.
Step 5: Finally, click on Record button.
Step 6: Go to FaceTime app and begin your FaceTime call and the recording is going on in the background. Once you are done, click on Stop button as shown below.

company, user or members of the same household. Action! - screen and game recorder</a>

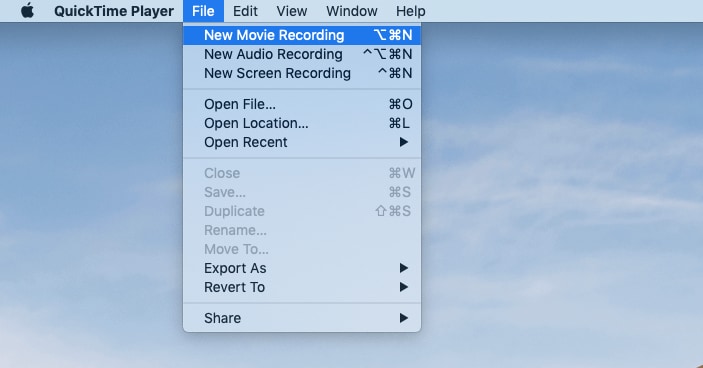
Way 2. Use QuickTime Player
If you have an older version of macOS and the inbuilt screen recorder tool is not available, you can use QuickTime Player to record FaceTime. QuickTime Player comes pre-installed on Mac and it is the default media player. However, it is more than just a media player as it lets you record your screen activities including FaceTime calls. Here are the steps on how to record a FaceTime call.
Step 1: Launch QuickTime Player.
Step 2: Go to File> New Screen Recording option.


Step 3: You can start recording anytime you want by pressing the Record button.
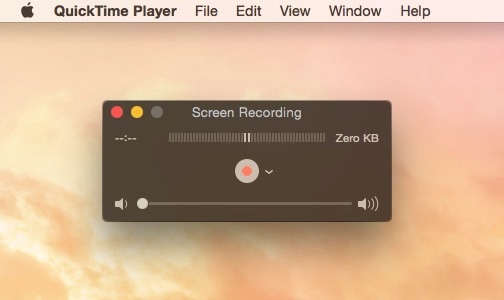
But make sure that you sound source is selected as Internal Microphone. This is the solution on how to screen record FaceTime with sound using QuickTime.
Step 4: Go to FaceTime app and start your FaceTime call.
Step 5: Once you are done recording, press the Stop button.
Step 6: You can go to File> Save option to save the recorded video file.
Way 3. Use Wondershare Filmora Recorder
There are times when QuickTime screen record FaceTime with audio fails to record the audio conversation. Besides, recording with QuickTime can make the FaceTime call lag a little bit. If you are facing any such issue, we recommend Wondershare Filmora to record your FaceTime calls on Mac. Filmora is a great screen recorder for PC and Mac . You can do any video recording including your webcam and edit the recorded video as per your requirements. Here are the steps on how to record FaceTimes with audio using Filmora.
Step 1: Download and install Wondershare Filmora on your Mac.
For Win 7 or later (64-bit)
For macOS 10.12 or later
Step 2: Launch the application and click on New Project.

Step 3: Go to Record > Record PC Screen option.
Step 4: Set screen size as per FaceTime application window that you want to record. Make sure to turn on Microphone option. This is how to screenrecord FaceTime with sound.

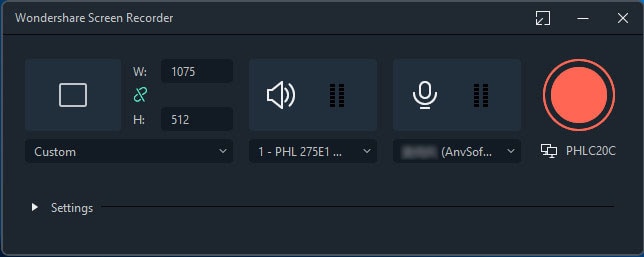
Step 5: Open FaceTime app and prepare for FaceTime call. Click on the Record button to start recording the screen.
You will get a few buffer seconds to start your FaceTime call after which the recording will start.
Step 6: Click on Stop button to stop recording whenever it is done.
Part 2. How to Record FaceTime on iPhone
There are many who ask the common question “Can you screen record FaceTime on iPhone?” The answer is yes and the steps are very easy if your iPhone has iOS 11 or higher. Otherwise, you can record your iPhone screen through your Mac as well. Here are the

Way 1. iPhone Screen Recording Feature
Most users make FaceTime calls from their iPhones. Recording FaceTime video calls has been an issue and finally, the issue is resolved by Apple as they have included an inbuilt screen recording feature from iOS 11 onwards. Therefore, if your iPhone runs on iOS 11 or above, you can record your FaceTime call with iPhone screen recording feature. Here are the steps to record FaceTime calls on iPhone.

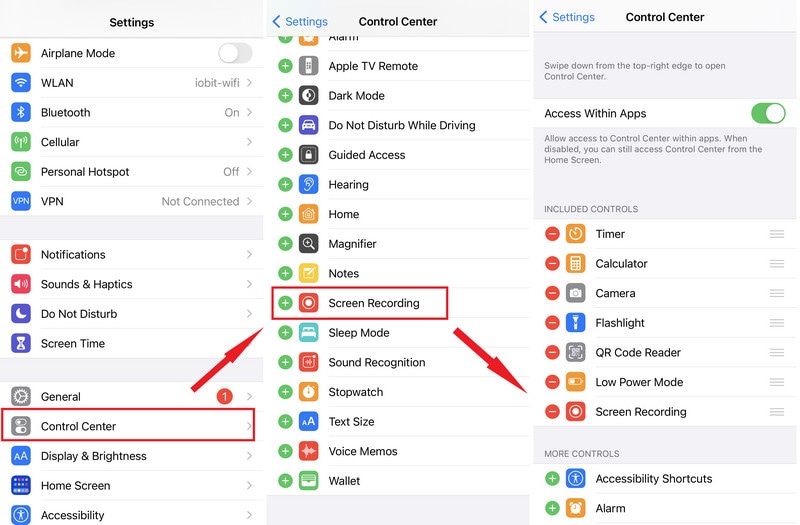
Step 1: Go to Settings> Control Centre.
Step 2: Enable Screen Recording option.
Step 3: Open FaceTime and prepare for the video call.
Step 4: Open Control Centre on your iPhone by swiping action.
Step 5: Tap on Screen Recording icon. Start your FaceTime call and it will be recorded in the background.
Once you are done, tap on Stop and the recorded video will be saved in iPhone Photos.
Way 2. Record iPhone Screen Through Mac
If your iPhone is running on an older version of iOS, you can still record your FaceTime video call with audio. For that, you need to connect your iPhone to your Mac and while you make the FaceTime call on your iPhone, it will be recorded through Mac. We will be using QuickTime Player on Mac to record your FaceTime call on iPhone. Here are the steps to follow rigorously.
Step 1: Connect your iPhone to your Mac through Lightning cable.
Step 2: Open QuickTime on your Mac and go to File> New Movie Recording.
Step 3: Click on Arrow icon beside Record button and under Camera section, select your iPhone. Your iPhone display should now be mirroring on Mac.
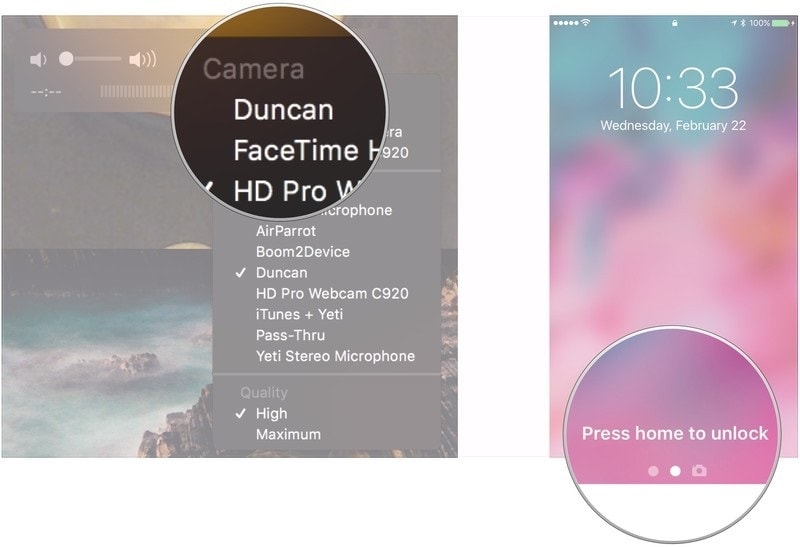
Step 4: Turn up the volume on QuickTime. Click on Record button to start recording.
 Power Tools add-on for Google Sheets, 12-month subscription
Step 5: Open FaceTime on iPhone and make the video call. Your video call is getting recorded on your mac through QuickTime.
Step 6: Once you are done, click on Stop button to stop recording. Go to File> Save option to save the recording on your device storage.
The Bottom Line
Hopefully, you have the answer to your question “Can you record FaceTime on Mac or iPhone?” The steps to record FaceTime get easier when you have the latest macOS and iOS installed on your respective devices. This is because of the presence of inbuilt screen recording feature. For Mac, we recommend Filmora for flawless and high-quality FaceTime call recording. iPhone users can record their iPhone FaceTime screen through their Mac as well.
Part 2. How to Record FaceTime on iPhone
Part 1. How to Record FaceTime on Mac
Way 1. Use Mac Screen Recorder Tool
If your Mac is running on the latest version of macOS, you should be aware of the presence of an inbuilt screen recorder tool. You can use the tool to screen record FaceTime with audio without any issue. This is advantageous because there is no need for installing any external software. Here are the steps you have to follow on how to record FaceTime calls with mac screen recorder tool.
Step 1: Open FaceTime app on your Mac and be ready to make a FaceTime call.
Step 2: Press Command + Shift + 5 keys together. This will launch the inbuilt screen recorder tool.
Step 3: Drag the selection to get the recording screen dimensions correct and click on Record Selected Portion.
Step 4: Click on Options and select audio source and the destination to save the recorded video.
Step 5: Finally, click on Record button.
Step 6: Go to FaceTime app and begin your FaceTime call and the recording is going on in the background. Once you are done, click on Stop button as shown below.

Way 2. Use QuickTime Player
If you have an older version of macOS and the inbuilt screen recorder tool is not available, you can use QuickTime Player to record FaceTime. QuickTime Player comes pre-installed on Mac and it is the default media player. However, it is more than just a media player as it lets you record your screen activities including FaceTime calls. Here are the steps on how to record a FaceTime call.
Step 1: Launch QuickTime Player.
Step 2: Go to File> New Screen Recording option.
Step 3: You can start recording anytime you want by pressing the Record button.

But make sure that you sound source is selected as Internal Microphone. This is the solution on how to screen record FaceTime with sound using QuickTime.
Step 4: Go to FaceTime app and start your FaceTime call.
Step 5: Once you are done recording, press the Stop button.
Step 6: You can go to File> Save option to save the recorded video file.
Way 3. Use Wondershare Filmora Recorder
There are times when QuickTime screen record FaceTime with audio fails to record the audio conversation. Besides, recording with QuickTime can make the FaceTime call lag a little bit. If you are facing any such issue, we recommend Wondershare Filmora to record your FaceTime calls on Mac. Filmora is a great screen recorder for PC and Mac . You can do any video recording including your webcam and edit the recorded video as per your requirements. Here are the steps on how to record FaceTimes with audio using Filmora.
Step 1: Download and install Wondershare Filmora on your Mac.
For Win 7 or later (64-bit)
For macOS 10.12 or later
Step 2: Launch the application and click on New Project.
Step 3: Go to Record > Record PC Screen option.
Step 4: Set screen size as per FaceTime application window that you want to record. Make sure to turn on Microphone option. This is how to screenrecord FaceTime with sound.
Step 5: Open FaceTime app and prepare for FaceTime call. Click on the Record button to start recording the screen.
You will get a few buffer seconds to start your FaceTime call after which the recording will start.
Step 6: Click on Stop button to stop recording whenever it is done.
Part 2. How to Record FaceTime on iPhone
There are many who ask the common question “Can you screen record FaceTime on iPhone?” The answer is yes and the steps are very easy if your iPhone has iOS 11 or higher. Otherwise, you can record your iPhone screen through your Mac as well. Here are the
Way 1. iPhone Screen Recording Feature
Most users make FaceTime calls from their iPhones. Recording FaceTime video calls has been an issue and finally, the issue is resolved by Apple as they have included an inbuilt screen recording feature from iOS 11 onwards. Therefore, if your iPhone runs on iOS 11 or above, you can record your FaceTime call with iPhone screen recording feature. Here are the steps to record FaceTime calls on iPhone.
Step 1: Go to Settings> Control Centre.
Step 2: Enable Screen Recording option.
Step 3: Open FaceTime and prepare for the video call.
Step 4: Open Control Centre on your iPhone by swiping action.
Step 5: Tap on Screen Recording icon. Start your FaceTime call and it will be recorded in the background.
Once you are done, tap on Stop and the recorded video will be saved in iPhone Photos.
Way 2. Record iPhone Screen Through Mac
If your iPhone is running on an older version of iOS, you can still record your FaceTime video call with audio. For that, you need to connect your iPhone to your Mac and while you make the FaceTime call on your iPhone, it will be recorded through Mac. We will be using QuickTime Player on Mac to record your FaceTime call on iPhone. Here are the steps to follow rigorously.
Step 1: Connect your iPhone to your Mac through Lightning cable.
Step 2: Open QuickTime on your Mac and go to File> New Movie Recording.
Step 3: Click on Arrow icon beside Record button and under Camera section, select your iPhone. Your iPhone display should now be mirroring on Mac.
Step 4: Turn up the volume on QuickTime. Click on Record button to start recording.

Step 5: Open FaceTime on iPhone and make the video call. Your video call is getting recorded on your mac through QuickTime.
Step 6: Once you are done, click on Stop button to stop recording. Go to File> Save option to save the recording on your device storage.
The Bottom Line
Hopefully, you have the answer to your question “Can you record FaceTime on Mac or iPhone?” The steps to record FaceTime get easier when you have the latest macOS and iOS installed on your respective devices. This is because of the presence of inbuilt screen recording feature. For Mac, we recommend Filmora for flawless and high-quality FaceTime call recording. iPhone users can record their iPhone FaceTime screen through their Mac as well.
Part 2. How to Record FaceTime on iPhone
 NeoDownloader - Fast and fully automatic image/video/music downloader.
Part 1. How to Record FaceTime on Mac
Way 1. Use Mac Screen Recorder Tool
If your Mac is running on the latest version of macOS, you should be aware of the presence of an inbuilt screen recorder tool. You can use the tool to screen record FaceTime with audio without any issue. This is advantageous because there is no need for installing any external software. Here are the steps you have to follow on how to record FaceTime calls with mac screen recorder tool.
Step 1: Open FaceTime app on your Mac and be ready to make a FaceTime call.
 With Screensaver Wonder you can easily make a screensaver from your own pictures and video files. Create screensavers for your own computer or create standalone, self-installing screensavers for easy sharing with your friends. Together with its sister product Screensaver Factory, Screensaver Wonder is one of the most popular screensaver software products in the world, helping thousands of users decorate their computer screens quickly and easily.
Step 2: Press Command + Shift + 5 keys together. This will launch the inbuilt screen recorder tool.
Step 3: Drag the selection to get the recording screen dimensions correct and click on Record Selected Portion.
 DEX 3 RE is Easy-To-Use DJ Mixing Software for MAC and Windows Designed for Today’s Versatile DJ.
Mix from your own library of music, iTunes or use the Pulselocker subsciprtion service for in-app access to over 44 million songs. Use with over 85 supported DJ controllers or mix with a keyboard and mouse.
DEX 3 RE is everything you need without the clutter - the perfect 2-deck mixing software solution for mobile DJs or hard-core hobbiests.
PCDJ DEX 3 RE (DJ Software for Win & MAC - Product Activation For 3 Machines)
Step 4: Click on Options and select audio source and the destination to save the recorded video.
Step 5: Finally, click on Record button.
Step 6: Go to FaceTime app and begin your FaceTime call and the recording is going on in the background. Once you are done, click on Stop button as shown below.
If you have an older version of macOS and the inbuilt screen recorder tool is not available, you can use QuickTime Player to record FaceTime. QuickTime Player comes pre-installed on Mac and it is the default media player. However, it is more than just a media player as it lets you record your screen activities including FaceTime calls. Here are the steps on how to record a FaceTime call.
Step 1: Launch QuickTime Player.
Step 2: Go to File> New Screen Recording option.
Step 3: You can start recording anytime you want by pressing the Record button.
But make sure that you sound source is selected as Internal Microphone. This is the solution on how to screen record FaceTime with sound using QuickTime.
Step 4: Go to FaceTime app and start your FaceTime call.
Step 5: Once you are done recording, press the Stop button.
Step 6: You can go to File> Save option to save the recorded video file.
Way 3. Use Wondershare Filmora Recorder
There are times when QuickTime screen record FaceTime with audio fails to record the audio conversation. Besides, recording with QuickTime can make the FaceTime call lag a little bit. If you are facing any such issue, we recommend Wondershare Filmora to record your FaceTime calls on Mac. Filmora is a great screen recorder for PC and Mac . You can do any video recording including your webcam and edit the recorded video as per your requirements. Here are the steps on how to record FaceTimes with audio using Filmora.
Step 1: Download and install Wondershare Filmora on your Mac.
For Win 7 or later (64-bit)
For macOS 10.12 or later
Step 2: Launch the application and click on New Project.
Step 3: Go to Record > Record PC Screen option.
Step 4: Set screen size as per FaceTime application window that you want to record. Make sure to turn on Microphone option. This is how to screenrecord FaceTime with sound.
Step 5: Open FaceTime app and prepare for FaceTime call. Click on the Record button to start recording the screen.
You will get a few buffer seconds to start your FaceTime call after which the recording will start.
Step 6: Click on Stop button to stop recording whenever it is done.
 Software Update Pro - Check and update software installed on your computer.
Part 2. How to Record FaceTime on iPhone
There are many who ask the common question “Can you screen record FaceTime on iPhone?” The answer is yes and the steps are very easy if your iPhone has iOS 11 or higher. Otherwise, you can record your iPhone screen through your Mac as well. Here are the
 PCDJ Karaoki is the complete professional karaoke software designed for KJs and karaoke venues. Karaoki includes an advanced automatic singer rotation list with singer history, key control, news ticker, next singers screen, a song book exporter and printer, a jukebox background music player and many other features designed so you can host karaoke shows faster and easier!
Way 1. iPhone Screen Recording Feature
Most users make FaceTime calls from their iPhones. Recording FaceTime video calls has been an issue and finally, the issue is resolved by Apple as they have included an inbuilt screen recording feature from iOS 11 onwards. Therefore, if your iPhone runs on iOS 11 or above, you can record your FaceTime call with iPhone screen recording feature. Here are the steps to record FaceTime calls on iPhone.
Step 1: Go to Settings> Control Centre.
Step 2: Enable Screen Recording option.
Step 3: Open FaceTime and prepare for the video call.
Step 4: Open Control Centre on your iPhone by swiping action.
Step 5: Tap on Screen Recording icon. Start your FaceTime call and it will be recorded in the background.
Once you are done, tap on Stop and the recorded video will be saved in iPhone Photos.
Way 2. Record iPhone Screen Through Mac
If your iPhone is running on an older version of iOS, you can still record your FaceTime video call with audio. For that, you need to connect your iPhone to your Mac and while you make the FaceTime call on your iPhone, it will be recorded through Mac. We will be using QuickTime Player on Mac to record your FaceTime call on iPhone. Here are the steps to follow rigorously.
Step 1: Connect your iPhone to your Mac through Lightning cable.
Step 2: Open QuickTime on your Mac and go to File> New Movie Recording.
Step 3: Click on Arrow icon beside Record button and under Camera section, select your iPhone. Your iPhone display should now be mirroring on Mac.
Step 4: Turn up the volume on QuickTime. Click on Record button to start recording.

Step 5: Open FaceTime on iPhone and make the video call. Your video call is getting recorded on your mac through QuickTime.
Step 6: Once you are done, click on Stop button to stop recording. Go to File> Save option to save the recording on your device storage.
The Bottom Line
Hopefully, you have the answer to your question “Can you record FaceTime on Mac or iPhone?” The steps to record FaceTime get easier when you have the latest macOS and iOS installed on your respective devices. This is because of the presence of inbuilt screen recording feature. For Mac, we recommend Filmora for flawless and high-quality FaceTime call recording. iPhone users can record their iPhone FaceTime screen through their Mac as well.
Part 2. How to Record FaceTime on iPhone
Part 1. How to Record FaceTime on Mac
Way 1. Use Mac Screen Recorder Tool
If your Mac is running on the latest version of macOS, you should be aware of the presence of an inbuilt screen recorder tool. You can use the tool to screen record FaceTime with audio without any issue. This is advantageous because there is no need for installing any external software. Here are the steps you have to follow on how to record FaceTime calls with mac screen recorder tool.
Step 1: Open FaceTime app on your Mac and be ready to make a FaceTime call.
Step 2: Press Command + Shift + 5 keys together. This will launch the inbuilt screen recorder tool.
Step 3: Drag the selection to get the recording screen dimensions correct and click on Record Selected Portion.
 dotConnect for Oracle is an ADO.NET data provider for Oracle with Entity Framework Support.
Step 4: Click on Options and select audio source and the destination to save the recorded video.
Step 5: Finally, click on Record button.
Step 6: Go to FaceTime app and begin your FaceTime call and the recording is going on in the background. Once you are done, click on Stop button as shown below.
 SwifDoo PDF 2-Year Plan
Way 2. Use QuickTime Player
If you have an older version of macOS and the inbuilt screen recorder tool is not available, you can use QuickTime Player to record FaceTime. QuickTime Player comes pre-installed on Mac and it is the default media player. However, it is more than just a media player as it lets you record your screen activities including FaceTime calls. Here are the steps on how to record a FaceTime call.
Step 1: Launch QuickTime Player.
Step 2: Go to File> New Screen Recording option.
Step 3: You can start recording anytime you want by pressing the Record button.
But make sure that you sound source is selected as Internal Microphone. This is the solution on how to screen record FaceTime with sound using QuickTime.
Step 4: Go to FaceTime app and start your FaceTime call.
Step 5: Once you are done recording, press the Stop button.
Step 6: You can go to File> Save option to save the recorded video file.

Way 3. Use Wondershare Filmora Recorder
There are times when QuickTime screen record FaceTime with audio fails to record the audio conversation. Besides, recording with QuickTime can make the FaceTime call lag a little bit. If you are facing any such issue, we recommend Wondershare Filmora to record your FaceTime calls on Mac. Filmora is a great screen recorder for PC and Mac . You can do any video recording including your webcam and edit the recorded video as per your requirements. Here are the steps on how to record FaceTimes with audio using Filmora.
Step 1: Download and install Wondershare Filmora on your Mac.
For Win 7 or later (64-bit)
For macOS 10.12 or later
Step 2: Launch the application and click on New Project.
Step 3: Go to Record > Record PC Screen option.
Step 4: Set screen size as per FaceTime application window that you want to record. Make sure to turn on Microphone option. This is how to screenrecord FaceTime with sound.
Step 5: Open FaceTime app and prepare for FaceTime call. Click on the Record button to start recording the screen.
You will get a few buffer seconds to start your FaceTime call after which the recording will start.
Step 6: Click on Stop button to stop recording whenever it is done.
Part 2. How to Record FaceTime on iPhone
There are many who ask the common question “Can you screen record FaceTime on iPhone?” The answer is yes and the steps are very easy if your iPhone has iOS 11 or higher. Otherwise, you can record your iPhone screen through your Mac as well. Here are the
Way 1. iPhone Screen Recording Feature
Most users make FaceTime calls from their iPhones. Recording FaceTime video calls has been an issue and finally, the issue is resolved by Apple as they have included an inbuilt screen recording feature from iOS 11 onwards. Therefore, if your iPhone runs on iOS 11 or above, you can record your FaceTime call with iPhone screen recording feature. Here are the steps to record FaceTime calls on iPhone.

Step 1: Go to Settings> Control Centre.
Step 2: Enable Screen Recording option.
Step 3: Open FaceTime and prepare for the video call.
Step 4: Open Control Centre on your iPhone by swiping action.
Step 5: Tap on Screen Recording icon. Start your FaceTime call and it will be recorded in the background.
Once you are done, tap on Stop and the recorded video will be saved in iPhone Photos.
Way 2. Record iPhone Screen Through Mac
If your iPhone is running on an older version of iOS, you can still record your FaceTime video call with audio. For that, you need to connect your iPhone to your Mac and while you make the FaceTime call on your iPhone, it will be recorded through Mac. We will be using QuickTime Player on Mac to record your FaceTime call on iPhone. Here are the steps to follow rigorously.
Step 1: Connect your iPhone to your Mac through Lightning cable.
Step 2: Open QuickTime on your Mac and go to File> New Movie Recording.
 Forex Robotron Basic Package
Step 3: Click on Arrow icon beside Record button and under Camera section, select your iPhone. Your iPhone display should now be mirroring on Mac.
Step 4: Turn up the volume on QuickTime. Click on Record button to start recording.
Step 5: Open FaceTime on iPhone and make the video call. Your video call is getting recorded on your mac through QuickTime.
Step 6: Once you are done, click on Stop button to stop recording. Go to File> Save option to save the recording on your device storage.

The Bottom Line
Hopefully, you have the answer to your question “Can you record FaceTime on Mac or iPhone?” The steps to record FaceTime get easier when you have the latest macOS and iOS installed on your respective devices. This is because of the presence of inbuilt screen recording feature. For Mac, we recommend Filmora for flawless and high-quality FaceTime call recording. iPhone users can record their iPhone FaceTime screen through their Mac as well.
- Title: [New] Streamline Screen-Recording Processes During FaceTime
- Author: Virginia Woolf
- Created at : 2024-07-24 13:17:31
- Updated at : 2024-07-25 13:17:31
- Link: https://visual-screen-recording.techidaily.com/new-streamline-screen-recording-processes-during-facetime/
- License: This work is licensed under CC BY-NC-SA 4.0.