![[New] Smooth Video Capture with Your Laptop's Webcam](https://thmb.techidaily.com/b77f4a1b111b54e2805878ed9aa3d1afc9409a9f5cc36ff257194dcf6821d1ac.jpg)
[New] Smooth Video Capture with Your Laptop's Webcam
Smooth Video Capture with Your Laptop’s Webcam
How to Record Webcam Video on HP Laptops and Chromebooks?


Max Wales
Mar 27, 2024• Proven solutions
Most of us now take webcams for granted. Yet, webcams are fantastic tools that have quickly become essential components in our digital lives. They serve several purposes, from taking still images to sending or recording live videos. Most HP laptops have built-in webcams. However, a lot of people have difficulties accessing their webcams. Furthermore, if you are running on Windows 7, or using an HP Chromebook, there is no built-in webcam recording software.
In this article, we will help you navigate these issues and learn how to record video on HP laptops running on Windows 7 and Chromebooks.
![]()

The All-in-One Screen Recorder & Video Editor
- Record desktop screen, voiceover, and webcam simultaneously
- Edit recorded clips quickly with a wide range of professional tools
- Built-in plentiful templates and effects
- Export to MP4, MOV, MKV, GIF and multiple formats
For Win 7 or later (64-bit)
For macOS 10.12 or later  Secure Download
How to Use the HP Laptop Webcam to Record Video?
To use the webcam built-in HP laptop, you need to make sure that you have the HP MediaSmart Software installed as well as the latest webcam driver.
The MediaSmart software is pre-installed on most HP laptops. But we recommend you download and install the most up-to-date version of the MediaSmart Software and the driver here using your laptop’s model number which can be found on the product sticker at the bottom of your laptop. Remember to reboot the computer after installing the latest driver.
1. Enable HP MediaSmart Webcam Feature
Launch the MediaSmart software webcam feature by double-clicking on the MediaSmart icon. Then select the webcam icon from the MediaSmart taskbar.
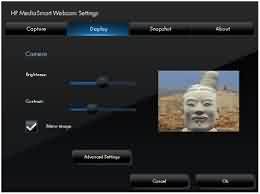
2. Adjust Settings
Adjust the webcam settings by selecting Settings on the right-hand side of the MediaSmart Webcam window. Here you can adjust the display settings such as brightness and contrast, and video capture quality as well.
You can also use the Advanced Settings tab to make further adjustments. After you have made all your adjustments, click OK to save your settings.
3. Record Webcam Videos
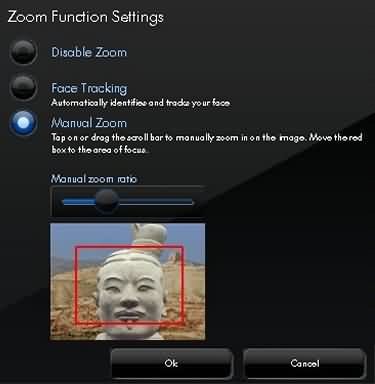
HP’s MediaSmart webcam is easy to use. Click Capture to record a video and once you are finished click Stop. Audio will be automatically recorded if you set up capture with audio in Advanced Settings.
Using the Zoom Function Settings, you can use Face Tracking to automatically track your face. Or, you can either Disable Zoom or use Manual Zoom to zoom in as you like.
Click OK to save the adjustments and continue.

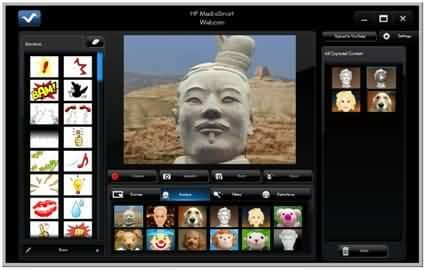
4.Add Effects and Filters
There are also a series of special effect tools you can use to make your video recordings more fun. You can add frames and filters to the recorded webcam video or draw on the video. The MediaSmart webcam also provides avatars, emotions and distortion effects which are very popular for making creative videos. If you want to remove an effect from your recorded video, use the Erase function at the top of the window.

That’s it! Now, you can try the MediaSmart webcam recording software on your HP laptop to record your own webcam videos.
The recording features in the HP MediaSmart webcam is limited, if you are want to record your desktop screen and the webcam at the same time with more advanced features like adding Markers during recording and editing the recorded video, we recommend you to try Wondershare Filmora .


How to Record Video on HP Chromebooks?
Chromebook have become increasingly popular over recent years. Google’s low-cost laptops have even come to dominate the education market in the US. Unfortunately, Chromebooks do not come with a pre-installed application for recording or streaming video. If you are using an HP Chromebook and want to record video you must visit the Chrome Web Store and download a screen recording app. Now, here are a lot of potential apps to choose from. However, we recommend using Screencast-O-Matic .
Screencast-O-Matic is the ideal combination of ease-of-use and powerful editing tools. You can make an unlimited number of recordings for no charge. Videos can also be published to YouTube or uploaded to Google Drive directly from the recorder.
The following is a breakdown of how to record video on HP Chromebooks using Screencast-O-Matic:
1. Launch Screencast-O-Matic
Download the app in the Chrome Web Store and then launch the application by double-clicking on the Screen-O-Matic icon. Getting started is easy, just click the Start Recording button to go to the screen recorder page.
2. Adjust Settings
When the recorder opens there will be a black and white frame with a prominent taskbar. Using the options at the top of the taskbar you can choose to record your screen, webcam or both your screen and webcam. You can click the Size button to choose from standard HD sizes. Or, you can drag and resize the frame manually to create custom sizes.
By default, the recorder will use your laptop’s built-in microphone. Click the Narration button to change your default microphone options.
3.Record Webcam Videos
When you are ready, click the red Record button to record all the action within the frame. You can then pause, resume and preview the recording using the options below the frame. To finish the recording click the Done button.
After you have clicked the Done button, a new window will appear. Here you can choose to either save the recording as a video file or upload it to Screencast-O-Matic.com or YouTube.
Screencast-O-Matic have a selection of other tutorials which can be accessed here . For $1.50 a month you can also upgrade to their Pro Recorder. With the Pro Recorder, you unlock unlimited recording time per video, enhanced editing capabilities, specialised mouse tracking and further uploading options, including Vimeo and Dropbox.
To recap, if you are running an HP laptop on Windows 7, you will need to download the latest MediaSmart software to record videos for better experience. If you have an HP Chromebook, you will need to download a screen recording app from the Chrome Web Store.
Max Wales
Max Wales is a writer and a lover of all things video.
Follow @Max Wales
Max Wales
Mar 27, 2024• Proven solutions
Most of us now take webcams for granted. Yet, webcams are fantastic tools that have quickly become essential components in our digital lives. They serve several purposes, from taking still images to sending or recording live videos. Most HP laptops have built-in webcams. However, a lot of people have difficulties accessing their webcams. Furthermore, if you are running on Windows 7, or using an HP Chromebook, there is no built-in webcam recording software.
In this article, we will help you navigate these issues and learn how to record video on HP laptops running on Windows 7 and Chromebooks.
![]()

The All-in-One Screen Recorder & Video Editor
- Record desktop screen, voiceover, and webcam simultaneously
- Edit recorded clips quickly with a wide range of professional tools
- Built-in plentiful templates and effects
- Export to MP4, MOV, MKV, GIF and multiple formats
For Win 7 or later (64-bit)
For macOS 10.12 or later Secure Download
How to Use the HP Laptop Webcam to Record Video?
To use the webcam built-in HP laptop, you need to make sure that you have the HP MediaSmart Software installed as well as the latest webcam driver.
The MediaSmart software is pre-installed on most HP laptops. But we recommend you download and install the most up-to-date version of the MediaSmart Software and the driver here using your laptop’s model number which can be found on the product sticker at the bottom of your laptop. Remember to reboot the computer after installing the latest driver.
1. Enable HP MediaSmart Webcam Feature
Launch the MediaSmart software webcam feature by double-clicking on the MediaSmart icon. Then select the webcam icon from the MediaSmart taskbar.
2. Adjust Settings
Adjust the webcam settings by selecting Settings on the right-hand side of the MediaSmart Webcam window. Here you can adjust the display settings such as brightness and contrast, and video capture quality as well.
You can also use the Advanced Settings tab to make further adjustments. After you have made all your adjustments, click OK to save your settings.
3. Record Webcam Videos
HP’s MediaSmart webcam is easy to use. Click Capture to record a video and once you are finished click Stop. Audio will be automatically recorded if you set up capture with audio in Advanced Settings.
Using the Zoom Function Settings, you can use Face Tracking to automatically track your face. Or, you can either Disable Zoom or use Manual Zoom to zoom in as you like.
Click OK to save the adjustments and continue.
4.Add Effects and Filters
There are also a series of special effect tools you can use to make your video recordings more fun. You can add frames and filters to the recorded webcam video or draw on the video. The MediaSmart webcam also provides avatars, emotions and distortion effects which are very popular for making creative videos. If you want to remove an effect from your recorded video, use the Erase function at the top of the window.
That’s it! Now, you can try the MediaSmart webcam recording software on your HP laptop to record your own webcam videos.
The recording features in the HP MediaSmart webcam is limited, if you are want to record your desktop screen and the webcam at the same time with more advanced features like adding Markers during recording and editing the recorded video, we recommend you to try Wondershare Filmora .
 Power Tools add-on for Google Sheets, Lifetime subscription
How to Record Video on HP Chromebooks?
Chromebook have become increasingly popular over recent years. Google’s low-cost laptops have even come to dominate the education market in the US. Unfortunately, Chromebooks do not come with a pre-installed application for recording or streaming video. If you are using an HP Chromebook and want to record video you must visit the Chrome Web Store and download a screen recording app. Now, here are a lot of potential apps to choose from. However, we recommend using Screencast-O-Matic .
Screencast-O-Matic is the ideal combination of ease-of-use and powerful editing tools. You can make an unlimited number of recordings for no charge. Videos can also be published to YouTube or uploaded to Google Drive directly from the recorder.
The following is a breakdown of how to record video on HP Chromebooks using Screencast-O-Matic:
1. Launch Screencast-O-Matic
Download the app in the Chrome Web Store and then launch the application by double-clicking on the Screen-O-Matic icon. Getting started is easy, just click the Start Recording button to go to the screen recorder page.
2. Adjust Settings
When the recorder opens there will be a black and white frame with a prominent taskbar. Using the options at the top of the taskbar you can choose to record your screen, webcam or both your screen and webcam. You can click the Size button to choose from standard HD sizes. Or, you can drag and resize the frame manually to create custom sizes.
By default, the recorder will use your laptop’s built-in microphone. Click the Narration button to change your default microphone options.
3.Record Webcam Videos
When you are ready, click the red Record button to record all the action within the frame. You can then pause, resume and preview the recording using the options below the frame. To finish the recording click the Done button.
After you have clicked the Done button, a new window will appear. Here you can choose to either save the recording as a video file or upload it to Screencast-O-Matic.com or YouTube.
Screencast-O-Matic have a selection of other tutorials which can be accessed here . For $1.50 a month you can also upgrade to their Pro Recorder. With the Pro Recorder, you unlock unlimited recording time per video, enhanced editing capabilities, specialised mouse tracking and further uploading options, including Vimeo and Dropbox.
To recap, if you are running an HP laptop on Windows 7, you will need to download the latest MediaSmart software to record videos for better experience. If you have an HP Chromebook, you will need to download a screen recording app from the Chrome Web Store.
Max Wales
Max Wales is a writer and a lover of all things video.
Follow @Max Wales
Max Wales
Mar 27, 2024• Proven solutions
Most of us now take webcams for granted. Yet, webcams are fantastic tools that have quickly become essential components in our digital lives. They serve several purposes, from taking still images to sending or recording live videos. Most HP laptops have built-in webcams. However, a lot of people have difficulties accessing their webcams. Furthermore, if you are running on Windows 7, or using an HP Chromebook, there is no built-in webcam recording software.
In this article, we will help you navigate these issues and learn how to record video on HP laptops running on Windows 7 and Chromebooks.
![]()
The All-in-One Screen Recorder & Video Editor
- Record desktop screen, voiceover, and webcam simultaneously
- Edit recorded clips quickly with a wide range of professional tools
- Built-in plentiful templates and effects
- Export to MP4, MOV, MKV, GIF and multiple formats
For Win 7 or later (64-bit)
For macOS 10.12 or later Secure Download
How to Use the HP Laptop Webcam to Record Video?
To use the webcam built-in HP laptop, you need to make sure that you have the HP MediaSmart Software installed as well as the latest webcam driver.
The MediaSmart software is pre-installed on most HP laptops. But we recommend you download and install the most up-to-date version of the MediaSmart Software and the driver here using your laptop’s model number which can be found on the product sticker at the bottom of your laptop. Remember to reboot the computer after installing the latest driver.
1. Enable HP MediaSmart Webcam Feature
Launch the MediaSmart software webcam feature by double-clicking on the MediaSmart icon. Then select the webcam icon from the MediaSmart taskbar.
2. Adjust Settings
Adjust the webcam settings by selecting Settings on the right-hand side of the MediaSmart Webcam window. Here you can adjust the display settings such as brightness and contrast, and video capture quality as well.
You can also use the Advanced Settings tab to make further adjustments. After you have made all your adjustments, click OK to save your settings.
3. Record Webcam Videos
HP’s MediaSmart webcam is easy to use. Click Capture to record a video and once you are finished click Stop. Audio will be automatically recorded if you set up capture with audio in Advanced Settings.
Using the Zoom Function Settings, you can use Face Tracking to automatically track your face. Or, you can either Disable Zoom or use Manual Zoom to zoom in as you like.
Click OK to save the adjustments and continue.
4.Add Effects and Filters
There are also a series of special effect tools you can use to make your video recordings more fun. You can add frames and filters to the recorded webcam video or draw on the video. The MediaSmart webcam also provides avatars, emotions and distortion effects which are very popular for making creative videos. If you want to remove an effect from your recorded video, use the Erase function at the top of the window.
 dotConnect for Oracle is an ADO.NET data provider for Oracle with Entity Framework Support.
That’s it! Now, you can try the MediaSmart webcam recording software on your HP laptop to record your own webcam videos.
The recording features in the HP MediaSmart webcam is limited, if you are want to record your desktop screen and the webcam at the same time with more advanced features like adding Markers during recording and editing the recorded video, we recommend you to try Wondershare Filmora .
 PDF application, powered by AI-based OCR, for unified workflows with both digital and scanned documents.
 How to Record Video on HP Chromebooks?
Chromebook have become increasingly popular over recent years. Google’s low-cost laptops have even come to dominate the education market in the US. Unfortunately, Chromebooks do not come with a pre-installed application for recording or streaming video. If you are using an HP Chromebook and want to record video you must visit the Chrome Web Store and download a screen recording app. Now, here are a lot of potential apps to choose from. However, we recommend using Screencast-O-Matic .
Screencast-O-Matic is the ideal combination of ease-of-use and powerful editing tools. You can make an unlimited number of recordings for no charge. Videos can also be published to YouTube or uploaded to Google Drive directly from the recorder.
The following is a breakdown of how to record video on HP Chromebooks using Screencast-O-Matic:
1. Launch Screencast-O-Matic
Download the app in the Chrome Web Store and then launch the application by double-clicking on the Screen-O-Matic icon. Getting started is easy, just click the Start Recording button to go to the screen recorder page.
2. Adjust Settings
When the recorder opens there will be a black and white frame with a prominent taskbar. Using the options at the top of the taskbar you can choose to record your screen, webcam or both your screen and webcam. You can click the Size button to choose from standard HD sizes. Or, you can drag and resize the frame manually to create custom sizes.
By default, the recorder will use your laptop’s built-in microphone. Click the Narration button to change your default microphone options.
3.Record Webcam Videos
When you are ready, click the red Record button to record all the action within the frame. You can then pause, resume and preview the recording using the options below the frame. To finish the recording click the Done button.
After you have clicked the Done button, a new window will appear. Here you can choose to either save the recording as a video file or upload it to Screencast-O-Matic.com or YouTube.
Screencast-O-Matic have a selection of other tutorials which can be accessed here . For $1.50 a month you can also upgrade to their Pro Recorder. With the Pro Recorder, you unlock unlimited recording time per video, enhanced editing capabilities, specialised mouse tracking and further uploading options, including Vimeo and Dropbox.
To recap, if you are running an HP laptop on Windows 7, you will need to download the latest MediaSmart software to record videos for better experience. If you have an HP Chromebook, you will need to download a screen recording app from the Chrome Web Store.
Max Wales
Max Wales is a writer and a lover of all things video.
Follow @Max Wales
Max Wales
Mar 27, 2024• Proven solutions
Most of us now take webcams for granted. Yet, webcams are fantastic tools that have quickly become essential components in our digital lives. They serve several purposes, from taking still images to sending or recording live videos. Most HP laptops have built-in webcams. However, a lot of people have difficulties accessing their webcams. Furthermore, if you are running on Windows 7, or using an HP Chromebook, there is no built-in webcam recording software.
In this article, we will help you navigate these issues and learn how to record video on HP laptops running on Windows 7 and Chromebooks.
![]()
The All-in-One Screen Recorder & Video Editor
- Record desktop screen, voiceover, and webcam simultaneously
- Edit recorded clips quickly with a wide range of professional tools
- Built-in plentiful templates and effects
- Export to MP4, MOV, MKV, GIF and multiple formats
For Win 7 or later (64-bit)
For macOS 10.12 or later Secure Download
How to Use the HP Laptop Webcam to Record Video?
To use the webcam built-in HP laptop, you need to make sure that you have the HP MediaSmart Software installed as well as the latest webcam driver.
The MediaSmart software is pre-installed on most HP laptops. But we recommend you download and install the most up-to-date version of the MediaSmart Software and the driver here using your laptop’s model number which can be found on the product sticker at the bottom of your laptop. Remember to reboot the computer after installing the latest driver.
1. Enable HP MediaSmart Webcam Feature
Launch the MediaSmart software webcam feature by double-clicking on the MediaSmart icon. Then select the webcam icon from the MediaSmart taskbar.
2. Adjust Settings
Adjust the webcam settings by selecting Settings on the right-hand side of the MediaSmart Webcam window. Here you can adjust the display settings such as brightness and contrast, and video capture quality as well.
You can also use the Advanced Settings tab to make further adjustments. After you have made all your adjustments, click OK to save your settings.
3. Record Webcam Videos
HP’s MediaSmart webcam is easy to use. Click Capture to record a video and once you are finished click Stop. Audio will be automatically recorded if you set up capture with audio in Advanced Settings.
Using the Zoom Function Settings, you can use Face Tracking to automatically track your face. Or, you can either Disable Zoom or use Manual Zoom to zoom in as you like.
Click OK to save the adjustments and continue.
4.Add Effects and Filters
There are also a series of special effect tools you can use to make your video recordings more fun. You can add frames and filters to the recorded webcam video or draw on the video. The MediaSmart webcam also provides avatars, emotions and distortion effects which are very popular for making creative videos. If you want to remove an effect from your recorded video, use the Erase function at the top of the window.

That’s it! Now, you can try the MediaSmart webcam recording software on your HP laptop to record your own webcam videos.
The recording features in the HP MediaSmart webcam is limited, if you are want to record your desktop screen and the webcam at the same time with more advanced features like adding Markers during recording and editing the recorded video, we recommend you to try Wondershare Filmora .

 PearlMountain Image Converter
How to Record Video on HP Chromebooks?
Chromebook have become increasingly popular over recent years. Google’s low-cost laptops have even come to dominate the education market in the US. Unfortunately, Chromebooks do not come with a pre-installed application for recording or streaming video. If you are using an HP Chromebook and want to record video you must visit the Chrome Web Store and download a screen recording app. Now, here are a lot of potential apps to choose from. However, we recommend using Screencast-O-Matic .
Screencast-O-Matic is the ideal combination of ease-of-use and powerful editing tools. You can make an unlimited number of recordings for no charge. Videos can also be published to YouTube or uploaded to Google Drive directly from the recorder.
The following is a breakdown of how to record video on HP Chromebooks using Screencast-O-Matic:
1. Launch Screencast-O-Matic
Download the app in the Chrome Web Store and then launch the application by double-clicking on the Screen-O-Matic icon. Getting started is easy, just click the Start Recording button to go to the screen recorder page.
2. Adjust Settings
When the recorder opens there will be a black and white frame with a prominent taskbar. Using the options at the top of the taskbar you can choose to record your screen, webcam or both your screen and webcam. You can click the Size button to choose from standard HD sizes. Or, you can drag and resize the frame manually to create custom sizes.
By default, the recorder will use your laptop’s built-in microphone. Click the Narration button to change your default microphone options.
3.Record Webcam Videos
When you are ready, click the red Record button to record all the action within the frame. You can then pause, resume and preview the recording using the options below the frame. To finish the recording click the Done button.
After you have clicked the Done button, a new window will appear. Here you can choose to either save the recording as a video file or upload it to Screencast-O-Matic.com or YouTube.
Screencast-O-Matic have a selection of other tutorials which can be accessed here . For $1.50 a month you can also upgrade to their Pro Recorder. With the Pro Recorder, you unlock unlimited recording time per video, enhanced editing capabilities, specialised mouse tracking and further uploading options, including Vimeo and Dropbox.
To recap, if you are running an HP laptop on Windows 7, you will need to download the latest MediaSmart software to record videos for better experience. If you have an HP Chromebook, you will need to download a screen recording app from the Chrome Web Store.
Max Wales
Max Wales is a writer and a lover of all things video.
Follow @Max Wales
- Title: [New] Smooth Video Capture with Your Laptop's Webcam
- Author: Virginia Woolf
- Created at : 2024-07-24 13:43:07
- Updated at : 2024-07-25 13:43:07
- Link: https://visual-screen-recording.techidaily.com/new-smooth-video-capture-with-your-laptops-webcam/
- License: This work is licensed under CC BY-NC-SA 4.0.