![[New] Minimize Surround Loudness - Economical & Premium Solutions](https://thmb.techidaily.com/4413b601ad195439beff9581253d1c8f619535fc721b43b4dca709d022c56e41.jpg)
"[New] Minimize Surround Loudness - Economical & Premium Solutions"
Minimize Surround Loudness - Economical & Premium Solutions
How to Reduce Audio Noise in Video Recording [Free and Paid]

Max Wales
Mar 27, 2024• Proven solutions
Anyone who has tried to record a video of a beautiful landscape on a windy day knows how irritating background noise can be. Screen recordings are not immune to background noises and for that reason, anyone using screen capturing software should do everything in their power to ensure that the environment in which they are recording a video is as quiet as it possibly can be.
Creating perfect conditions for audio recording is often hard, due to unforeseen events that can happen while the screen recording session is in progress. Most modern screen recording and video editing computer programs provide features that enable their users to reduce noise levels in their videos significantly. In this article, we are going to provide our readers with a few different methods of reducing or removing noise from their videos.
- Part 1: How to Reduce Audio Noise in a Video Recording For Free
- A better way to Reduce Audio Noise in a Video Recording with One-click
Part 1: How to Reduce Audio Noise in a Video Recording For Free with Audacity
It can hardly be stressed enough how important it is to be prepared for the post-production process, because during the time you spend in the editing room you’ll realize that if you are missing something which may seem trivial, like a room tone recording can prove to be crucial for the success of your video making endeavor.
A room tone is an audio recording of the atmospheric sounds of the room in which you recorded the video. It is frequently used as a baseline for the soundtrack of an entire video since it can help the software remove the unwanted noises from the video’s original audio file. Room tone recordings become even more important if you already know that you’ll have to deal with background noises during the video editing process.
Besides the room tone recording, you will also need some audio editing software, such as Audacity if you want to remove or at least reduce the levels of audio noise. However, you can only use this software to work with audio files.
In order to start removing background noises from an audio file, you first need to import the file into Audacity and place it on the software’s timeline. Afterward, you should place the room tone recording to the timeline as well, and then select the silent part of the recording. Once you’ve selected the portion of the room tone recording you’d like to use, find the Effects menu, and select the Noise Reduction option.
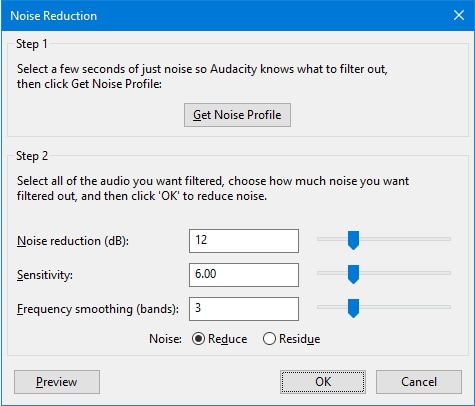
In the next step, you should click on the Get Noise Profile feature, and proceed to deselect the room tone audio file on the timeline. Go back to the Noise Reduction option, and click play to preview the changes you’ve made. If you are not happy with the results, you can adjust the sliders until you are perfectly happy with the sound file you created.
Part 2: A Better Way to Remove Background Audio Noise With One-Click After Recording

Audacity doesn’t offer any video editing features and you can only use to edit audio files. Removing background audio noises after recording with a software program like Filmora video editor is a better option since it enables you to edit audio and video files in the same project.
Import the video file into Filmora video editor and place the file on the timeline. Select the audio file and head over to the Audio menu on the left side of the screen. Make sure that the Enable checkbox, in the Denoise menu is marked and then proceed to select Weak, Mid or Strong value. You can play the video and hear if the background noises have been removed. If the audio track has too much noise, you can use the Mute option or you can detach the audio file from the video file and delete it. That’s how easy it is to remove background noises with Wondershare Filmora.


Conclusion
Regardless of the type of video you are creating, having crystal clear audio is equally important as producing sharp, high-resolution videos. Video clips that have a great soundtrack are more likely to be a success on social media, which is why you should do everything in your power to create videos that don’t contain any of the unpleasant noises you might have accidentally captured during a screen recording session.
 Glarysoft File Recovery Pro - Helps to recover your lost file/data, even permanently deleted data.
Max Wales
Max Wales is a writer and a lover of all things video.
Follow @Max Wales
Max Wales
Mar 27, 2024• Proven solutions
Anyone who has tried to record a video of a beautiful landscape on a windy day knows how irritating background noise can be. Screen recordings are not immune to background noises and for that reason, anyone using screen capturing software should do everything in their power to ensure that the environment in which they are recording a video is as quiet as it possibly can be.
Creating perfect conditions for audio recording is often hard, due to unforeseen events that can happen while the screen recording session is in progress. Most modern screen recording and video editing computer programs provide features that enable their users to reduce noise levels in their videos significantly. In this article, we are going to provide our readers with a few different methods of reducing or removing noise from their videos.
- Part 1: How to Reduce Audio Noise in a Video Recording For Free
- A better way to Reduce Audio Noise in a Video Recording with One-click

Part 1: How to Reduce Audio Noise in a Video Recording For Free with Audacity
It can hardly be stressed enough how important it is to be prepared for the post-production process, because during the time you spend in the editing room you’ll realize that if you are missing something which may seem trivial, like a room tone recording can prove to be crucial for the success of your video making endeavor.
A room tone is an audio recording of the atmospheric sounds of the room in which you recorded the video. It is frequently used as a baseline for the soundtrack of an entire video since it can help the software remove the unwanted noises from the video’s original audio file. Room tone recordings become even more important if you already know that you’ll have to deal with background noises during the video editing process.
Besides the room tone recording, you will also need some audio editing software, such as Audacity if you want to remove or at least reduce the levels of audio noise. However, you can only use this software to work with audio files.
In order to start removing background noises from an audio file, you first need to import the file into Audacity and place it on the software’s timeline. Afterward, you should place the room tone recording to the timeline as well, and then select the silent part of the recording. Once you’ve selected the portion of the room tone recording you’d like to use, find the Effects menu, and select the Noise Reduction option.

In the next step, you should click on the Get Noise Profile feature, and proceed to deselect the room tone audio file on the timeline. Go back to the Noise Reduction option, and click play to preview the changes you’ve made. If you are not happy with the results, you can adjust the sliders until you are perfectly happy with the sound file you created.
Part 2: A Better Way to Remove Background Audio Noise With One-Click After Recording
Audacity doesn’t offer any video editing features and you can only use to edit audio files. Removing background audio noises after recording with a software program like Filmora video editor is a better option since it enables you to edit audio and video files in the same project.
Import the video file into Filmora video editor and place the file on the timeline. Select the audio file and head over to the Audio menu on the left side of the screen. Make sure that the Enable checkbox, in the Denoise menu is marked and then proceed to select Weak, Mid or Strong value. You can play the video and hear if the background noises have been removed. If the audio track has too much noise, you can use the Mute option or you can detach the audio file from the video file and delete it. That’s how easy it is to remove background noises with Wondershare Filmora.
Conclusion
Regardless of the type of video you are creating, having crystal clear audio is equally important as producing sharp, high-resolution videos. Video clips that have a great soundtrack are more likely to be a success on social media, which is why you should do everything in your power to create videos that don’t contain any of the unpleasant noises you might have accidentally captured during a screen recording session.
Max Wales
Max Wales is a writer and a lover of all things video.
Follow @Max Wales
Max Wales
Mar 27, 2024• Proven solutions
Anyone who has tried to record a video of a beautiful landscape on a windy day knows how irritating background noise can be. Screen recordings are not immune to background noises and for that reason, anyone using screen capturing software should do everything in their power to ensure that the environment in which they are recording a video is as quiet as it possibly can be.
Creating perfect conditions for audio recording is often hard, due to unforeseen events that can happen while the screen recording session is in progress. Most modern screen recording and video editing computer programs provide features that enable their users to reduce noise levels in their videos significantly. In this article, we are going to provide our readers with a few different methods of reducing or removing noise from their videos.
- Part 1: How to Reduce Audio Noise in a Video Recording For Free
- A better way to Reduce Audio Noise in a Video Recording with One-click
Part 1: How to Reduce Audio Noise in a Video Recording For Free with Audacity
It can hardly be stressed enough how important it is to be prepared for the post-production process, because during the time you spend in the editing room you’ll realize that if you are missing something which may seem trivial, like a room tone recording can prove to be crucial for the success of your video making endeavor.
A room tone is an audio recording of the atmospheric sounds of the room in which you recorded the video. It is frequently used as a baseline for the soundtrack of an entire video since it can help the software remove the unwanted noises from the video’s original audio file. Room tone recordings become even more important if you already know that you’ll have to deal with background noises during the video editing process.
Besides the room tone recording, you will also need some audio editing software, such as Audacity if you want to remove or at least reduce the levels of audio noise. However, you can only use this software to work with audio files.
In order to start removing background noises from an audio file, you first need to import the file into Audacity and place it on the software’s timeline. Afterward, you should place the room tone recording to the timeline as well, and then select the silent part of the recording. Once you’ve selected the portion of the room tone recording you’d like to use, find the Effects menu, and select the Noise Reduction option.
In the next step, you should click on the Get Noise Profile feature, and proceed to deselect the room tone audio file on the timeline. Go back to the Noise Reduction option, and click play to preview the changes you’ve made. If you are not happy with the results, you can adjust the sliders until you are perfectly happy with the sound file you created.
Part 2: A Better Way to Remove Background Audio Noise With One-Click After Recording
Audacity doesn’t offer any video editing features and you can only use to edit audio files. Removing background audio noises after recording with a software program like Filmora video editor is a better option since it enables you to edit audio and video files in the same project.
Import the video file into Filmora video editor and place the file on the timeline. Select the audio file and head over to the Audio menu on the left side of the screen. Make sure that the Enable checkbox, in the Denoise menu is marked and then proceed to select Weak, Mid or Strong value. You can play the video and hear if the background noises have been removed. If the audio track has too much noise, you can use the Mute option or you can detach the audio file from the video file and delete it. That’s how easy it is to remove background noises with Wondershare Filmora.
Conclusion
Regardless of the type of video you are creating, having crystal clear audio is equally important as producing sharp, high-resolution videos. Video clips that have a great soundtrack are more likely to be a success on social media, which is why you should do everything in your power to create videos that don’t contain any of the unpleasant noises you might have accidentally captured during a screen recording session.
Max Wales
 is a writer and a lover of all things video.
Follow @Max Wales
Max Wales
Mar 27, 2024• Proven solutions
Anyone who has tried to record a video of a beautiful landscape on a windy day knows how irritating background noise can be. Screen recordings are not immune to background noises and for that reason, anyone using screen capturing software should do everything in their power to ensure that the environment in which they are recording a video is as quiet as it possibly can be.
Creating perfect conditions for audio recording is often hard, due to unforeseen events that can happen while the screen recording session is in progress. Most modern screen recording and video editing computer programs provide features that enable their users to reduce noise levels in their videos significantly. In this article, we are going to provide our readers with a few different methods of reducing or removing noise from their videos.
- Part 1: How to Reduce Audio Noise in a Video Recording For Free
- A better way to Reduce Audio Noise in a Video Recording with One-click
Part 1: How to Reduce Audio Noise in a Video Recording For Free with Audacity
It can hardly be stressed enough how important it is to be prepared for the post-production process, because during the time you spend in the editing room you’ll realize that if you are missing something which may seem trivial, like a room tone recording can prove to be crucial for the success of your video making endeavor.
A room tone is an audio recording of the atmospheric sounds of the room in which you recorded the video. It is frequently used as a baseline for the soundtrack of an entire video since it can help the software remove the unwanted noises from the video’s original audio file. Room tone recordings become even more important if you already know that you’ll have to deal with background noises during the video editing process.
Besides the room tone recording, you will also need some audio editing software, such as Audacity if you want to remove or at least reduce the levels of audio noise. However, you can only use this software to work with audio files.
In order to start removing background noises from an audio file, you first need to import the file into Audacity and place it on the software’s timeline. Afterward, you should place the room tone recording to the timeline as well, and then select the silent part of the recording. Once you’ve selected the portion of the room tone recording you’d like to use, find the Effects menu, and select the Noise Reduction option.
In the next step, you should click on the Get Noise Profile feature, and proceed to deselect the room tone audio file on the timeline. Go back to the Noise Reduction option, and click play to preview the changes you’ve made. If you are not happy with the results, you can adjust the sliders until you are perfectly happy with the sound file you created.

Part 2: A Better Way to Remove Background Audio Noise With One-Click After Recording
 Project Manager - Asset Browser for 3Ds Max
Audacity doesn’t offer any video editing features and you can only use to edit audio files. Removing background audio noises after recording with a software program like Filmora video editor is a better option since it enables you to edit audio and video files in the same project.
Import the video file into Filmora video editor and place the file on the timeline. Select the audio file and head over to the Audio menu on the left side of the screen. Make sure that the Enable checkbox, in the Denoise menu is marked and then proceed to select Weak, Mid or Strong value. You can play the video and hear if the background noises have been removed. If the audio track has too much noise, you can use the Mute option or you can detach the audio file from the video file and delete it. That’s how easy it is to remove background noises with Wondershare Filmora.

Conclusion
Regardless of the type of video you are creating, having crystal clear audio is equally important as producing sharp, high-resolution videos. Video clips that have a great soundtrack are more likely to be a success on social media, which is why you should do everything in your power to create videos that don’t contain any of the unpleasant noises you might have accidentally captured during a screen recording session.
 Project Manager - Asset Browser for 3Ds Max
Max Wales
Max Wales is a writer and a lover of all things video.
Follow @Max Wales
- Title: [New] Minimize Surround Loudness - Economical & Premium Solutions
- Author: Virginia Woolf
- Created at : 2024-07-24 12:01:22
- Updated at : 2024-07-25 12:01:22
- Link: https://visual-screen-recording.techidaily.com/new-minimize-surround-loudness-economical-and-premium-solutions/
- License: This work is licensed under CC BY-NC-SA 4.0.