![[New] Mac Studio Screen & Sounds Recording Feature](https://thmb.techidaily.com/95c7607cc85834758f594e36f86b8274633568f32ba37267dd79e6e802f121e2.png)
"[New] Mac Studio Screen & Sounds Recording Feature"
Mac Studio: Screen & Sounds Recording Feature
For a lot of professionals, shifting to the completely virtual setup has turned into quite a hassle. There are certain tools that are needed to be installed on the device so that everyone is able to share the project developments with their colleagues and team. One of the tools that one must install is a screen recorder with audio. It’s a tool that will allow you to capture all the desktop activity and it’s being widely used by the creators who are producing guides and tutorials.
Mac is the operating system that is known for its versatile functionality and all the basic tools are offered preinstalled with the package. These are the basic tools that will come with limited features. If you are a heavy user and want some advanced features on your screen recording tool, we would recommend going for a paid one. In this blog, we will discuss a few tools that are available for you, both paid and free. Let’s dive in without any further adieu.
Part 1. Free Ways to Record Mac Screen with Audio
Part 2. Best Recorders to Record Screen and Audio on Mac
Part 1. Free Ways to Record Mac Screen with Audio
Before getting to more advanced tools, it’s better to go through a couple of free screen and audio recorders that you can use.
Use QuickTime Player
If you are using a Mac, you must have used QuickTime Player to watch media. It’s a tool that has multiple functions rather than just a player. It comes preinstalled on all the Macs and you will not need to pay any amount to unlock its features.
Users will get to record the screen along with mic and system audio using this tool and while you are on it, you should know that it is just a recorder and not an editor. The interface that you will get is highly intuitive and user friendly where the recording process is extremely simple and straightforward.
How to record?
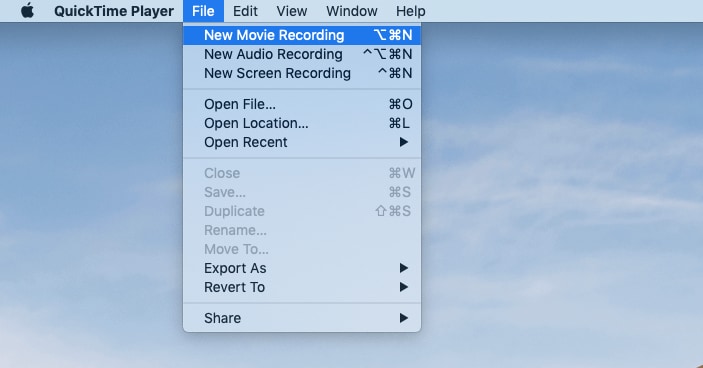
- Launch the Search and enter QuickTime Player. To get started with the recording, press and hold the Ctrl key, click on the app icon.
- Alternatively, you can open the app and click on the File button to screen record on Mac with audio. Click on the New Screen Recording button.
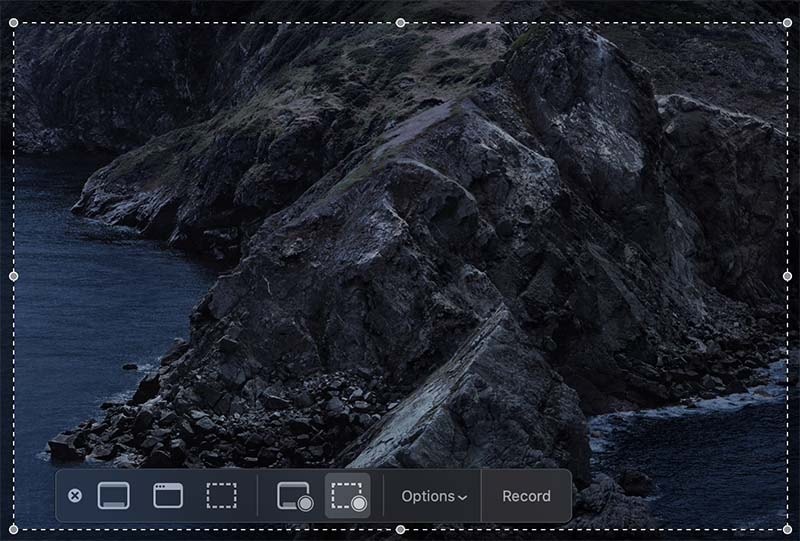
- It will greet you with a new compact dashboard that will offer a few controls for the screen recording. In the center, you will get a Record button with a few options in the dropdown menu to enable the mouse clicks.
- Here, you will also get to enable the mouse clicks to be recorded in the captured screen. It will help a lot of creators who are into creating guides and tutorials for their online audience.
- Once everything is set, it’s time to hit the Record button and it will give you a drag & drop tool to make the screen selection. If you want to record the full screen, all you need to do is click anywhere on the screen to start recording.
- To select a specific area, you will need to drag and drop from any corner of the screen.
Use Screenshot Toolbar
The above tool is the one with just the screen recording feature and the screenshot toolbar is the one with multiple functions. It is also preinstalled on all the Macs with MacOS Mojave and above.

This tool offers you screen recording and snapshot with a plethora of options. You will get to select a specific window or area using the different selection options. This toolbar will also let you screen record Mac with internal audio. Let’s go through the steps below.
How to record?
- Launch the content that you want to record and then, you will need to press the Cmd+Shift+5 combination to launch the screenshot toolbar.
- On the left, there will be options to take the screen snapshot according to your preference. The first tool will capture the full screen, the next will be used to capture a specific window, and the last will be used to make a custom selection.
- Right next to it, users will get the recording options. You can either go with recording the full screen or you can use the mouse to select a specific area.
- To get a few advanced settings, you will need to click on the Options button to access the dropdown menu. Here, you will also get to enable/disable the mic input.
- Once all the parameters for the Macbook screen recording with audio are set, it’s time to hit the Record button. In the Options, you will also get to set up the save location.
Part 2. Best Recorders to Record Screen and Audio on Mac
The tools that we have mentioned above are completely free and have very limited functionality. For advanced users, these preinstalled apps aren’t recommended. In this section, we are going to discuss two apps that are equipped with a range of advanced customizations.
Wondershare Filmora
There are various creators who are struggling to find a screen recording tool along with an editor. After going through this guide, we hope that you are able to get done with all the tweaks and customizations that you want for your video.
Wondershare Filmora is an advanced tool that packs a range of features to give your content a professional look. The recording and editing process is quite simple on the Mac record screen and audio and we are going to jot the steps down here.
 CalendarBudget - Monthly subscription membership to CalendarBudget via web browser or mobile app. Support included.
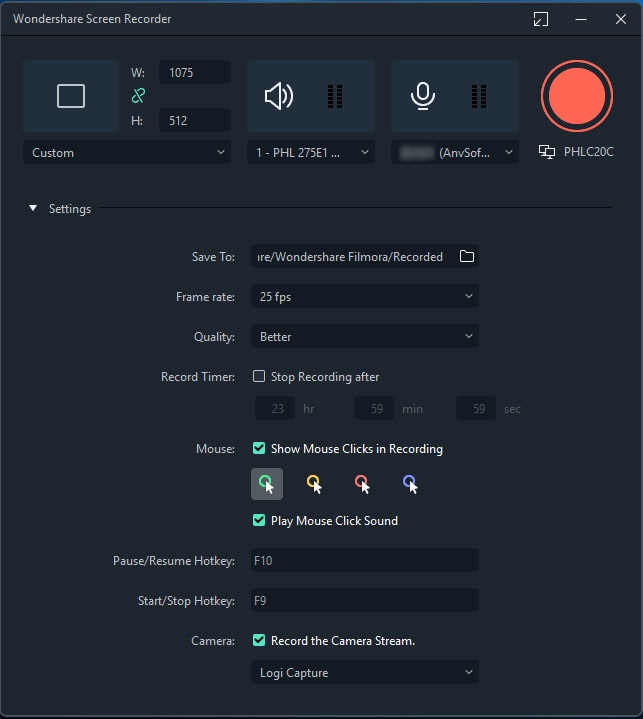
How to record?
- Launch the app and a dialog box will appear with a couple of options. To start a new screen recording, click on New Project.
- Now, the app will take up all the screen space with various sections. Here, you will get a Record button in the middle. The screen will look something similar to this.
- You will need to create a new project by clicking the File button from the top taskbar. Once clicked, it will give you a number of options in the dropdown menu. Click on Record Media and it will have an expanded menu list. Click on Record PC Screen.
- A new dialog box will appear and here, you will get all the options related to the screen recording.
- Upfront, you will get to select the screen area that you want to record. You can either go with Full Screen or enter a custom width & height to set the recording area. You will also have the option of using the drag & drop tool to select any specific section.
- Right next to it, you will get the mic button and you can click on it to enable/disable. It will be paired with the option to turn on/off the recording of the system sound.
- To access more settings, you can click on the gear icon. For example, you will have the option of recording the mouse clicks in the captured screen recording.
- Once done, hit the Record button and it will give you a 5-second buffer time and the recording will be started. To stop the screen recorder Mac with internal audio, you will need to press the Stop button on the taskbar.
- It will be automatically saved to the Filmora folder and you will also be able to add the file to the editor’s Media Panel for any sort of post-processing.
For Win 7 or later (64-bit)
For macOS 10.12 or later
VLC Screen Recorder
Among a range of tools that are available in the market for the purpose of screen recording, VLC Recorder holds a very high ranking when it comes to free tools. It’s an open-source platform with a plethora of features that will attract various advanced users.
 Power Tools add-on for Google Sheets, 12-month subscription

The interface that you will get here is highly intuitive and you will not face any sort of hassle while setting up or even recording the screen. There are also many advanced options in terms of customization of the preferred settings. Let’s go through the process in the following section.
How to record?
- Launch the app and navigate to the File button on the taskbar. Click on it and go to the Open Capture Device option.
- A new dialog box will appear and it will give you all the options to easily record Mac screen with internal audio. The Capture tab will let you add the webcam footage along with mic input as basic settings.
- We are discussing the screen recording process here so for that you have to change the Input Devices to Screen.
- Now, choose the screen resolution along with the frames per second. By default, the FPS will be set to 5, however, for the screen recording, we would recommend setting it to 30. If the VLC isn’t able to handle it properly, you can set it to 15, as well.
- Make sure that the Capture Audio checkbox is enabled and built-in mic or your external mic is selected. Click on the Settings button for more advanced options.
- Once you have configured everything, it’s time to get back to the previous dialog box and hit Open. It will start recording.
- To stop the recording, you will simply need to press the Stop button on the bottom left.
Conclusion
The methods that we have discussed here are quite simple and you will get some very advanced features for the screen recording tasks. We are seeing a surge in the demand of these apps and it has become an essential tool for those who are remotely working. The tools that we have discussed here are able to answer the question of how to record Mac screen with internal audio and mic input without any hassle. The free tools that come preinstalled are limited in features but the recorded content is in high quality.
Part 2. Best Recorders to Record Screen and Audio on Mac

Part 1. Free Ways to Record Mac Screen with Audio
Before getting to more advanced tools, it’s better to go through a couple of free screen and audio recorders that you can use.
Use QuickTime Player
If you are using a Mac, you must have used QuickTime Player to watch media. It’s a tool that has multiple functions rather than just a player. It comes preinstalled on all the Macs and you will not need to pay any amount to unlock its features.
Users will get to record the screen along with mic and system audio using this tool and while you are on it, you should know that it is just a recorder and not an editor. The interface that you will get is highly intuitive and user friendly where the recording process is extremely simple and straightforward.
How to record?
- Launch the Search and enter QuickTime Player. To get started with the recording, press and hold the Ctrl key, click on the app icon.
- Alternatively, you can open the app and click on the File button to screen record on Mac with audio. Click on the New Screen Recording button.
- It will greet you with a new compact dashboard that will offer a few controls for the screen recording. In the center, you will get a Record button with a few options in the dropdown menu to enable the mouse clicks.
- Here, you will also get to enable the mouse clicks to be recorded in the captured screen. It will help a lot of creators who are into creating guides and tutorials for their online audience.
- Once everything is set, it’s time to hit the Record button and it will give you a drag & drop tool to make the screen selection. If you want to record the full screen, all you need to do is click anywhere on the screen to start recording.
- To select a specific area, you will need to drag and drop from any corner of the screen.
Use Screenshot Toolbar
The above tool is the one with just the screen recording feature and the screenshot toolbar is the one with multiple functions. It is also preinstalled on all the Macs with MacOS Mojave and above.
This tool offers you screen recording and snapshot with a plethora of options. You will get to select a specific window or area using the different selection options. This toolbar will also let you screen record Mac with internal audio. Let’s go through the steps below.
How to record?
- Launch the content that you want to record and then, you will need to press the Cmd+Shift+5 combination to launch the screenshot toolbar.
- On the left, there will be options to take the screen snapshot according to your preference. The first tool will capture the full screen, the next will be used to capture a specific window, and the last will be used to make a custom selection.
- Right next to it, users will get the recording options. You can either go with recording the full screen or you can use the mouse to select a specific area.
- To get a few advanced settings, you will need to click on the Options button to access the dropdown menu. Here, you will also get to enable/disable the mic input.
- Once all the parameters for the Macbook screen recording with audio are set, it’s time to hit the Record button. In the Options, you will also get to set up the save location.
Part 2. Best Recorders to Record Screen and Audio on Mac
The tools that we have mentioned above are completely free and have very limited functionality. For advanced users, these preinstalled apps aren’t recommended. In this section, we are going to discuss two apps that are equipped with a range of advanced customizations.
 Forex Robotron Basic Package
Wondershare Filmora
There are various creators who are struggling to find a screen recording tool along with an editor. After going through this guide, we hope that you are able to get done with all the tweaks and customizations that you want for your video.
Wondershare Filmora is an advanced tool that packs a range of features to give your content a professional look. The recording and editing process is quite simple on the Mac record screen and audio and we are going to jot the steps down here.
How to record?
- Launch the app and a dialog box will appear with a couple of options. To start a new screen recording, click on New Project.
- Now, the app will take up all the screen space with various sections. Here, you will get a Record button in the middle. The screen will look something similar to this.
- You will need to create a new project by clicking the File button from the top taskbar. Once clicked, it will give you a number of options in the dropdown menu. Click on Record Media and it will have an expanded menu list. Click on Record PC Screen.
- A new dialog box will appear and here, you will get all the options related to the screen recording.
- Upfront, you will get to select the screen area that you want to record. You can either go with Full Screen or enter a custom width & height to set the recording area. You will also have the option of using the drag & drop tool to select any specific section.
- Right next to it, you will get the mic button and you can click on it to enable/disable. It will be paired with the option to turn on/off the recording of the system sound.
- To access more settings, you can click on the gear icon. For example, you will have the option of recording the mouse clicks in the captured screen recording.
- Once done, hit the Record button and it will give you a 5-second buffer time and the recording will be started. To stop the screen recorder Mac with internal audio, you will need to press the Stop button on the taskbar.
- It will be automatically saved to the Filmora folder and you will also be able to add the file to the editor’s Media Panel for any sort of post-processing.
For Win 7 or later (64-bit)
For macOS 10.12 or later
VLC Screen Recorder
Among a range of tools that are available in the market for the purpose of screen recording, VLC Recorder holds a very high ranking when it comes to free tools. It’s an open-source platform with a plethora of features that will attract various advanced users.
The interface that you will get here is highly intuitive and you will not face any sort of hassle while setting up or even recording the screen. There are also many advanced options in terms of customization of the preferred settings. Let’s go through the process in the following section.
How to record?
- Launch the app and navigate to the File button on the taskbar. Click on it and go to the Open Capture Device option.
- A new dialog box will appear and it will give you all the options to easily record Mac screen with internal audio. The Capture tab will let you add the webcam footage along with mic input as basic settings.
- We are discussing the screen recording process here so for that you have to change the Input Devices to Screen.
- Now, choose the screen resolution along with the frames per second. By default, the FPS will be set to 5, however, for the screen recording, we would recommend setting it to 30. If the VLC isn’t able to handle it properly, you can set it to 15, as well.
- Make sure that the Capture Audio checkbox is enabled and built-in mic or your external mic is selected. Click on the Settings button for more advanced options.
- Once you have configured everything, it’s time to get back to the previous dialog box and hit Open. It will start recording.
- To stop the recording, you will simply need to press the Stop button on the bottom left.

Conclusion
The methods that we have discussed here are quite simple and you will get some very advanced features for the screen recording tasks. We are seeing a surge in the demand of these apps and it has become an essential tool for those who are remotely working. The tools that we have discussed here are able to answer the question of how to record Mac screen with internal audio and mic input without any hassle. The free tools that come preinstalled are limited in features but the recorded content is in high quality.
Part 2. Best Recorders to Record Screen and Audio on Mac
Part 1. Free Ways to Record Mac Screen with Audio
Before getting to more advanced tools, it’s better to go through a couple of free screen and audio recorders that you can use.
Use QuickTime Player
If you are using a Mac, you must have used QuickTime Player to watch media. It’s a tool that has multiple functions rather than just a player. It comes preinstalled on all the Macs and you will not need to pay any amount to unlock its features.
Users will get to record the screen along with mic and system audio using this tool and while you are on it, you should know that it is just a recorder and not an editor. The interface that you will get is highly intuitive and user friendly where the recording process is extremely simple and straightforward.
How to record?
- Launch the Search and enter QuickTime Player. To get started with the recording, press and hold the Ctrl key, click on the app icon.
- Alternatively, you can open the app and click on the File button to screen record on Mac with audio. Click on the New Screen Recording button.
- It will greet you with a new compact dashboard that will offer a few controls for the screen recording. In the center, you will get a Record button with a few options in the dropdown menu to enable the mouse clicks.
- Here, you will also get to enable the mouse clicks to be recorded in the captured screen. It will help a lot of creators who are into creating guides and tutorials for their online audience.
- Once everything is set, it’s time to hit the Record button and it will give you a drag & drop tool to make the screen selection. If you want to record the full screen, all you need to do is click anywhere on the screen to start recording.
- To select a specific area, you will need to drag and drop from any corner of the screen.
 Power Tools add-on for Google Sheets, Lifetime subscription
Use Screenshot Toolbar
The above tool is the one with just the screen recording feature and the screenshot toolbar is the one with multiple functions. It is also preinstalled on all the Macs with MacOS Mojave and above.
This tool offers you screen recording and snapshot with a plethora of options. You will get to select a specific window or area using the different selection options. This toolbar will also let you screen record Mac with internal audio. Let’s go through the steps below.
How to record?
- Launch the content that you want to record and then, you will need to press the Cmd+Shift+5 combination to launch the screenshot toolbar.
- On the left, there will be options to take the screen snapshot according to your preference. The first tool will capture the full screen, the next will be used to capture a specific window, and the last will be used to make a custom selection.
- Right next to it, users will get the recording options. You can either go with recording the full screen or you can use the mouse to select a specific area.
- To get a few advanced settings, you will need to click on the Options button to access the dropdown menu. Here, you will also get to enable/disable the mic input.
- Once all the parameters for the Macbook screen recording with audio are set, it’s time to hit the Record button. In the Options, you will also get to set up the save location.
Part 2. Best Recorders to Record Screen and Audio on Mac
The tools that we have mentioned above are completely free and have very limited functionality. For advanced users, these preinstalled apps aren’t recommended. In this section, we are going to discuss two apps that are equipped with a range of advanced customizations.
Wondershare Filmora
There are various creators who are struggling to find a screen recording tool along with an editor. After going through this guide, we hope that you are able to get done with all the tweaks and customizations that you want for your video.
Wondershare Filmora is an advanced tool that packs a range of features to give your content a professional look. The recording and editing process is quite simple on the Mac record screen and audio and we are going to jot the steps down here.
How to record?
- Launch the app and a dialog box will appear with a couple of options. To start a new screen recording, click on New Project.
- Now, the app will take up all the screen space with various sections. Here, you will get a Record button in the middle. The screen will look something similar to this.
- You will need to create a new project by clicking the File button from the top taskbar. Once clicked, it will give you a number of options in the dropdown menu. Click on Record Media and it will have an expanded menu list. Click on Record PC Screen.
- A new dialog box will appear and here, you will get all the options related to the screen recording.
- Upfront, you will get to select the screen area that you want to record. You can either go with Full Screen or enter a custom width & height to set the recording area. You will also have the option of using the drag & drop tool to select any specific section.
- Right next to it, you will get the mic button and you can click on it to enable/disable. It will be paired with the option to turn on/off the recording of the system sound.
- To access more settings, you can click on the gear icon. For example, you will have the option of recording the mouse clicks in the captured screen recording.
- Once done, hit the Record button and it will give you a 5-second buffer time and the recording will be started. To stop the screen recorder Mac with internal audio, you will need to press the Stop button on the taskbar.
- It will be automatically saved to the Filmora folder and you will also be able to add the file to the editor’s Media Panel for any sort of post-processing.
For Win 7 or later (64-bit)
For macOS 10.12 or later
 Allavsoft Batch Download Online Videos, Music Offline to MP4, MP3, MOV, etc format
VLC Screen Recorder
Among a range of tools that are available in the market for the purpose of screen recording, VLC Recorder holds a very high ranking when it comes to free tools. It’s an open-source platform with a plethora of features that will attract various advanced users.
The interface that you will get here is highly intuitive and you will not face any sort of hassle while setting up or even recording the screen. There are also many advanced options in terms of customization of the preferred settings. Let’s go through the process in the following section.
How to record?
- Launch the app and navigate to the File button on the taskbar. Click on it and go to the Open Capture Device option.
- A new dialog box will appear and it will give you all the options to easily record Mac screen with internal audio. The Capture tab will let you add the webcam footage along with mic input as basic settings.
- We are discussing the screen recording process here so for that you have to change the Input Devices to Screen.
- Now, choose the screen resolution along with the frames per second. By default, the FPS will be set to 5, however, for the screen recording, we would recommend setting it to 30. If the VLC isn’t able to handle it properly, you can set it to 15, as well.
- Make sure that the Capture Audio checkbox is enabled and built-in mic or your external mic is selected. Click on the Settings button for more advanced options.
- Once you have configured everything, it’s time to get back to the previous dialog box and hit Open. It will start recording.
- To stop the recording, you will simply need to press the Stop button on the bottom left.
Conclusion
The methods that we have discussed here are quite simple and you will get some very advanced features for the screen recording tasks. We are seeing a surge in the demand of these apps and it has become an essential tool for those who are remotely working. The tools that we have discussed here are able to answer the question of how to record Mac screen with internal audio and mic input without any hassle. The free tools that come preinstalled are limited in features but the recorded content is in high quality.
Part 2. Best Recorders to Record Screen and Audio on Mac

company, user or members of the same household. Action! - screen and game recorder</a>
Part 1. Free Ways to Record Mac Screen with Audio
Before getting to more advanced tools, it’s better to go through a couple of free screen and audio recorders that you can use.
Use QuickTime Player
If you are using a Mac, you must have used QuickTime Player to watch media. It’s a tool that has multiple functions rather than just a player. It comes preinstalled on all the Macs and you will not need to pay any amount to unlock its features.
Users will get to record the screen along with mic and system audio using this tool and while you are on it, you should know that it is just a recorder and not an editor. The interface that you will get is highly intuitive and user friendly where the recording process is extremely simple and straightforward.
How to record?
- Launch the Search and enter QuickTime Player. To get started with the recording, press and hold the Ctrl key, click on the app icon.
- Alternatively, you can open the app and click on the File button to screen record on Mac with audio. Click on the New Screen Recording button.
- It will greet you with a new compact dashboard that will offer a few controls for the screen recording. In the center, you will get a Record button with a few options in the dropdown menu to enable the mouse clicks.
- Here, you will also get to enable the mouse clicks to be recorded in the captured screen. It will help a lot of creators who are into creating guides and tutorials for their online audience.
- Once everything is set, it’s time to hit the Record button and it will give you a drag & drop tool to make the screen selection. If you want to record the full screen, all you need to do is click anywhere on the screen to start recording.
- To select a specific area, you will need to drag and drop from any corner of the screen.
Use Screenshot Toolbar
The above tool is the one with just the screen recording feature and the screenshot toolbar is the one with multiple functions. It is also preinstalled on all the Macs with MacOS Mojave and above.
This tool offers you screen recording and snapshot with a plethora of options. You will get to select a specific window or area using the different selection options. This toolbar will also let you screen record Mac with internal audio. Let’s go through the steps below.
How to record?
- Launch the content that you want to record and then, you will need to press the Cmd+Shift+5 combination to launch the screenshot toolbar.
- On the left, there will be options to take the screen snapshot according to your preference. The first tool will capture the full screen, the next will be used to capture a specific window, and the last will be used to make a custom selection.
- Right next to it, users will get the recording options. You can either go with recording the full screen or you can use the mouse to select a specific area.
- To get a few advanced settings, you will need to click on the Options button to access the dropdown menu. Here, you will also get to enable/disable the mic input.
- Once all the parameters for the Macbook screen recording with audio are set, it’s time to hit the Record button. In the Options, you will also get to set up the save location.
Part 2. Best Recorders to Record Screen and Audio on Mac
The tools that we have mentioned above are completely free and have very limited functionality. For advanced users, these preinstalled apps aren’t recommended. In this section, we are going to discuss two apps that are equipped with a range of advanced customizations.
Wondershare Filmora
There are various creators who are struggling to find a screen recording tool along with an editor. After going through this guide, we hope that you are able to get done with all the tweaks and customizations that you want for your video.
Wondershare Filmora is an advanced tool that packs a range of features to give your content a professional look. The recording and editing process is quite simple on the Mac record screen and audio and we are going to jot the steps down here.

How to record?
- Launch the app and a dialog box will appear with a couple of options. To start a new screen recording, click on New Project.
- Now, the app will take up all the screen space with various sections. Here, you will get a Record button in the middle. The screen will look something similar to this.
- You will need to create a new project by clicking the File button from the top taskbar. Once clicked, it will give you a number of options in the dropdown menu. Click on Record Media and it will have an expanded menu list. Click on Record PC Screen.
- A new dialog box will appear and here, you will get all the options related to the screen recording.
- Upfront, you will get to select the screen area that you want to record. You can either go with Full Screen or enter a custom width & height to set the recording area. You will also have the option of using the drag & drop tool to select any specific section.
- Right next to it, you will get the mic button and you can click on it to enable/disable. It will be paired with the option to turn on/off the recording of the system sound.
- To access more settings, you can click on the gear icon. For example, you will have the option of recording the mouse clicks in the captured screen recording.
- Once done, hit the Record button and it will give you a 5-second buffer time and the recording will be started. To stop the screen recorder Mac with internal audio, you will need to press the Stop button on the taskbar.
- It will be automatically saved to the Filmora folder and you will also be able to add the file to the editor’s Media Panel for any sort of post-processing.
For Win 7 or later (64-bit)
For macOS 10.12 or later

VLC Screen Recorder
Among a range of tools that are available in the market for the purpose of screen recording, VLC Recorder holds a very high ranking when it comes to free tools. It’s an open-source platform with a plethora of features that will attract various advanced users.

The interface that you will get here is highly intuitive and you will not face any sort of hassle while setting up or even recording the screen. There are also many advanced options in terms of customization of the preferred settings. Let’s go through the process in the following section.
How to record?
- Launch the app and navigate to the File button on the taskbar. Click on it and go to the Open Capture Device option.
- A new dialog box will appear and it will give you all the options to easily record Mac screen with internal audio. The Capture tab will let you add the webcam footage along with mic input as basic settings.
- We are discussing the screen recording process here so for that you have to change the Input Devices to Screen.
- Now, choose the screen resolution along with the frames per second. By default, the FPS will be set to 5, however, for the screen recording, we would recommend setting it to 30. If the VLC isn’t able to handle it properly, you can set it to 15, as well.
- Make sure that the Capture Audio checkbox is enabled and built-in mic or your external mic is selected. Click on the Settings button for more advanced options.
- Once you have configured everything, it’s time to get back to the previous dialog box and hit Open. It will start recording.
- To stop the recording, you will simply need to press the Stop button on the bottom left.
 Simple and intuitive video editing
Conclusion
The methods that we have discussed here are quite simple and you will get some very advanced features for the screen recording tasks. We are seeing a surge in the demand of these apps and it has become an essential tool for those who are remotely working. The tools that we have discussed here are able to answer the question of how to record Mac screen with internal audio and mic input without any hassle. The free tools that come preinstalled are limited in features but the recorded content is in high quality.
- Title: [New] Mac Studio Screen & Sounds Recording Feature
- Author: Virginia Woolf
- Created at : 2024-07-24 12:55:53
- Updated at : 2024-07-25 12:55:53
- Link: https://visual-screen-recording.techidaily.com/new-mac-studio-screen-and-sounds-recording-feature/
- License: This work is licensed under CC BY-NC-SA 4.0.