![[New] Leveraging OBS for Top-Notch Social Media Streaming for 2024](https://thmb.techidaily.com/ced37c54f6280b48c4cccd59bb3d4e6e75cf48a369ed52226c792a6ec4885ea2.jpg)
"[New] Leveraging OBS for Top-Notch Social Media Streaming for 2024"
Leveraging OBS for Top-Notch Social Media Streaming
OBS Studio has become one of the most popular streaming applications out there. It’s extremely simple to utilize with numerous social media sites such as YouTube, Facebook Live, and Twitch. Today, we will teach you how to link OBS Studio with Facebook Live and start broadcasting in no time. You may embed scene sources inside scene sources so that the user can control what’s occurring. Using this will enable you to represent a certain scenario throughout a historical period. Nesting sceneries enable you to edit one portion of a scene without having to go through the full scenario. OBS Studio takes your web camera, microphone, and other devices as inputs and works well on all Windows, Mac, and Linux systems. It has a big community, which assures a steady supply of filters, transition effects, overlays, and help if you ever have trouble when working the program.
On Facebook Live, it’s very simple to generate high-quality live streaming nowadays, but effective live broadcasts take a little know-how and technical knowledge or understanding. OBS Studio allows you to communicate with your Facebook network via HD live streaming. It allows you to make your live broadcasts seem professional and leave a lasting impression. Open Broadcaster Software Studio is a free live streaming application with cross-platform interoperability. It gives you extensive customization choices, enabling you to manage every element of video recording and streaming. In addition to video recording and streaming, OBS can also allow you to capture your computer screen and live stream gameplays in high quality. The program provides a customizable UI to match your needs simply. Many of the OBS features match those seen in paid products. Here, we’ve put together our best advice for maximizing OBS settings for live broadcasting.
Filmora Audio Recorder
Record computer system audio
Capture microphone audio
Customize recording volume
Record screen and webcam as well
Part 1: How to Set up OBS Stream Settings
OBS Studio provides several wonderful tools for beginner broadcasters who are just getting the swing of live broadcasting. The program contains a set of OBS-specific system requirements to guarantee the most optimum live broadcasting experience. These options include the ability to mix several sources with unique transitions, employ audio/video filters and correction tools, and more. First, access the OBS Studio settings by selecting the “Settings” button in the bottom-right region of the program window. The first tab, named “General,” doesn’t include anything particularly significant to examine. However, here, you may pick your language and choose a bright or dark theme.
 Project Manager - Asset Browser for 3Ds Max
Steps to Set up OBS Stream Settings
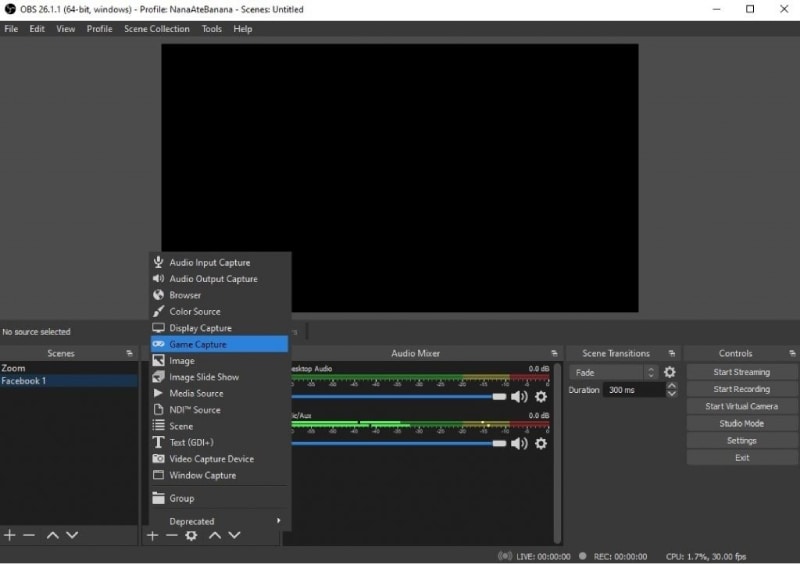
**Step 1: Once you’ve evaluated these options, click on the next tab labeled “Stream” in the OBS Studio settings box. Game capture is suggested for live streaming since it is designed for recording screen material as well as capturing video. Multiple sources may be utilized as scenes, and they can be made visible or invisible with the touch of a button.
**Step 2: As soon as you run OBS, you are greeted with the auto-config window, which automatically picks various choices for you based on how you want to use it. The auto-configuration settings may be toggled again by clicking on Tools -> Auto-Configuration Wizard. However, your connection speed may be too slow to handle this bitrate. You may simply confirm whether this is the case by running a speed test.

**Step 3: On the top, we have the primary canvas showcasing all material to be captured or broadcast. We may add as many sources as we need. There are several choices for visual sources as well as audio channels. By default, the resolution is the same as the laptop screen. At the bottom, various sceneries may be specified. Scenes comprise multiple sources that may be utilized to capture or broadcast.
Part 2: Connect OBS to Facebook Live
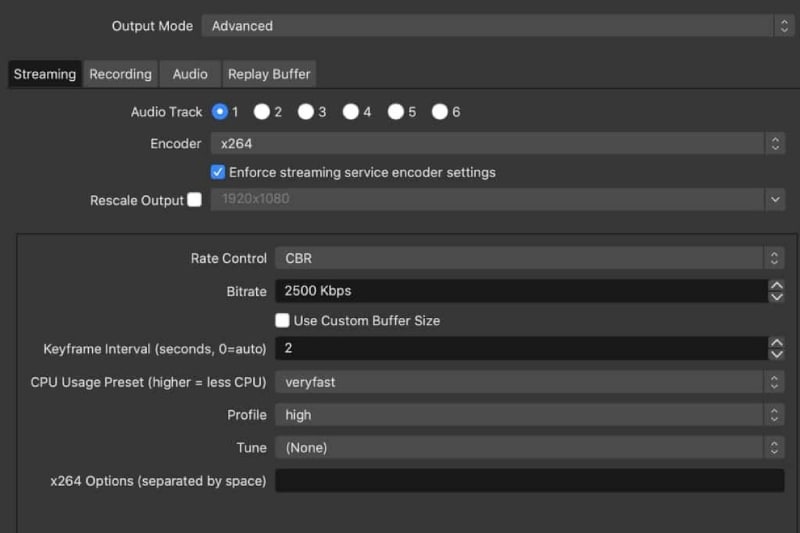
OBS Studio can broadcast your videos on all the main streaming networks, including Twitch, YouTube, Facebook Live, and more than 30 similar services. When you live stream on Facebook with OBS Studio, you may experience the host of visual mixing and customization tools of OBS Studio. To alter your OBS Studio settings, you will have to visit the “Output “settings in your OBS Studio account.
By default, the chosen output mode is “Simple.” To guarantee your live broadcast is reliable and completely functioning we suggest you follow the configuration options offered in the “Encoder Setup” box. The technique to combine OBS Studio and Facebook is pretty straightforward and comprises the following stages.
Steps to Connect OBS to Facebook Live
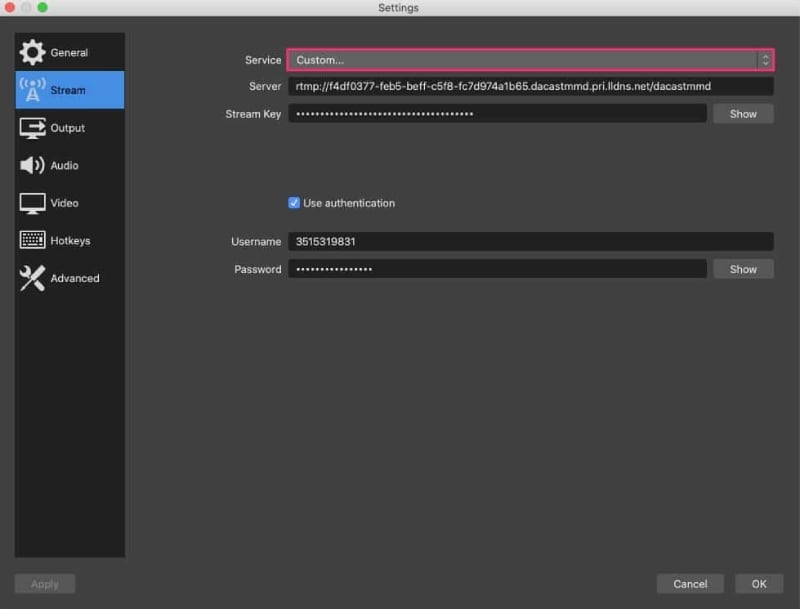
**Step 1: Launch OBS Studio. Then go to Files and Click on Settings. Select the Stream option.
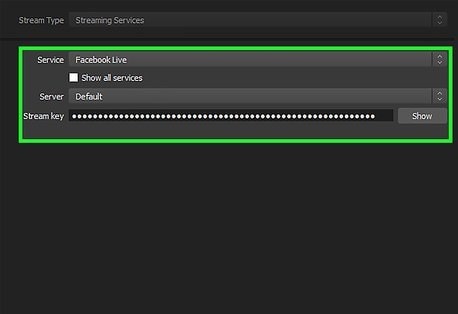
**Step 2: Set Stream Type as Streaming Services from the drop-down. Select Facebook Live in the Service drop-down list.
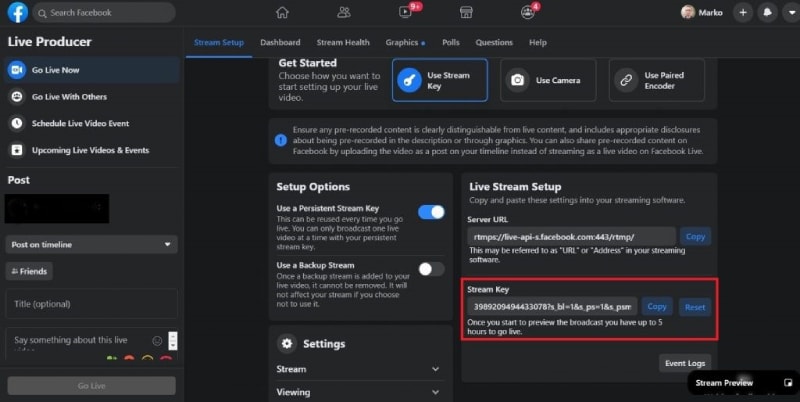
**Step 3: Copy the stream key from Facebook and put it into the provided box in OBS Studio. Once done, click OK to conclude the procedure.

**Step 4: By combining OBS Studio with Facebook Live, you can go live on Facebook with all the amazing capabilities of OBS Studio.
Part 3: Start live streaming Facebook with OBS
In the OBS Studio main screen, select Start Streaming to transmit the broadcast to Facebook Live. You are not live streaming at this time; you need to preview and confirm the feedthrough Facebook before the stream is officially uploaded. Now that your production is set and streaming on Facebook Live, you need to return to your Facebook page and do some final verification before the stream is properly published. From your Facebook browser window or tab, click the Next button at the bottom-right corner of the window to access the preview page.

Steps to Start live streaming Facebook with OBS
**Step 1: Click the Settings button in the lower-right corner of the OBS Studio interface to enter the Settings window.
**Step 2: Click Stream, then pick Facebook Live from the Service drop-down box and start streaming by hitting on the ‘Start Streaming’ button.
**Step 3: Live streaming may be started immediately away. Live streaming may also be arranged. Streams may be launched by specifying a thumbnail picture of the required size, 1280×720 pixels before they begin broadcasting. You are all prepared to utilize OBS for Live broadcasting on Facebook!
**Step 4: Verify that your stream is coming through correctly, and when satisfied, use the fields on this page to add a video title, keywords, and accompanying text to post alongside your live stream.
 Jet Profiler for MySQL, Enterprise Version: Jet Profiler for MySQL is real-time query performance and diagnostics tool for the MySQL database server. Its detailed query information, graphical interface and ease of use makes this a great tool for finding performance bottlenecks in your MySQL databases.
 Conclusion
Facebook Live provides an exciting and entertaining opportunity to connect with your audience fully and in real-time. It has become one of the top channels for businesses, influencers, and consumers alike. Numerous users and surveys suggest that novices and pros use OBS for live streaming on Facebook since it is a feature-rich tool. It is straightforward to set up and operate and users have control over the numerous parameters from video quality, frame rate, and audio bitrate. All in all, it is one of the finest tools available for live streaming and screen recording. It also includes a vast community of users and a blog which is beneficial if users are lost or puzzled when using OBS.
Part 1: How to Set up OBS Stream Settings
OBS Studio provides several wonderful tools for beginner broadcasters who are just getting the swing of live broadcasting. The program contains a set of OBS-specific system requirements to guarantee the most optimum live broadcasting experience. These options include the ability to mix several sources with unique transitions, employ audio/video filters and correction tools, and more. First, access the OBS Studio settings by selecting the “Settings” button in the bottom-right region of the program window. The first tab, named “General,” doesn’t include anything particularly significant to examine. However, here, you may pick your language and choose a bright or dark theme.
Steps to Set up OBS Stream Settings
**Step 1: Once you’ve evaluated these options, click on the next tab labeled “Stream” in the OBS Studio settings box. Game capture is suggested for live streaming since it is designed for recording screen material as well as capturing video. Multiple sources may be utilized as scenes, and they can be made visible or invisible with the touch of a button.
**Step 2: As soon as you run OBS, you are greeted with the auto-config window, which automatically picks various choices for you based on how you want to use it. The auto-configuration settings may be toggled again by clicking on Tools -> Auto-Configuration Wizard. However, your connection speed may be too slow to handle this bitrate. You may simply confirm whether this is the case by running a speed test.
 PDF application, powered by AI-based OCR, for unified workflows with both digital and scanned documents.
**Step 3: On the top, we have the primary canvas showcasing all material to be captured or broadcast. We may add as many sources as we need. There are several choices for visual sources as well as audio channels. By default, the resolution is the same as the laptop screen. At the bottom, various sceneries may be specified. Scenes comprise multiple sources that may be utilized to capture or broadcast.


Part 2: Connect OBS to Facebook Live
OBS Studio can broadcast your videos on all the main streaming networks, including Twitch, YouTube, Facebook Live, and more than 30 similar services. When you live stream on Facebook with OBS Studio, you may experience the host of visual mixing and customization tools of OBS Studio. To alter your OBS Studio settings, you will have to visit the “Output “settings in your OBS Studio account.
By default, the chosen output mode is “Simple.” To guarantee your live broadcast is reliable and completely functioning we suggest you follow the configuration options offered in the “Encoder Setup” box. The technique to combine OBS Studio and Facebook is pretty straightforward and comprises the following stages.
Steps to Connect OBS to Facebook Live
**Step 1: Launch OBS Studio. Then go to Files and Click on Settings. Select the Stream option.
**Step 2: Set Stream Type as Streaming Services from the drop-down. Select Facebook Live in the Service drop-down list.

**Step 3: Copy the stream key from Facebook and put it into the provided box in OBS Studio. Once done, click OK to conclude the procedure.
**Step 4: By combining OBS Studio with Facebook Live, you can go live on Facebook with all the amazing capabilities of OBS Studio.
Part 3: Start live streaming Facebook with OBS
In the OBS Studio main screen, select Start Streaming to transmit the broadcast to Facebook Live. You are not live streaming at this time; you need to preview and confirm the feedthrough Facebook before the stream is officially uploaded. Now that your production is set and streaming on Facebook Live, you need to return to your Facebook page and do some final verification before the stream is properly published. From your Facebook browser window or tab, click the Next button at the bottom-right corner of the window to access the preview page.
Steps to Start live streaming Facebook with OBS
**Step 1: Click the Settings button in the lower-right corner of the OBS Studio interface to enter the Settings window.
**Step 2: Click Stream, then pick Facebook Live from the Service drop-down box and start streaming by hitting on the ‘Start Streaming’ button.
**Step 3: Live streaming may be started immediately away. Live streaming may also be arranged. Streams may be launched by specifying a thumbnail picture of the required size, 1280×720 pixels before they begin broadcasting. You are all prepared to utilize OBS for Live broadcasting on Facebook!

**Step 4: Verify that your stream is coming through correctly, and when satisfied, use the fields on this page to add a video title, keywords, and accompanying text to post alongside your live stream.
 SwifDoo PDF Perpetual (2-PC) Free upgrade. No monthly fees ever.
Conclusion
Facebook Live provides an exciting and entertaining opportunity to connect with your audience fully and in real-time. It has become one of the top channels for businesses, influencers, and consumers alike. Numerous users and surveys suggest that novices and pros use OBS for live streaming on Facebook since it is a feature-rich tool. It is straightforward to set up and operate and users have control over the numerous parameters from video quality, frame rate, and audio bitrate. All in all, it is one of the finest tools available for live streaming and screen recording. It also includes a vast community of users and a blog which is beneficial if users are lost or puzzled when using OBS.

Part 1: How to Set up OBS Stream Settings
OBS Studio provides several wonderful tools for beginner broadcasters who are just getting the swing of live broadcasting. The program contains a set of OBS-specific system requirements to guarantee the most optimum live broadcasting experience. These options include the ability to mix several sources with unique transitions, employ audio/video filters and correction tools, and more. First, access the OBS Studio settings by selecting the “Settings” button in the bottom-right region of the program window. The first tab, named “General,” doesn’t include anything particularly significant to examine. However, here, you may pick your language and choose a bright or dark theme.
Steps to Set up OBS Stream Settings
**Step 1: Once you’ve evaluated these options, click on the next tab labeled “Stream” in the OBS Studio settings box. Game capture is suggested for live streaming since it is designed for recording screen material as well as capturing video. Multiple sources may be utilized as scenes, and they can be made visible or invisible with the touch of a button.
**Step 2: As soon as you run OBS, you are greeted with the auto-config window, which automatically picks various choices for you based on how you want to use it. The auto-configuration settings may be toggled again by clicking on Tools -> Auto-Configuration Wizard. However, your connection speed may be too slow to handle this bitrate. You may simply confirm whether this is the case by running a speed test.
**Step 3: On the top, we have the primary canvas showcasing all material to be captured or broadcast. We may add as many sources as we need. There are several choices for visual sources as well as audio channels. By default, the resolution is the same as the laptop screen. At the bottom, various sceneries may be specified. Scenes comprise multiple sources that may be utilized to capture or broadcast.
 The BootIt Collection covers multi-booting, partitioning, and disk imaging on traditional PC’s using the standard BIOS and newer PC’s using UEFI. The collection includes BootIt Bare Metal (BIBM) for standard BIOS systems and BootIt UEFI (BIU) for UEFI system.
Part 2: Connect OBS to Facebook Live
OBS Studio can broadcast your videos on all the main streaming networks, including Twitch, YouTube, Facebook Live, and more than 30 similar services. When you live stream on Facebook with OBS Studio, you may experience the host of visual mixing and customization tools of OBS Studio. To alter your OBS Studio settings, you will have to visit the “Output “settings in your OBS Studio account.
By default, the chosen output mode is “Simple.” To guarantee your live broadcast is reliable and completely functioning we suggest you follow the configuration options offered in the “Encoder Setup” box. The technique to combine OBS Studio and Facebook is pretty straightforward and comprises the following stages.
Steps to Connect OBS to Facebook Live
**Step 1: Launch OBS Studio. Then go to Files and Click on Settings. Select the Stream option.
**Step 2: Set Stream Type as Streaming Services from the drop-down. Select Facebook Live in the Service drop-down list.
**Step 3: Copy the stream key from Facebook and put it into the provided box in OBS Studio. Once done, click OK to conclude the procedure.
**Step 4: By combining OBS Studio with Facebook Live, you can go live on Facebook with all the amazing capabilities of OBS Studio.
Part 3: Start live streaming Facebook with OBS
In the OBS Studio main screen, select Start Streaming to transmit the broadcast to Facebook Live. You are not live streaming at this time; you need to preview and confirm the feedthrough Facebook before the stream is officially uploaded. Now that your production is set and streaming on Facebook Live, you need to return to your Facebook page and do some final verification before the stream is properly published. From your Facebook browser window or tab, click the Next button at the bottom-right corner of the window to access the preview page.

Steps to Start live streaming Facebook with OBS
**Step 1: Click the Settings button in the lower-right corner of the OBS Studio interface to enter the Settings window.
**Step 2: Click Stream, then pick Facebook Live from the Service drop-down box and start streaming by hitting on the ‘Start Streaming’ button.
**Step 3: Live streaming may be started immediately away. Live streaming may also be arranged. Streams may be launched by specifying a thumbnail picture of the required size, 1280×720 pixels before they begin broadcasting. You are all prepared to utilize OBS for Live broadcasting on Facebook!
**Step 4: Verify that your stream is coming through correctly, and when satisfied, use the fields on this page to add a video title, keywords, and accompanying text to post alongside your live stream.
Conclusion
Facebook Live provides an exciting and entertaining opportunity to connect with your audience fully and in real-time. It has become one of the top channels for businesses, influencers, and consumers alike. Numerous users and surveys suggest that novices and pros use OBS for live streaming on Facebook since it is a feature-rich tool. It is straightforward to set up and operate and users have control over the numerous parameters from video quality, frame rate, and audio bitrate. All in all, it is one of the finest tools available for live streaming and screen recording. It also includes a vast community of users and a blog which is beneficial if users are lost or puzzled when using OBS.
Part 1: How to Set up OBS Stream Settings
OBS Studio provides several wonderful tools for beginner broadcasters who are just getting the swing of live broadcasting. The program contains a set of OBS-specific system requirements to guarantee the most optimum live broadcasting experience. These options include the ability to mix several sources with unique transitions, employ audio/video filters and correction tools, and more. First, access the OBS Studio settings by selecting the “Settings” button in the bottom-right region of the program window. The first tab, named “General,” doesn’t include anything particularly significant to examine. However, here, you may pick your language and choose a bright or dark theme.
Steps to Set up OBS Stream Settings
**Step 1: Once you’ve evaluated these options, click on the next tab labeled “Stream” in the OBS Studio settings box. Game capture is suggested for live streaming since it is designed for recording screen material as well as capturing video. Multiple sources may be utilized as scenes, and they can be made visible or invisible with the touch of a button.
**Step 2: As soon as you run OBS, you are greeted with the auto-config window, which automatically picks various choices for you based on how you want to use it. The auto-configuration settings may be toggled again by clicking on Tools -> Auto-Configuration Wizard. However, your connection speed may be too slow to handle this bitrate. You may simply confirm whether this is the case by running a speed test.
**Step 3: On the top, we have the primary canvas showcasing all material to be captured or broadcast. We may add as many sources as we need. There are several choices for visual sources as well as audio channels. By default, the resolution is the same as the laptop screen. At the bottom, various sceneries may be specified. Scenes comprise multiple sources that may be utilized to capture or broadcast.
Part 2: Connect OBS to Facebook Live
OBS Studio can broadcast your videos on all the main streaming networks, including Twitch, YouTube, Facebook Live, and more than 30 similar services. When you live stream on Facebook with OBS Studio, you may experience the host of visual mixing and customization tools of OBS Studio. To alter your OBS Studio settings, you will have to visit the “Output “settings in your OBS Studio account.
By default, the chosen output mode is “Simple.” To guarantee your live broadcast is reliable and completely functioning we suggest you follow the configuration options offered in the “Encoder Setup” box. The technique to combine OBS Studio and Facebook is pretty straightforward and comprises the following stages.
Steps to Connect OBS to Facebook Live
**Step 1: Launch OBS Studio. Then go to Files and Click on Settings. Select the Stream option.
**Step 2: Set Stream Type as Streaming Services from the drop-down. Select Facebook Live in the Service drop-down list.
**Step 3: Copy the stream key from Facebook and put it into the provided box in OBS Studio. Once done, click OK to conclude the procedure.
**Step 4: By combining OBS Studio with Facebook Live, you can go live on Facebook with all the amazing capabilities of OBS Studio.
Part 3: Start live streaming Facebook with OBS
In the OBS Studio main screen, select Start Streaming to transmit the broadcast to Facebook Live. You are not live streaming at this time; you need to preview and confirm the feedthrough Facebook before the stream is officially uploaded. Now that your production is set and streaming on Facebook Live, you need to return to your Facebook page and do some final verification before the stream is properly published. From your Facebook browser window or tab, click the Next button at the bottom-right corner of the window to access the preview page.
Steps to Start live streaming Facebook with OBS
**Step 1: Click the Settings button in the lower-right corner of the OBS Studio interface to enter the Settings window.
**Step 2: Click Stream, then pick Facebook Live from the Service drop-down box and start streaming by hitting on the ‘Start Streaming’ button.
**Step 3: Live streaming may be started immediately away. Live streaming may also be arranged. Streams may be launched by specifying a thumbnail picture of the required size, 1280×720 pixels before they begin broadcasting. You are all prepared to utilize OBS for Live broadcasting on Facebook!
**Step 4: Verify that your stream is coming through correctly, and when satisfied, use the fields on this page to add a video title, keywords, and accompanying text to post alongside your live stream.

Conclusion
Facebook Live provides an exciting and entertaining opportunity to connect with your audience fully and in real-time. It has become one of the top channels for businesses, influencers, and consumers alike. Numerous users and surveys suggest that novices and pros use OBS for live streaming on Facebook since it is a feature-rich tool. It is straightforward to set up and operate and users have control over the numerous parameters from video quality, frame rate, and audio bitrate. All in all, it is one of the finest tools available for live streaming and screen recording. It also includes a vast community of users and a blog which is beneficial if users are lost or puzzled when using OBS.
- Title: [New] Leveraging OBS for Top-Notch Social Media Streaming for 2024
- Author: Virginia Woolf
- Created at : 2024-07-24 13:30:54
- Updated at : 2024-07-25 13:30:54
- Link: https://visual-screen-recording.techidaily.com/new-leveraging-obs-for-top-notch-social-media-streaming-for-2024/
- License: This work is licensed under CC BY-NC-SA 4.0.