
Innovative Practices for Online Learning Archives for 2024
Innovative Practices for Online Learning Archives
The individuals are having an expanding number of online meetings or online courses to join in while using webinar recording software. Also almost certainly, you want to save a recording of an online course so you can return to the innovative thoughts later. Additionally, having the option to pre-record webinars and record an online course can be truly helpful particularly when you need to share and scatter the substance and thoughts with your colleagues or loved ones. To turn an online class, be it live or GoTo webinar recording, into evergreen video content, having a screen recorder to record webinars is essential. This instructional exercise will tell you the best way to record an online class on Windows and Mac with legitimate webinar recording software.
Normally, just the host of the online course can record and control the recording. To record the Webinar meeting whenever you like, you may require an online course recording application, which can record an online course that you are watching and save it as a video document for later review. All things considered; a screen recording instrument has turned into a famous usefulness device just as basic work-from-home stuff. You might utilize it to record an online class for later audit or record a significant conference or an internet-based class to take notes. In addition, a decent screen recording apparatus even permits you to record a webcam so you might make introductions or instructive recordings. By and large, a speaker of an online class imparts thoughts and other substance to interactive media structures like a PowerPoint show, a video, a website page, etc.
Part 1. How to Record Webinar on Windows PC
Part 2. How to Record Webinar on Mac
Part 3. Related FAQs
Part 1. How to Record Webinar on Windows PC
For recording webinars, it is additionally conceivable to record a zoom online course as a participant. However, you will require recording consent from the host, which is excessively inconvenient. Assuming you need more opportunities on record to zoom online courses, online course recording software is vital. With a wide determination of webinar recording software accessible, here we’ll suggest an adaptable and clear screen recording program for recording online courses. Wondershare Filmora is a simple to-utilize webinar recording software for fledglings to make online course accounts. It additionally gives some accommodating altering choices to work on your accounts. How about we investigate this quality device and what it offers.
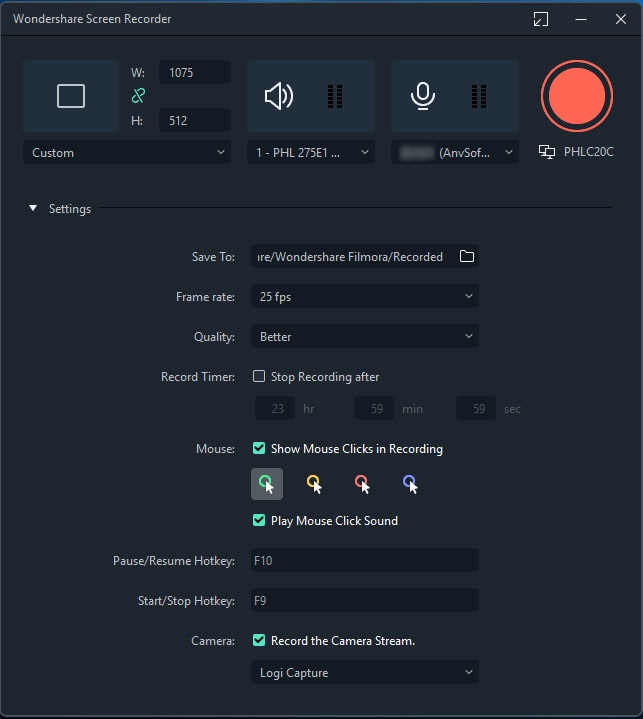
Wondershare Filmora is also an extraordinary pre-record webinar recorder for Windows and Mac. It can record an online class without a period limit however long you want it. You can begin and end the recording with console hotkeys. All webcams and the voices of all participants at the online class can be recorded. The recorder additionally empowers you to take screen captures during the online class. In addition, with the Wondershare Filmora online class recorder, you can decide to show or conceal mouse activities, incorporate or reject exercises of other applications on your PC on the online course recording. The online class will be recorded and saved in MP4, WMV, F4V, TS, AVI, MOV designs with the goal that you can share or transfer them through YouTube or different stages.
For Win 7 or later (64-bit)
For macOS 10.12 or later
Step 1: Install and Launch Filmora Recorder
Visit the official website of Filmora and then download this software for your compatible system due to its simplistic all-in-one approach to video editing and recording solutions. Well, if you haven’t, then this is the time and links as mentioned below to download it hassle-free. Right after the downloading and installation/updating process finishes, you can launch it directly from your desktop.

Step 2: Record the Webinar with Customization
In the next step, you can do the settings on your own without having any prior expertise in this regard. To do that, simply hit the New Recording button, and inside the recording interface, enable Webcam and microphone settings right on your fingertips.
Step 3: Edit Your Recorded Webinar
Just as you’re finished with the webinar recording, now is the time to launch the recording inside the Filmora video editor to further polish it according to your extent. The Wondershare Filmora is viable with modest frameworks, its video editor has a lot of implicit items to be utilized in the video projects. Planned explicitly for the recordings, this product thinks of a streamlined interface to take your recordings to the next level through its professional editing features.

Step 4: Export/Save the Masterpiece
Lastly, when you are finished with creating the informational webinar video recording and editing it, you can now save it to share on social media. Filmora allows embedded sharing platforms like YouTube on the go. The file can be saved into the format as; MP4, WMV, AVI, MOV, GIF, MP3.
Part 2. How to Record Webinar on Mac
QuickTime Player is your Mac’s default video (and sound) application that can likewise be utilized to record and delicately alter the video of your screen. The application is free, pre-introduced, and simple to utilize. QuickTime is preinstalled on each Mac PC and it permits you to record your screen. Assuming that you’re searching for a simple and clear method for recording your screen, QuickTime certainly possesses all the necessary qualities. Furthermore, the application highlights broad altering capacities and allows you to go with your online course with additional soundtracks. As well as playing recordings, QuickTime Player additionally serves as a screen recorder! We will tell you the best way to begin screen recording in this instructional exercise.
Step 1: Launch QuickTime Player
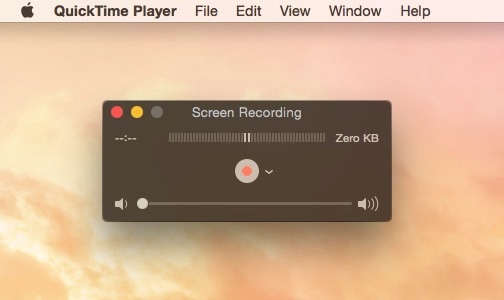
QuickTime Player is one out of numerous well-known video players. Launch it from your MacBook and with the QuickTime Player open, go to File > New Screen Recording. A Screen Recording brief will show up.

Step 2: Setup the Webinar Recording
Before you click the record button, Click the down bolt close to the button to guarantee you are set up appropriately. On the off chance that you like to have your voice recorded, pick the mouthpiece you like. You should have an inward or outside amplifier for recording. Pick “Show Mouse Clicks in Recording” if you would like your mouse clicks stressed.
Step 3: Start Recording
When you are prepared, click the record button. A popup will show up at the focal point of your screen. Click anyplace on the screen assuming you need your Entire Screen Recorded. On the off chance that you need just a piece of your screen recorded, snap and drag over the segment you need and snap “Begin Recording”.
Step 4: Save the Recording
When you are prepared to complete the process of recording, in the top menu bar, click on the Stop Icon. Your recording will spring up on your screen for you to survey. Assuming you are happy with the result and might want to save the recording, Go to File > Save. A flyover will show up on your video, name your video and hit “Save”.
Part 3. Related FAQs
Q1. How can I record a webinar for free?
Is it safe to say that you are searching for an online course application that has a recording highlight? Look no more. Presently, Filmora is one of the most favoured online course benefits with recording highlights. Its notoriety depends on the way that it can address the issues of any association. Assuming that your work identifies with business, you should know about an online course, which implies a web class, a web-based occasion to share novel thoughts, new items, and energize the crowd all over the planet to take part.
Q2. What is the best software for recording a webinar?
Online courses can be a unique expansion to your substance promoting toolbox. That is the reason we want to screen record online classes, regardless of whether you will go to an instructive workshop or business show. Albeit numerous Webinar stages offer implicit screen recorders to record all visuals and sounds, to re-watch the online course, you want to sign into the stage for the playback. assuming you need a program that is fast and simple to utilize Filmora merits considering.
Q3. How do I record a webinar engaging?
In the wake of recording an online course, they can likewise get all the data regardless of whether they can’t join the meeting alongside you. Online course administrations can be led locally just as all around the world. With regards to picking an online course software, there are a few elements that you should take a gander at. You should set up your camera and receiver, dispatch your show, and take out audios, notices, and interruptions before beginning to record. Also more significantly, as a crowd of people, you may just need a few clasps rather than the entire video of the online course.
Part 2. How to Record Webinar on Mac
Part 3. Related FAQs
Part 1. How to Record Webinar on Windows PC
For recording webinars, it is additionally conceivable to record a zoom online course as a participant. However, you will require recording consent from the host, which is excessively inconvenient. Assuming you need more opportunities on record to zoom online courses, online course recording software is vital. With a wide determination of webinar recording software accessible, here we’ll suggest an adaptable and clear screen recording program for recording online courses. Wondershare Filmora is a simple to-utilize webinar recording software for fledglings to make online course accounts. It additionally gives some accommodating altering choices to work on your accounts. How about we investigate this quality device and what it offers.
Wondershare Filmora is also an extraordinary pre-record webinar recorder for Windows and Mac. It can record an online class without a period limit however long you want it. You can begin and end the recording with console hotkeys. All webcams and the voices of all participants at the online class can be recorded. The recorder additionally empowers you to take screen captures during the online class. In addition, with the Wondershare Filmora online class recorder, you can decide to show or conceal mouse activities, incorporate or reject exercises of other applications on your PC on the online course recording. The online class will be recorded and saved in MP4, WMV, F4V, TS, AVI, MOV designs with the goal that you can share or transfer them through YouTube or different stages.
For Win 7 or later (64-bit)
For macOS 10.12 or later
Step 1: Install and Launch Filmora Recorder
Visit the official website of Filmora and then download this software for your compatible system due to its simplistic all-in-one approach to video editing and recording solutions. Well, if you haven’t, then this is the time and links as mentioned below to download it hassle-free. Right after the downloading and installation/updating process finishes, you can launch it directly from your desktop.
Step 2: Record the Webinar with Customization
In the next step, you can do the settings on your own without having any prior expertise in this regard. To do that, simply hit the New Recording button, and inside the recording interface, enable Webcam and microphone settings right on your fingertips.
Step 3: Edit Your Recorded Webinar
Just as you’re finished with the webinar recording, now is the time to launch the recording inside the Filmora video editor to further polish it according to your extent. The Wondershare Filmora is viable with modest frameworks, its video editor has a lot of implicit items to be utilized in the video projects. Planned explicitly for the recordings, this product thinks of a streamlined interface to take your recordings to the next level through its professional editing features.
Step 4: Export/Save the Masterpiece
Lastly, when you are finished with creating the informational webinar video recording and editing it, you can now save it to share on social media. Filmora allows embedded sharing platforms like YouTube on the go. The file can be saved into the format as; MP4, WMV, AVI, MOV, GIF, MP3.
Part 2. How to Record Webinar on Mac
QuickTime Player is your Mac’s default video (and sound) application that can likewise be utilized to record and delicately alter the video of your screen. The application is free, pre-introduced, and simple to utilize. QuickTime is preinstalled on each Mac PC and it permits you to record your screen. Assuming that you’re searching for a simple and clear method for recording your screen, QuickTime certainly possesses all the necessary qualities. Furthermore, the application highlights broad altering capacities and allows you to go with your online course with additional soundtracks. As well as playing recordings, QuickTime Player additionally serves as a screen recorder! We will tell you the best way to begin screen recording in this instructional exercise.
Step 1: Launch QuickTime Player
QuickTime Player is one out of numerous well-known video players. Launch it from your MacBook and with the QuickTime Player open, go to File > New Screen Recording. A Screen Recording brief will show up.
Step 2: Setup the Webinar Recording
Before you click the record button, Click the down bolt close to the button to guarantee you are set up appropriately. On the off chance that you like to have your voice recorded, pick the mouthpiece you like. You should have an inward or outside amplifier for recording. Pick “Show Mouse Clicks in Recording” if you would like your mouse clicks stressed.
Step 3: Start Recording
When you are prepared, click the record button. A popup will show up at the focal point of your screen. Click anyplace on the screen assuming you need your Entire Screen Recorded. On the off chance that you need just a piece of your screen recorded, snap and drag over the segment you need and snap “Begin Recording”.
Step 4: Save the Recording
When you are prepared to complete the process of recording, in the top menu bar, click on the Stop Icon. Your recording will spring up on your screen for you to survey. Assuming you are happy with the result and might want to save the recording, Go to File > Save. A flyover will show up on your video, name your video and hit “Save”.
Part 3. Related FAQs
Q1. How can I record a webinar for free?
Is it safe to say that you are searching for an online course application that has a recording highlight? Look no more. Presently, Filmora is one of the most favoured online course benefits with recording highlights. Its notoriety depends on the way that it can address the issues of any association. Assuming that your work identifies with business, you should know about an online course, which implies a web class, a web-based occasion to share novel thoughts, new items, and energize the crowd all over the planet to take part.
Q2. What is the best software for recording a webinar?
Online courses can be a unique expansion to your substance promoting toolbox. That is the reason we want to screen record online classes, regardless of whether you will go to an instructive workshop or business show. Albeit numerous Webinar stages offer implicit screen recorders to record all visuals and sounds, to re-watch the online course, you want to sign into the stage for the playback. assuming you need a program that is fast and simple to utilize Filmora merits considering.
Q3. How do I record a webinar engaging?
In the wake of recording an online course, they can likewise get all the data regardless of whether they can’t join the meeting alongside you. Online course administrations can be led locally just as all around the world. With regards to picking an online course software, there are a few elements that you should take a gander at. You should set up your camera and receiver, dispatch your show, and take out audios, notices, and interruptions before beginning to record. Also more significantly, as a crowd of people, you may just need a few clasps rather than the entire video of the online course.
Also read:
- [New] The Ultimate Checklist for Adding Effective On-Screen Captions to Your Videos for 2024
- [Updated] CameraSection Breakdown Analysis
- [Updated] The Art of Revision Efficient Erasing Techniques in PSX
- 2024 Approved E-Learning Event Recording
- 2024 Approved Mastering Windows Animation The Best 9 Software for High-Quality GIF Capture
- Capturing Slideshows on Screen Webcam Tips and Tricks for 2024
- Complete Tutorial to Use VPNa to Fake GPS Location On Lava Yuva 2 Pro | Dr.fone
- Expert Strategies to Protect Your Inbox by Adding Your Domain to the MacOS Mail Safelist
- French Expression Excellence: Mastering the 'Enchanté' Salute
- In 2024, Easy-to-Use Screen Recording Software, Including Apowersoft
- Mini Marvels' Ultimate Game Hunt for 2024
- New 2024 Approved FCPX XML Essentials What You Need to Know
- Unlocking Affordability in Smartphones: An In-Depth Look at the OnePlus Nord N100 Model
- Unlocking the Power of Smart Lock A Beginners Guide for Tecno Spark Go (2023) Users
- Title: Innovative Practices for Online Learning Archives for 2024
- Author: Virginia Woolf
- Created at : 2025-01-25 19:17:26
- Updated at : 2025-01-30 22:30:49
- Link: https://visual-screen-recording.techidaily.com/innovative-practices-for-online-learning-archives-for-2024/
- License: This work is licensed under CC BY-NC-SA 4.0.