
Your Comprehensive Manual for Creating an Accessible and Effective Chat Room Within Skype, Compatible with Both Windows & MacOS Platforms.
Your Comprehensive Manual for Creating an Accessible and Effective Chat Room Within Skype, Compatible with Both Windows & MacOS Platforms
How to Make a Group Chat on Skype [For Windows and Mac]

Richard Bennett
Mar 27, 2024• Proven solutions
From the inventions of Alexander Graham Bell to today’s swift text messages, the mode of communication has changed throughout history. The workplace communication needs are evolving significantly and every one of us, individuals, companies, and organizations need to adapt promptly to the new ways of collaborating. Advanced technologies have now made it possible to make a group chat with family, friends, school, and coworkers to constantly stay updated with the latest family happenings or the progress of a particular project you’re working on. Skype group chat allows you to swiftly send messages, videos, pictures, etc. to multiple people at once while constantly apprising the group members of the latest events and developments. In this article, you will learn:
- Part 1: Make a Skype Group Chat on Windows
- Part 2: Start a Skype Group Chat on Mac
- Part 3: Manage Your Skype Group Chat
- Part 4: Q&A about Skype Group Chat
Part 1: Make a Skype Group Chat on Windows
Communicating with multiple people simultaneously from different parts of the world in real-time couldn’t be thought of some years ago. However, today Skype group chat makes it possible for anyone to connect and collaborate with several people without any barriers and limitations.
To make a group chat on Skype using a Windows operating system you can get connected with individuals from diverse localities of the world within a minute. To make a Skype group chat for yourself follow along with the steps below.
- Download Skype on your Windows PC. You’ll need to sign in with a Microsoft account or sign up if you haven’t already had a Skype account.
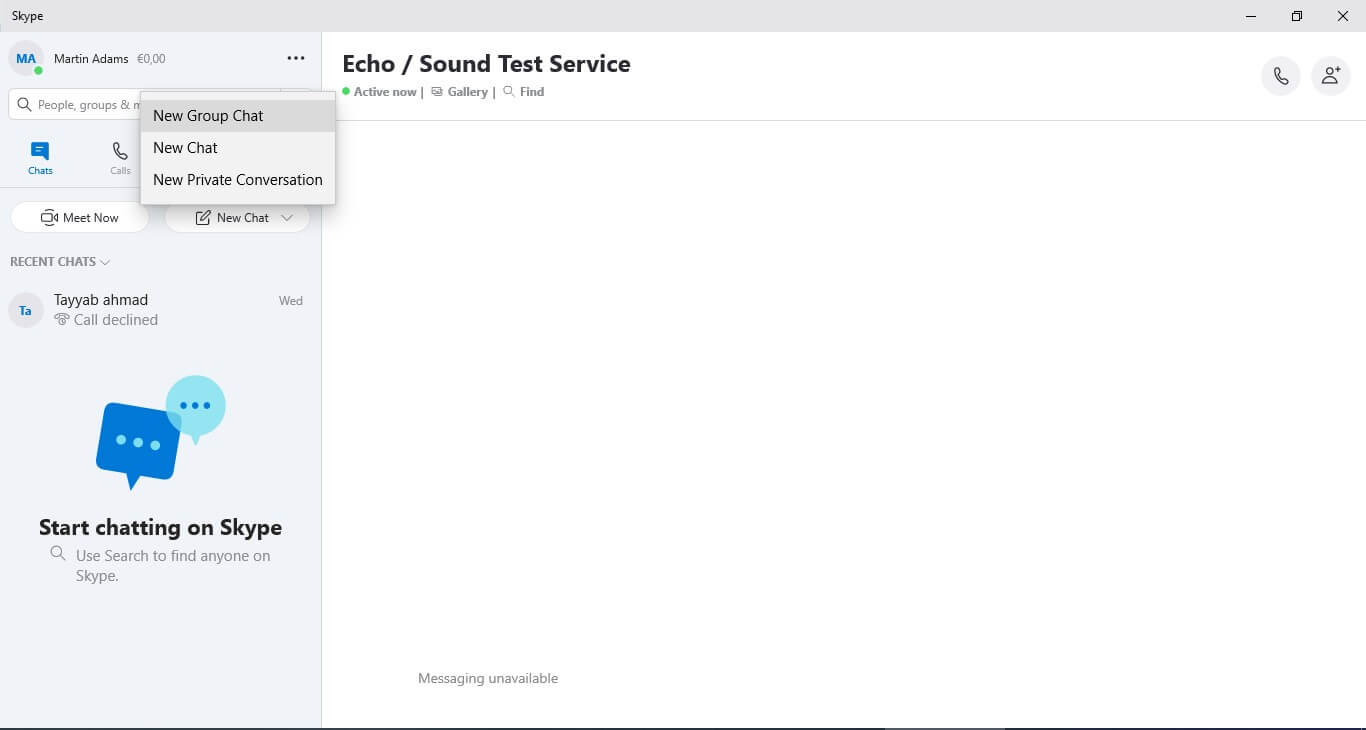
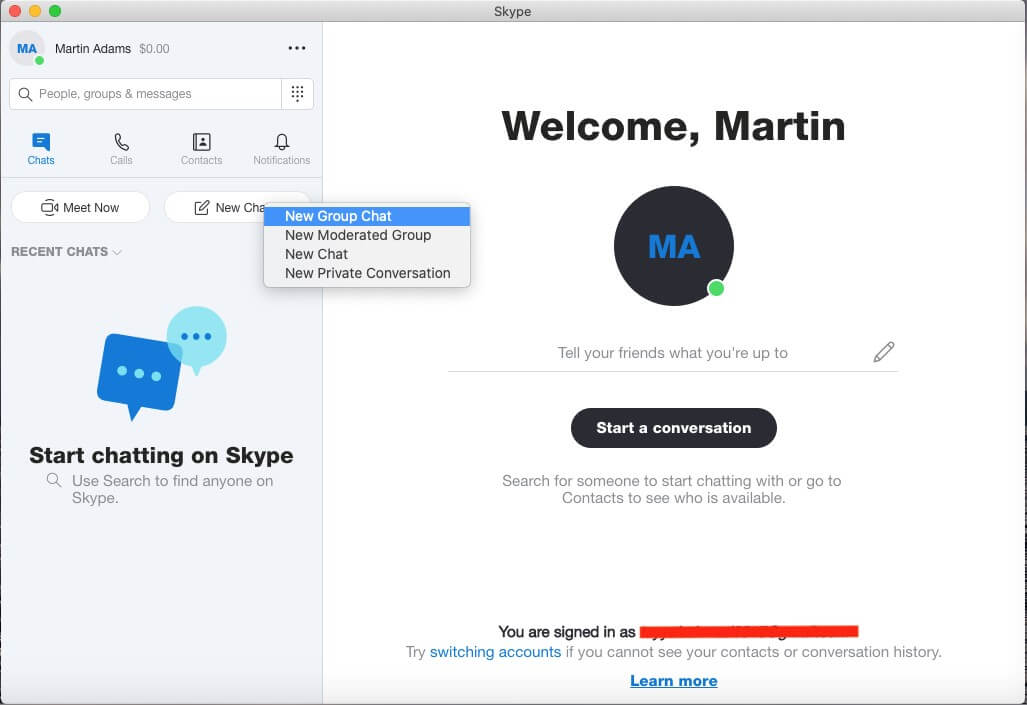
- Once you’ve logged in to Skype you’ll be presented with a similar interface with “Recent Chats” showing up in the left pane. To make a group chat click on the drop-down icon next to the “New Chat” button and select “New Group Chat” and your new Skype group chat is only a few clicks away.
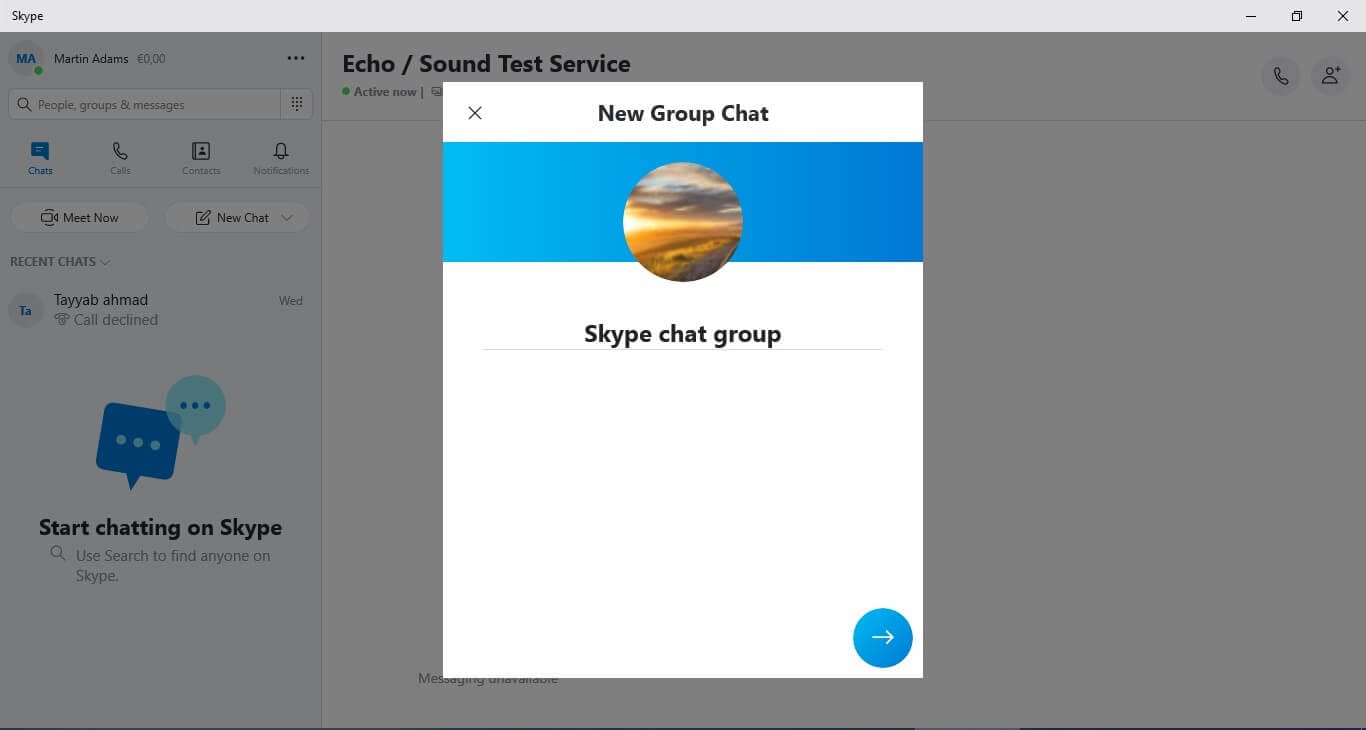
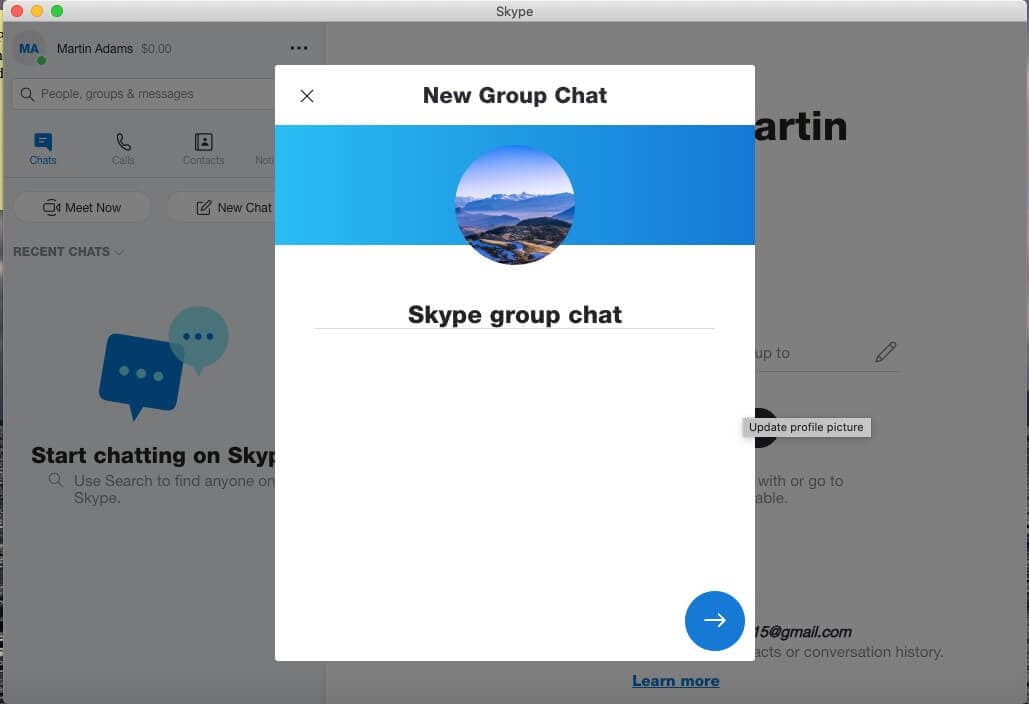
- A new window will appear in the Skype main screen. Here you’ll have to write the name of the group and select a picture for the group chat. The name should represent the purpose of the chat group to make sense to its participants, I’ve selected a figurative name for the sake of an example. After you’re done with the name and picture, press the ahead arrow.
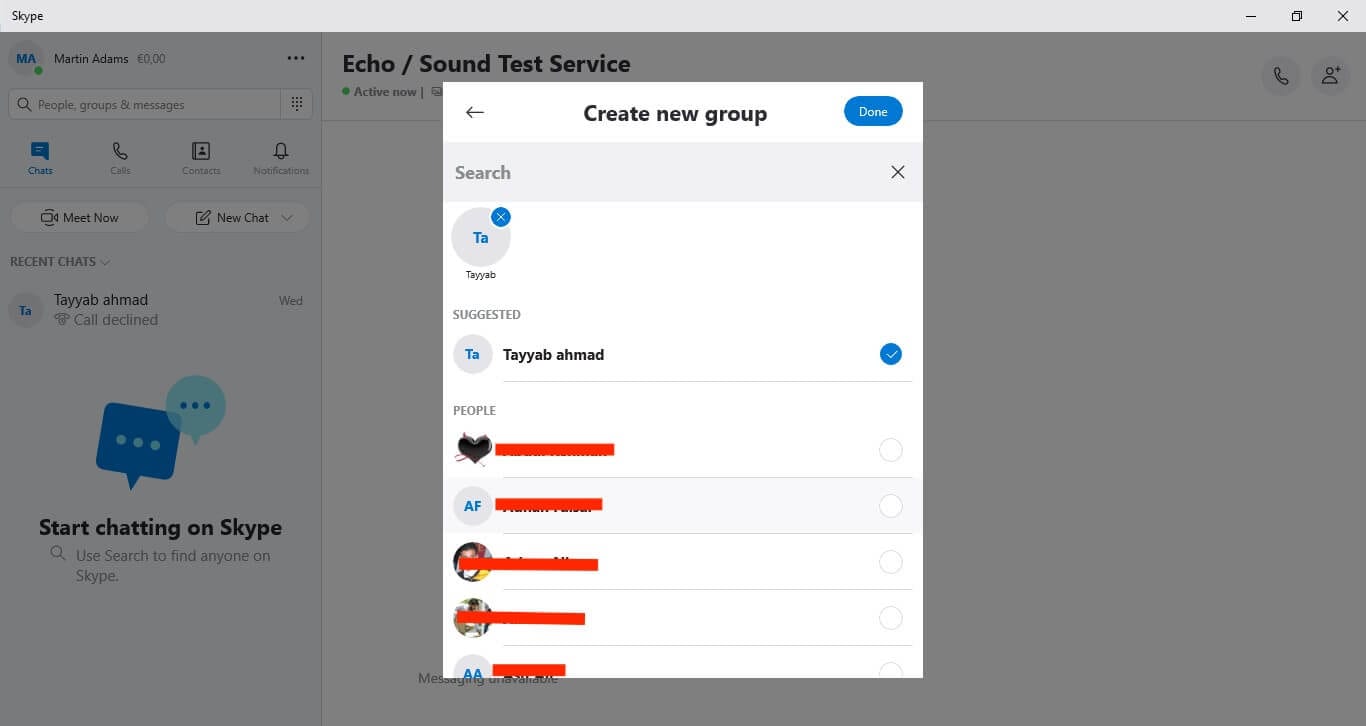
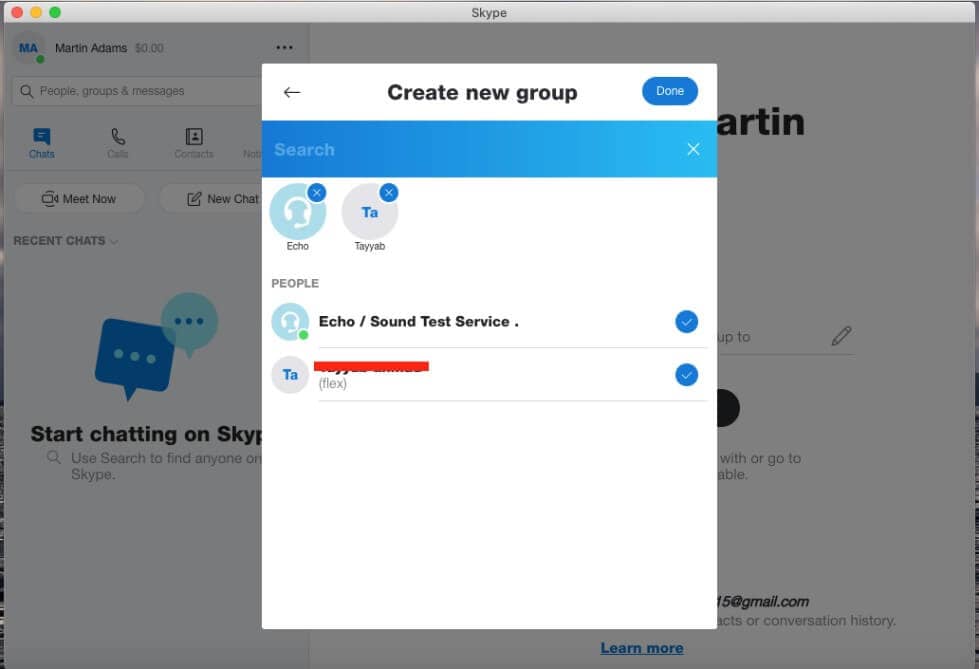
- Skype will take you to your contact list to choose the members for your new chat group. You can skimp through the whole list or search the name in the search bar to look for a particular person. Once you’re done selecting all your contacts press the “Done” button and Skype will create your new shiny group within a minute.
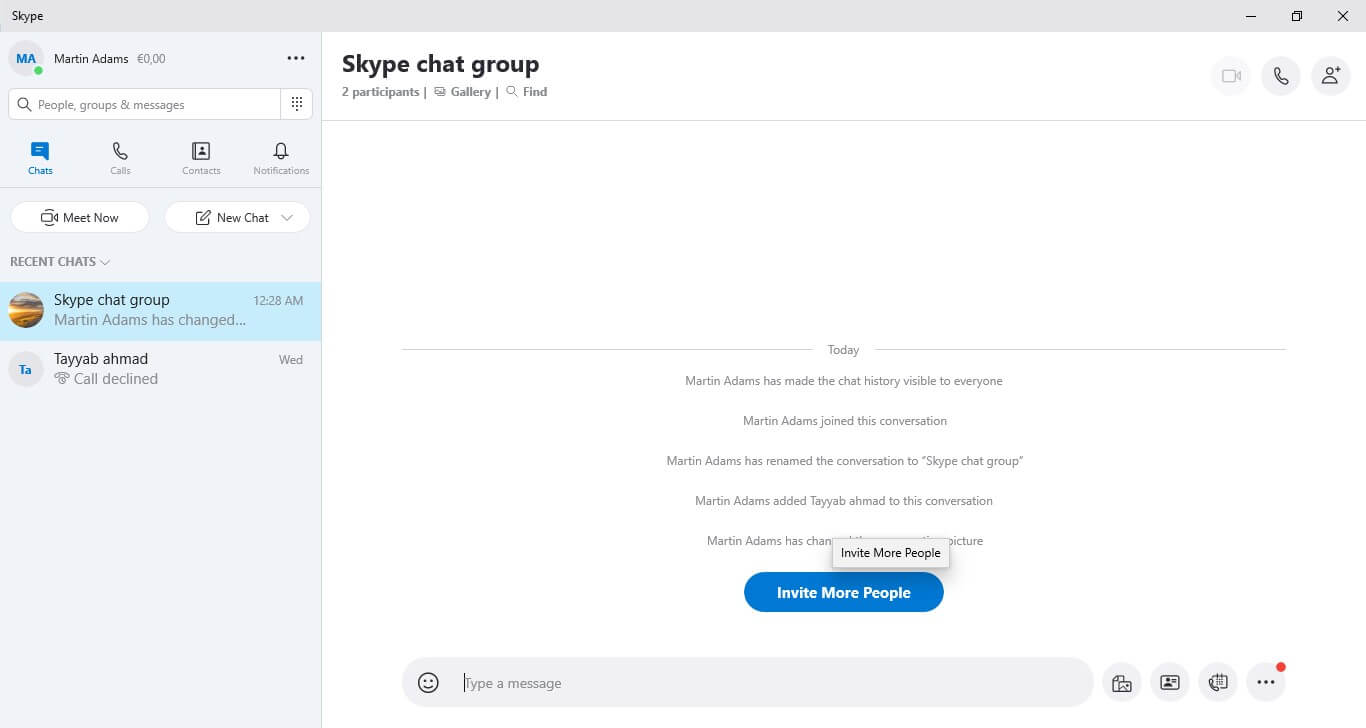
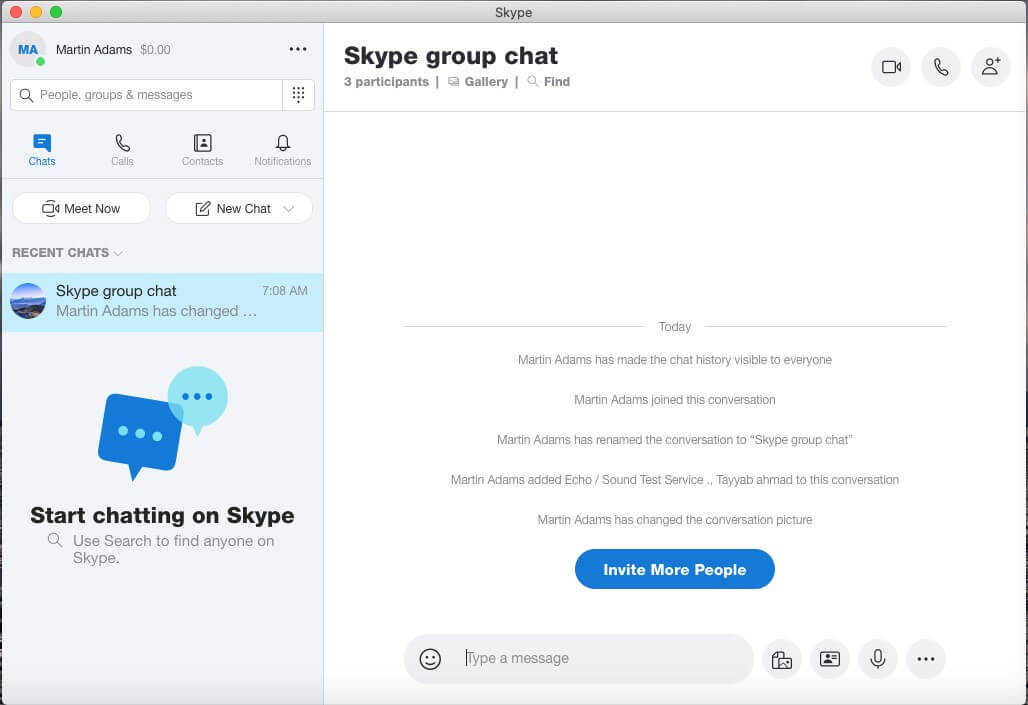
- You’ll be taken directly to the new group chat you just created. Here you can chat with all the group members at the same time without any delay. Send pictures, videos, schedule a group call, add more people to the group, and many more features.
Part 2: Start a Skype Group Chat on Mac
Skype allows anyone to create a group chat on Mac. You can easily create and enjoy your Skype group chat with the simple steps below.
- Download Skype on your Mac system and sign in with your Microsoft account.
- On the home page of Skype, you need to press and open the drop-down menu right next to the “New Chat” notepad icon. From the list select the “New Group Chat” option to get started creating your Skype group chat.
- A new window will pop up for you to determine the group name and picture. Choose a name that best describes the purpose of the group, as in our case it’s a dummy chat group, so I named it “Skype group chat”. Once you’ve done press the forward arrow button.
- You’ll be taken to your “Contact List” to choose the contacts you want to add to the group. After selecting all the contacts press the “Done” button and Skype will make a group chat and notify all the members of their joining the group.
- You will directly be taken to the newly created Skype group chat. where you can start chit chat with the group members.

- Now you can have a group video or audio call in real-time with members around the world. Talk and collaborate with coworkers, family, and friends while being able to send pictures, videos, and other files simultaneously.
Part 3: Manage Your Skype Group Chat
Skype gives you full control over the group chats you create on Windows, Mac, Linux, and other platforms. To manage your Skype group chats, you can keep the following:
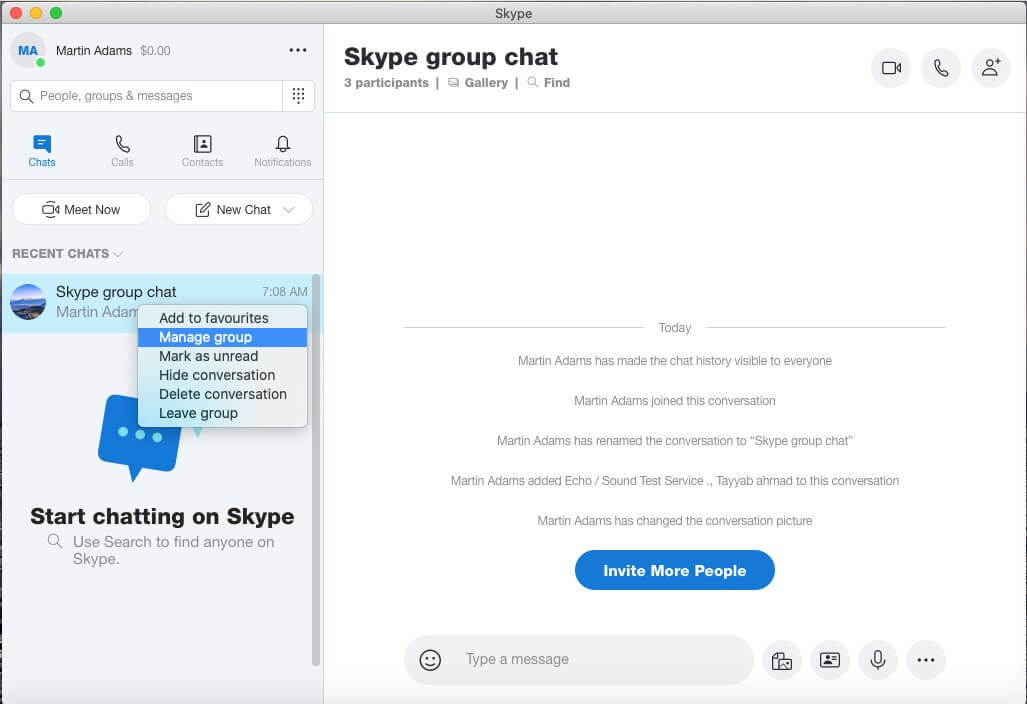
- Open the group settings: right-click the group name under “Recent Chats”.
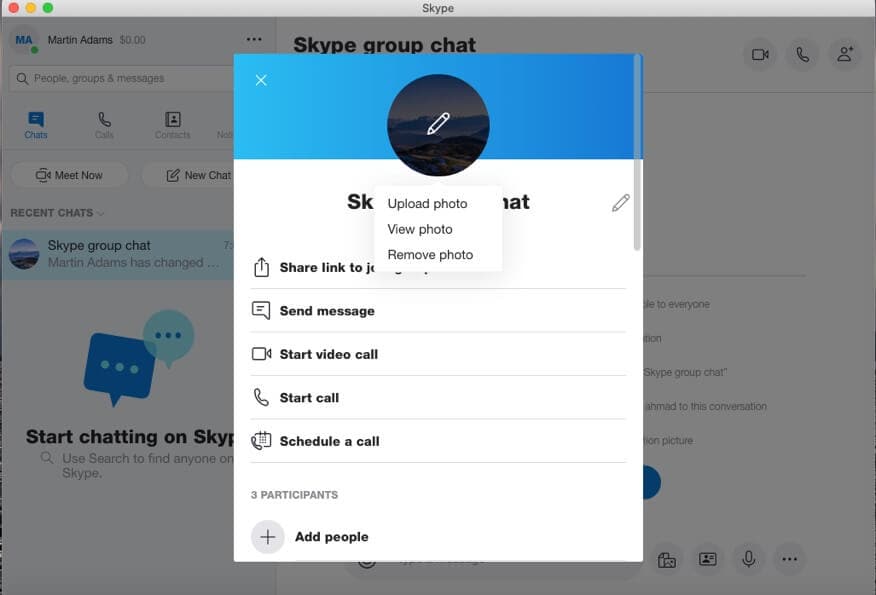
- Update or add a group picture: Upload, view, or remove the group picture.
- Change your group name: Press the Edit (pencil) icon next to the group name to edit the name of your group.
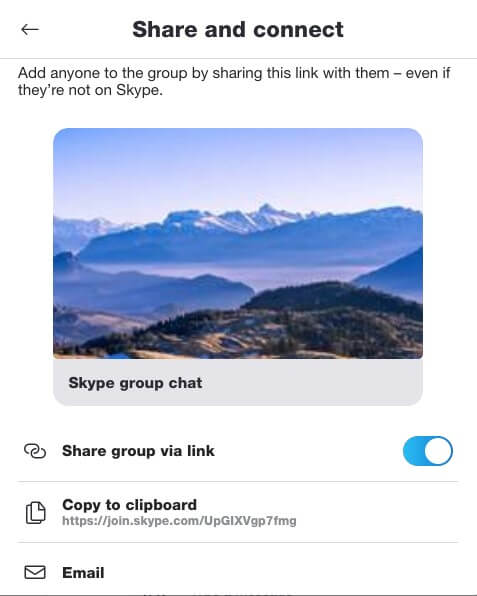
- Share a link to join your group: You can add virtually anyone to your Skype group by sending them this link even if they’re not using Skype.
- Send a message: Press the “Send Message” button to send a message to the group.
- Start a video call: Press the Start video call camera icon to start a video call with the whole group.
- Start a call: Select Start call to begin an audio call with the group.
- Schedule a call: Schedule a call with the group. All the group members will be invited.
- Add people: You can add more participants to the group by pressing Add people and selecting from the contact list.
- Group gallery: In Group Gallery you can view all the images, videos, links, and files that have been shared with this group chat.

Part 4: Q&A about Skype Group Chat
Have some questions about skype group video chat? Keep the following!
Q1: How many people can you have on a Skype group chat?
Skype group video chat enables up to 50 people to meet and cooperate all at once. The group screen sharing option allows the presenter to share PowerPoint slides, video recordings of the skype meeting, and much more. Making long-distance learning a possible reality for students all around the world and enabling remote co-workers to work on projects efficiently. Assign project modules and discuss due dates with more productive face-to-face conversations via Skype group video calling.
Q2: Is it no longer possible to block individual contacts on Skype?
Skype enables you to block a contact to prevent them from sending you instant messages, calling you, and seeing your state on Skype, in effect blocking their access to your Skype profile. While the company also allows you to report the contact as abusive which can notify the company moderators to stop the spammers from an early stage and not allow them to torture other Skype users.
You can in effect block a contact in Skype
- 1. Go to the “Recent Chats” or “Contacts” tab and select the contact you want to block.
- 2. Right-click the contact name and chose the “View profile” option from the menu.
- 3. In the profile of the contact, member scroll down to the bottom of the profile window and click the red colored “Block contact” option.
- 4. Skype will ask you to confirm if you want to block this particular contact and also if you want to report the abuse from this person by pressing the toggle button.
- 5. Press the “Block” button and the contact will effectively be blocked from your Skype account and removed from your contact list and chats.
Tips:
In case you receive an unwanted call from an unknown number, you have the privilege to block the number right ways from the chat. Just press the “Block + the number” link to block a particular number.
Q3: How do I delete all contacts on a Skype list with one click?
Every once in a while, you may find some contacts you no longer need in your Skype contacts – particularly after a quick call or a job interview. Generally, to delete a contact you’ll have to view the person’s profile details and then press the “Remove from contact list” option, but here I’ll be showing you a fairly easy and simple way to delete all your contacts at once.
To delete all your Skype contacts at once follow the steps:
- 1. Open Skype app and press the menu bar right next to your name. Select “Settings” to open the settings of Skype.
- 2. In the settings go to the “Contacts” tab on the left sidebar. This will show all the settings for contacts, go to “Privacy” settings.
- 3. In the Privacy settings, you will see all the other details. We need to go into the “View list” under the Profile section. This will reveal all your contacts in a list.
- 4. In the list, you’ll be presented with all your contacts. Deleting them is very easy, just left-click each or dotted menu option and select “Delete contact”. This way you won’t have to go into each contact’s profile to delete the particular contact.

Conclusion
Skype group chats allow multiple people to communicate face-to-face through time, space, and culture. The group chat feature of Skype mimics the important characters of interpersonal communication and can help boost confidence and expedite effective communication for students and teams across the office. I showed you an efficient way to make a group chat using Skype to collaborate and share your time with loved ones, coworkers, friends, and anyone for that matter to share the stuff that appeals to the particular group of people.
If you feel the same about the need for group chats like the one Skype offers, tell us about the applications you usually use for group chatting among your friends, family, and office staff in the comment section below.
Richard Bennett
Richard Bennett is a writer and a lover of all things video.
Follow @Richard Bennett
Richard Bennett
Mar 27, 2024• Proven solutions
From the inventions of Alexander Graham Bell to today’s swift text messages, the mode of communication has changed throughout history. The workplace communication needs are evolving significantly and every one of us, individuals, companies, and organizations need to adapt promptly to the new ways of collaborating. Advanced technologies have now made it possible to make a group chat with family, friends, school, and coworkers to constantly stay updated with the latest family happenings or the progress of a particular project you’re working on. Skype group chat allows you to swiftly send messages, videos, pictures, etc. to multiple people at once while constantly apprising the group members of the latest events and developments. In this article, you will learn:
- Part 1: Make a Skype Group Chat on Windows
- Part 2: Start a Skype Group Chat on Mac
- Part 3: Manage Your Skype Group Chat
- Part 4: Q&A about Skype Group Chat
Part 1: Make a Skype Group Chat on Windows
Communicating with multiple people simultaneously from different parts of the world in real-time couldn’t be thought of some years ago. However, today Skype group chat makes it possible for anyone to connect and collaborate with several people without any barriers and limitations.
To make a group chat on Skype using a Windows operating system you can get connected with individuals from diverse localities of the world within a minute. To make a Skype group chat for yourself follow along with the steps below.
- Download Skype on your Windows PC. You’ll need to sign in with a Microsoft account or sign up if you haven’t already had a Skype account.
- Once you’ve logged in to Skype you’ll be presented with a similar interface with “Recent Chats” showing up in the left pane. To make a group chat click on the drop-down icon next to the “New Chat” button and select “New Group Chat” and your new Skype group chat is only a few clicks away.
- A new window will appear in the Skype main screen. Here you’ll have to write the name of the group and select a picture for the group chat. The name should represent the purpose of the chat group to make sense to its participants, I’ve selected a figurative name for the sake of an example. After you’re done with the name and picture, press the ahead arrow.
- Skype will take you to your contact list to choose the members for your new chat group. You can skimp through the whole list or search the name in the search bar to look for a particular person. Once you’re done selecting all your contacts press the “Done” button and Skype will create your new shiny group within a minute.
- You’ll be taken directly to the new group chat you just created. Here you can chat with all the group members at the same time without any delay. Send pictures, videos, schedule a group call, add more people to the group, and many more features.
Part 2: Start a Skype Group Chat on Mac
Skype allows anyone to create a group chat on Mac. You can easily create and enjoy your Skype group chat with the simple steps below.
- Download Skype on your Mac system and sign in with your Microsoft account.
- On the home page of Skype, you need to press and open the drop-down menu right next to the “New Chat” notepad icon. From the list select the “New Group Chat” option to get started creating your Skype group chat.
- A new window will pop up for you to determine the group name and picture. Choose a name that best describes the purpose of the group, as in our case it’s a dummy chat group, so I named it “Skype group chat”. Once you’ve done press the forward arrow button.
- You’ll be taken to your “Contact List” to choose the contacts you want to add to the group. After selecting all the contacts press the “Done” button and Skype will make a group chat and notify all the members of their joining the group.
- You will directly be taken to the newly created Skype group chat. where you can start chit chat with the group members.
- Now you can have a group video or audio call in real-time with members around the world. Talk and collaborate with coworkers, family, and friends while being able to send pictures, videos, and other files simultaneously.
Part 3: Manage Your Skype Group Chat
Skype gives you full control over the group chats you create on Windows, Mac, Linux, and other platforms. To manage your Skype group chats, you can keep the following:
- Open the group settings: right-click the group name under “Recent Chats”.
- Update or add a group picture: Upload, view, or remove the group picture.
- Change your group name: Press the Edit (pencil) icon next to the group name to edit the name of your group.
- Share a link to join your group: You can add virtually anyone to your Skype group by sending them this link even if they’re not using Skype.
- Send a message: Press the “Send Message” button to send a message to the group.
- Start a video call: Press the Start video call camera icon to start a video call with the whole group.
- Start a call: Select Start call to begin an audio call with the group.
- Schedule a call: Schedule a call with the group. All the group members will be invited.
- Add people: You can add more participants to the group by pressing Add people and selecting from the contact list.
- Group gallery: In Group Gallery you can view all the images, videos, links, and files that have been shared with this group chat.
Part 4: Q&A about Skype Group Chat
Have some questions about skype group video chat? Keep the following!
Q1: How many people can you have on a Skype group chat?
Skype group video chat enables up to 50 people to meet and cooperate all at once. The group screen sharing option allows the presenter to share PowerPoint slides, video recordings of the skype meeting, and much more. Making long-distance learning a possible reality for students all around the world and enabling remote co-workers to work on projects efficiently. Assign project modules and discuss due dates with more productive face-to-face conversations via Skype group video calling.
Q2: Is it no longer possible to block individual contacts on Skype?
Skype enables you to block a contact to prevent them from sending you instant messages, calling you, and seeing your state on Skype, in effect blocking their access to your Skype profile. While the company also allows you to report the contact as abusive which can notify the company moderators to stop the spammers from an early stage and not allow them to torture other Skype users.
You can in effect block a contact in Skype
- 1. Go to the “Recent Chats” or “Contacts” tab and select the contact you want to block.
- 2. Right-click the contact name and chose the “View profile” option from the menu.
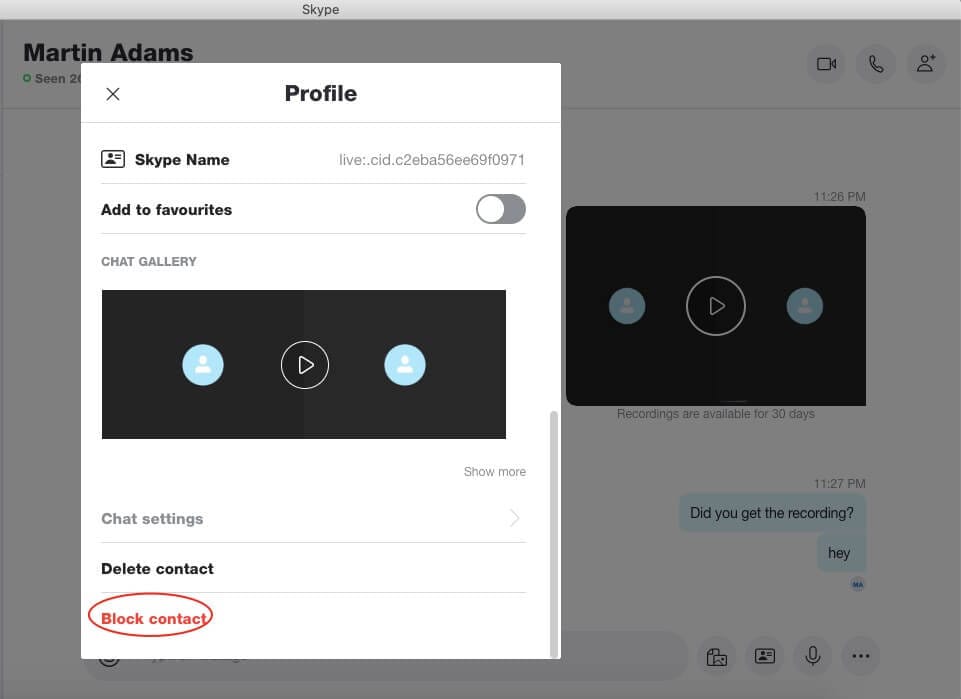
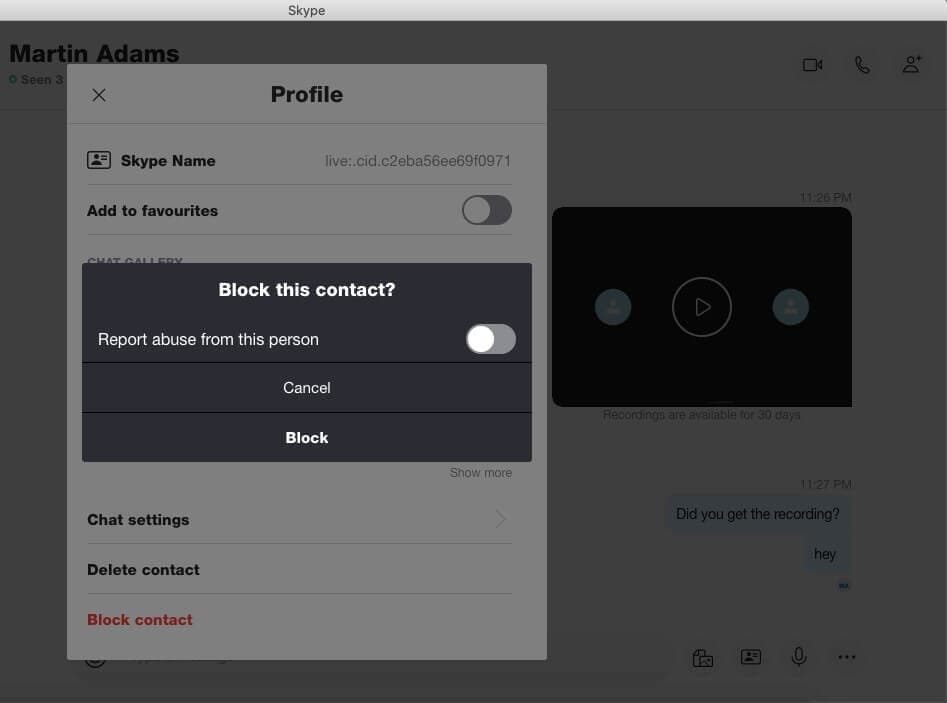
- 3. In the profile of the contact, member scroll down to the bottom of the profile window and click the red colored “Block contact” option.
- 4. Skype will ask you to confirm if you want to block this particular contact and also if you want to report the abuse from this person by pressing the toggle button.
- 5. Press the “Block” button and the contact will effectively be blocked from your Skype account and removed from your contact list and chats.
Tips:
In case you receive an unwanted call from an unknown number, you have the privilege to block the number right ways from the chat. Just press the “Block + the number” link to block a particular number.
Q3: How do I delete all contacts on a Skype list with one click?
Every once in a while, you may find some contacts you no longer need in your Skype contacts – particularly after a quick call or a job interview. Generally, to delete a contact you’ll have to view the person’s profile details and then press the “Remove from contact list” option, but here I’ll be showing you a fairly easy and simple way to delete all your contacts at once.
To delete all your Skype contacts at once follow the steps:
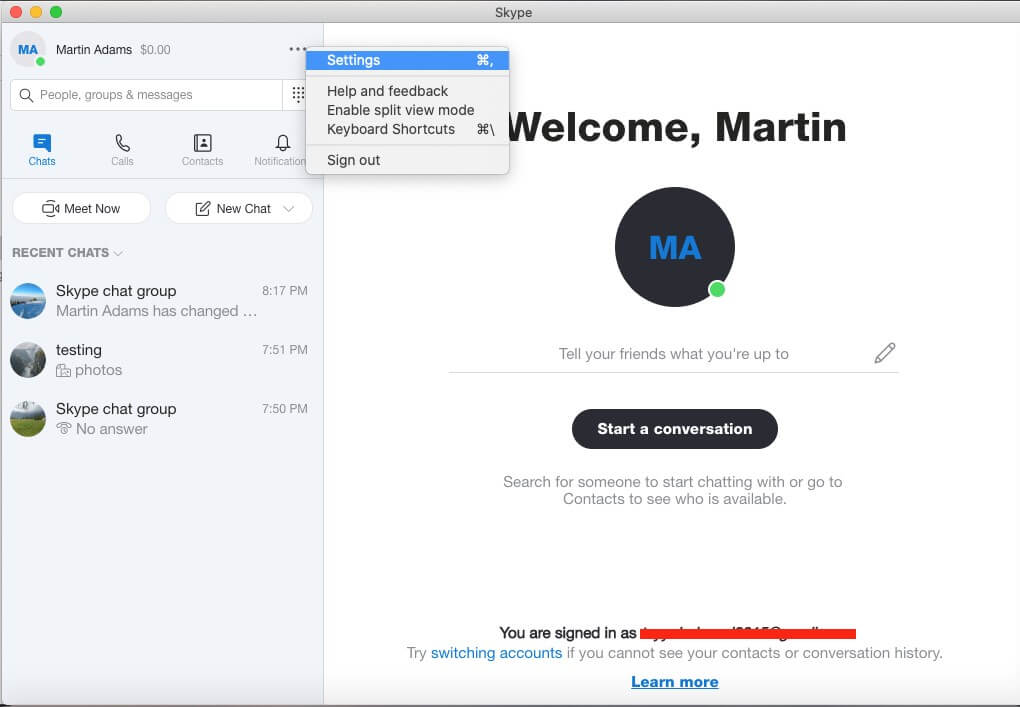
- 1. Open Skype app and press the menu bar right next to your name. Select “Settings” to open the settings of Skype.
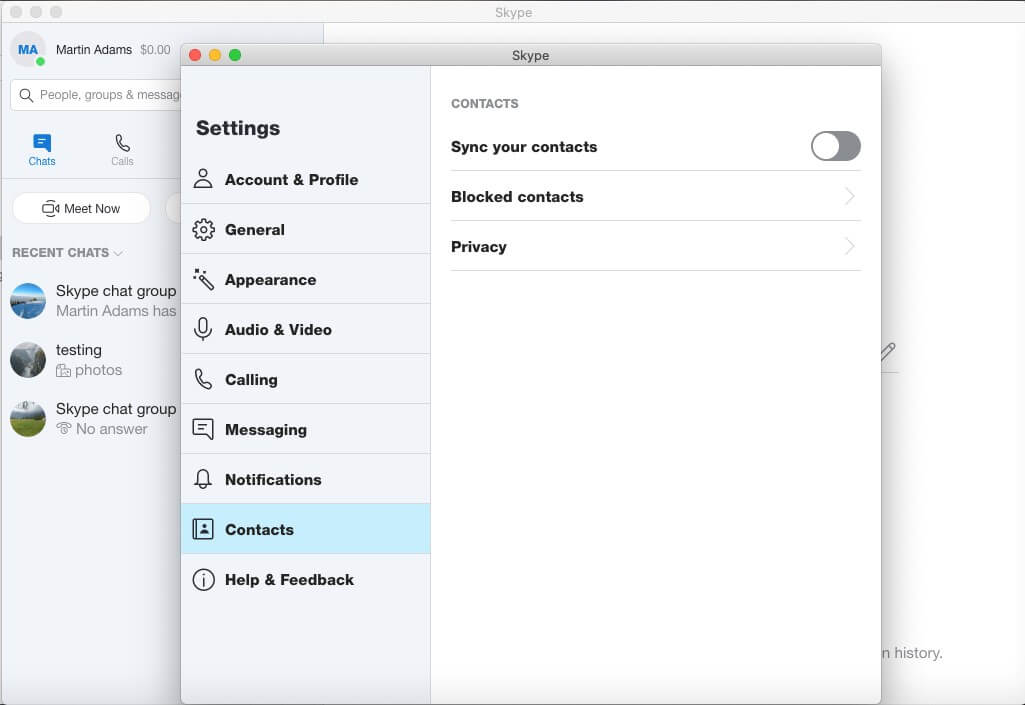
- 2. In the settings go to the “Contacts” tab on the left sidebar. This will show all the settings for contacts, go to “Privacy” settings.
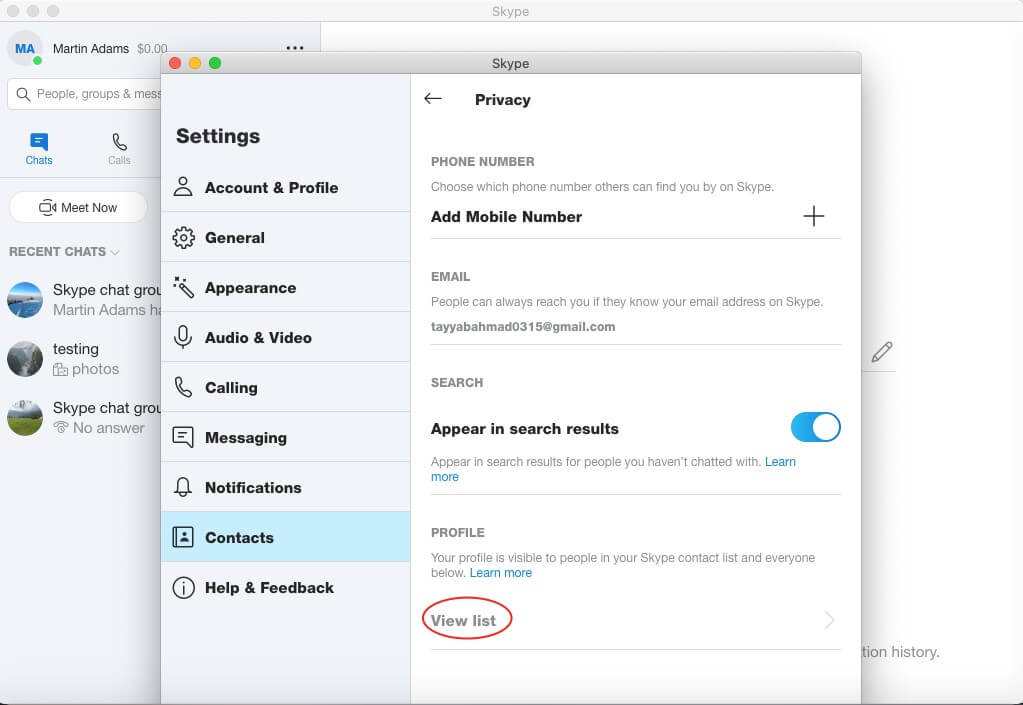
- 3. In the Privacy settings, you will see all the other details. We need to go into the “View list” under the Profile section. This will reveal all your contacts in a list.
- 4. In the list, you’ll be presented with all your contacts. Deleting them is very easy, just left-click each or dotted menu option and select “Delete contact”. This way you won’t have to go into each contact’s profile to delete the particular contact.
Conclusion
Skype group chats allow multiple people to communicate face-to-face through time, space, and culture. The group chat feature of Skype mimics the important characters of interpersonal communication and can help boost confidence and expedite effective communication for students and teams across the office. I showed you an efficient way to make a group chat using Skype to collaborate and share your time with loved ones, coworkers, friends, and anyone for that matter to share the stuff that appeals to the particular group of people.
If you feel the same about the need for group chats like the one Skype offers, tell us about the applications you usually use for group chatting among your friends, family, and office staff in the comment section below.
Richard Bennett
Richard Bennett is a writer and a lover of all things video.
Follow @Richard Bennett
Richard Bennett
Mar 27, 2024• Proven solutions
From the inventions of Alexander Graham Bell to today’s swift text messages, the mode of communication has changed throughout history. The workplace communication needs are evolving significantly and every one of us, individuals, companies, and organizations need to adapt promptly to the new ways of collaborating. Advanced technologies have now made it possible to make a group chat with family, friends, school, and coworkers to constantly stay updated with the latest family happenings or the progress of a particular project you’re working on. Skype group chat allows you to swiftly send messages, videos, pictures, etc. to multiple people at once while constantly apprising the group members of the latest events and developments. In this article, you will learn:
- Part 1: Make a Skype Group Chat on Windows
- Part 2: Start a Skype Group Chat on Mac
- Part 3: Manage Your Skype Group Chat
- Part 4: Q&A about Skype Group Chat
Part 1: Make a Skype Group Chat on Windows
Communicating with multiple people simultaneously from different parts of the world in real-time couldn’t be thought of some years ago. However, today Skype group chat makes it possible for anyone to connect and collaborate with several people without any barriers and limitations.
To make a group chat on Skype using a Windows operating system you can get connected with individuals from diverse localities of the world within a minute. To make a Skype group chat for yourself follow along with the steps below.
- Download Skype on your Windows PC. You’ll need to sign in with a Microsoft account or sign up if you haven’t already had a Skype account.
- Once you’ve logged in to Skype you’ll be presented with a similar interface with “Recent Chats” showing up in the left pane. To make a group chat click on the drop-down icon next to the “New Chat” button and select “New Group Chat” and your new Skype group chat is only a few clicks away.
- A new window will appear in the Skype main screen. Here you’ll have to write the name of the group and select a picture for the group chat. The name should represent the purpose of the chat group to make sense to its participants, I’ve selected a figurative name for the sake of an example. After you’re done with the name and picture, press the ahead arrow.
- Skype will take you to your contact list to choose the members for your new chat group. You can skimp through the whole list or search the name in the search bar to look for a particular person. Once you’re done selecting all your contacts press the “Done” button and Skype will create your new shiny group within a minute.
- You’ll be taken directly to the new group chat you just created. Here you can chat with all the group members at the same time without any delay. Send pictures, videos, schedule a group call, add more people to the group, and many more features.
Part 2: Start a Skype Group Chat on Mac
Skype allows anyone to create a group chat on Mac. You can easily create and enjoy your Skype group chat with the simple steps below.
- Download Skype on your Mac system and sign in with your Microsoft account.
- On the home page of Skype, you need to press and open the drop-down menu right next to the “New Chat” notepad icon. From the list select the “New Group Chat” option to get started creating your Skype group chat.
- A new window will pop up for you to determine the group name and picture. Choose a name that best describes the purpose of the group, as in our case it’s a dummy chat group, so I named it “Skype group chat”. Once you’ve done press the forward arrow button.
- You’ll be taken to your “Contact List” to choose the contacts you want to add to the group. After selecting all the contacts press the “Done” button and Skype will make a group chat and notify all the members of their joining the group.
- You will directly be taken to the newly created Skype group chat. where you can start chit chat with the group members.
- Now you can have a group video or audio call in real-time with members around the world. Talk and collaborate with coworkers, family, and friends while being able to send pictures, videos, and other files simultaneously.
Part 3: Manage Your Skype Group Chat
Skype gives you full control over the group chats you create on Windows, Mac, Linux, and other platforms. To manage your Skype group chats, you can keep the following:
- Open the group settings: right-click the group name under “Recent Chats”.
- Update or add a group picture: Upload, view, or remove the group picture.
- Change your group name: Press the Edit (pencil) icon next to the group name to edit the name of your group.
- Share a link to join your group: You can add virtually anyone to your Skype group by sending them this link even if they’re not using Skype.
- Send a message: Press the “Send Message” button to send a message to the group.
- Start a video call: Press the Start video call camera icon to start a video call with the whole group.
- Start a call: Select Start call to begin an audio call with the group.
- Schedule a call: Schedule a call with the group. All the group members will be invited.
- Add people: You can add more participants to the group by pressing Add people and selecting from the contact list.
- Group gallery: In Group Gallery you can view all the images, videos, links, and files that have been shared with this group chat.
Part 4: Q&A about Skype Group Chat
Have some questions about skype group video chat? Keep the following!
Q1: How many people can you have on a Skype group chat?
Skype group video chat enables up to 50 people to meet and cooperate all at once. The group screen sharing option allows the presenter to share PowerPoint slides, video recordings of the skype meeting, and much more. Making long-distance learning a possible reality for students all around the world and enabling remote co-workers to work on projects efficiently. Assign project modules and discuss due dates with more productive face-to-face conversations via Skype group video calling.
Q2: Is it no longer possible to block individual contacts on Skype?
Skype enables you to block a contact to prevent them from sending you instant messages, calling you, and seeing your state on Skype, in effect blocking their access to your Skype profile. While the company also allows you to report the contact as abusive which can notify the company moderators to stop the spammers from an early stage and not allow them to torture other Skype users.
You can in effect block a contact in Skype
- 1. Go to the “Recent Chats” or “Contacts” tab and select the contact you want to block.
- 2. Right-click the contact name and chose the “View profile” option from the menu.
- 3. In the profile of the contact, member scroll down to the bottom of the profile window and click the red colored “Block contact” option.
- 4. Skype will ask you to confirm if you want to block this particular contact and also if you want to report the abuse from this person by pressing the toggle button.
- 5. Press the “Block” button and the contact will effectively be blocked from your Skype account and removed from your contact list and chats.
Tips:
In case you receive an unwanted call from an unknown number, you have the privilege to block the number right ways from the chat. Just press the “Block + the number” link to block a particular number.
Q3: How do I delete all contacts on a Skype list with one click?
Every once in a while, you may find some contacts you no longer need in your Skype contacts – particularly after a quick call or a job interview. Generally, to delete a contact you’ll have to view the person’s profile details and then press the “Remove from contact list” option, but here I’ll be showing you a fairly easy and simple way to delete all your contacts at once.
To delete all your Skype contacts at once follow the steps:
- 1. Open Skype app and press the menu bar right next to your name. Select “Settings” to open the settings of Skype.
- 2. In the settings go to the “Contacts” tab on the left sidebar. This will show all the settings for contacts, go to “Privacy” settings.
- 3. In the Privacy settings, you will see all the other details. We need to go into the “View list” under the Profile section. This will reveal all your contacts in a list.
- 4. In the list, you’ll be presented with all your contacts. Deleting them is very easy, just left-click each or dotted menu option and select “Delete contact”. This way you won’t have to go into each contact’s profile to delete the particular contact.
Conclusion
Skype group chats allow multiple people to communicate face-to-face through time, space, and culture. The group chat feature of Skype mimics the important characters of interpersonal communication and can help boost confidence and expedite effective communication for students and teams across the office. I showed you an efficient way to make a group chat using Skype to collaborate and share your time with loved ones, coworkers, friends, and anyone for that matter to share the stuff that appeals to the particular group of people.
If you feel the same about the need for group chats like the one Skype offers, tell us about the applications you usually use for group chatting among your friends, family, and office staff in the comment section below.
Richard Bennett
Richard Bennett is a writer and a lover of all things video.
Follow @Richard Bennett
Also read:
- [New] 2024 Approved Step-by-Step Process of Setting Up Your Logitech Webcam for Video
- [New] 2024 Approved The Complete iTunes User's Manual (Recording)
- [New] In 2024, Secrets to a Reliable Windows 11 Photo Viewer
- [New] In 2024, Top-Tier Screen Capture Tools for Windows & macOS
- [New] Retrospective Graphics Radeon's Reprise for 2024
- [New] The Ultimate Guide to Avoiding VR Nausea for 2024
- [New] The Ultimate Key to Capturing and Preserving Your Favorite Streamed Shows for 2024
- 2024 Approved Flavorful Filmmaking Made Easy The Best Tips for Food Videography
- Best 10 Complimentary Video Stitchers: Software & Online Services for Seamless Editing
- Dive Into Digital Green Magic Top 4 YouTube Sources for No-Cost Background Workshops for 2024
- Eliminate All FB Message and Post Alerts
- How to Delete iCloud Account On iPhone 14 Plus without Password?
- In 2024, Expert Guide Streaming and Saving Hulu Seasons Flawlessly
- Prime Platforms Crafting 3D Animation Art for 2024
- The Art of Perfection: An In-Depth Evaluation of the Asus ROG Swift PG32UCDP OLED Monitor
- Title: Your Comprehensive Manual for Creating an Accessible and Effective Chat Room Within Skype, Compatible with Both Windows & MacOS Platforms.
- Author: Virginia Woolf
- Created at : 2024-11-10 02:00:40
- Updated at : 2024-11-16 01:50:37
- Link: https://visual-screen-recording.techidaily.com/1715701157020-your-comprehensive-manual-for-creating-an-accessible-and-effective-chat-room-within-skype-compatible-with-both-windows-and-macos-platforms/
- License: This work is licensed under CC BY-NC-SA 4.0.